Bookmark and Share
Showing posts with label dress. Show all posts

Sunday, June 1, 2014

Tank Top to Summer Dress Refashion

This is a simple refashion of a tank top to a summer dress for Dress A Girl Around The World and inspired by tutorials on that blog.

Items used:
  • Tank Top
  • 1 1/2 yards of fabric (for a girl's size 14 - 23 inches around - wider if a fuller skirt is desired)
  • Thread
  • Scissors
  • Straight Pins
  • 1/4 yard iron on interfacing  
  • Iron 
To decide where to cut I folded the top in half then cut in the middle.

Turn inside out and cut a piece of interfacing approximately 3 inches wide and the length of the tank top on each side and iron on.  It is to help prevent the skirt from stretching out knit in the tank top.

For the skirt, I used the selvage edge as the bottom of the skirt so no need to hem it and measured up 28 inches and cut across.


Then added a gathering stitch 1/4 and 1/2 inch away from the top edge beginning 5/8 of in inch end on each side leaving long tails to be able to gather the fabric.

With right sides together, pin then stitch a seam down the back and pin the seam in the center in back then pin and gather then stitch 5/8 an inch away from the edge.   Turn right side out, clip any loose threads and your new tank dress is complete.

Thank you for stopping by my blog and happy crafting:)


Saturday, June 8, 2013

Refashion of Girl's T-Shirt to Dress

This is a dress I made for donation to Dress A Girl Around The World and it for a Size 8 girl.  The skirt is only slightly gathered, but if you wanted a fuller skirt you could double up on the yardage cut two pieces, on for the front and another for the back.

Items used:
  • T-shirt 
  • T-shirt in contrasting color (I was able use the sleeves off of an adult t-shirt)
  • Half a yard of fabric
  • Dollar Store Lei
  • Button
  • 1/2 yard of fabric (more for larger sizes)
  • Sewing machine and thread
  • Scissors
  • Straight Pins
  • Iron
  • Ziplock baggie (optional)
  • Needle
  • Clear or sparkly Nail Polish
This a Size 8 girls t-shirt, but it the same concept could be used to make any size.

First I cut the sleeves and about halfway down on the t-shirt off.

Save the bottom for a different project.


Cut 2 strips of the contrasting fabric 4 inches wide and as long as the width + 1 inch. (1/2 inc for seam allowances.

Right sides together stitch the two strips together. Press seams open.

Pin the right side of the strip to the right side of the t-shirt with the seams at the side of the t-shirt and stitch together.


 For the bottom skirt, fold the right side to the wrong side  1/2 all the way around at the bottom, then fold up  1/2 inch again the top stitch 1/4 inch away from the edge all the way around.
Run a basting stitch 1/4 of an inch and 1/2 inch from the edge at the top up to 1/2 inch from each edge and leaving the threads long so the fabric can be gathered.

Right sides together, pin the long side of the fabric together in and stitch.  Press seam open.

Right sides together pin the back seam at the center back of the t-shirt (find center back by folding t-shirt in back and then insert a straight pin.  Gather and pin then stitch.


Take the Dollar Store Lei apart by clipping the string.   For easier clean up I opened a ziplock baggie and pushed everything off the string into the bag (there are little clear plastic pieces in between each flower that can be hard to see and they can mess up a vacuum cleaner).


To help prevent the edges of the flower from fraying and used sparkly nail polish around the edges of the three flowers I chose and also put a little on the button and allowed the to dry before stacking the flowers on top of each other and pinned them to the dress.

Put the button in the center and hand stitch the flowers/button to the dress.


Linking up to:
30 Days of Creativity


Happy Crafting!


Friday, August 3, 2012

Dress from 3 T-Shirts


This is a good way to use t-shirts that might have an imperfection, stain or logo on them but with the majority of the fabric useable to make a color block t-shirt dress.

The measurements for the dress that I made are for a Girls size 2-3, but could easily be adapted to any size.

Items used:
  • 3 T-shirts
  • T-shirt or tank top that fits
  • Paper and pen
  • Straight Pins
  • Sewing machine
  • Coordinating Thread
  • Iron
  • Scissors
  • Ribbon or double fold bias tape (I used 1 1/2 yds for this size)
  • Safety pin 
  • Measuring tape or ruler
All seams are 1/2 inch wide

For the top part of the dress it would be best to use the bottom part of t-shirt that fits or is slightly larger.

Use the T or tank to that fits as a template to make a pattern - measure from the front neckline to under the bust and add 2 inches for the horizontal measurement.


Fold the t-shirt you are using for the top in half, flip upside down and line up the pattern with the bottom of the shirt and cut out an armhole on the non-folded side (the bottom of the t-shirt will be where you thread the ribbon.).  

Turn the area in the armhole under 1/2 inch and press. Stitch down on all sides.  Stitch sides together.


For the middle part of the shirt measure from under the bust to the waistline and add 1 inch for for the horizontal measurement.

For the width, angle down slightly so is is wider at the bottom.


Pin and stitch to the top part of the dress.


For the bottom part measure from the bottom of the waist to the length that you want the dress to be and add 1 inch for seam allowances and hem.

The width should match the bottom width of the slightly angled middle piece.


Turn under 1/2 inch at the bottom and top stitch the hem down.  Pin and stitch the bottom to the middle part

For the ties, thread the ribbon through one shoulder in the back to the other side using a safety pin and then around to the front and thread through to the other side to tie in a bow.


Happy crafting:)

Linking up to:

Thursday, July 26, 2012

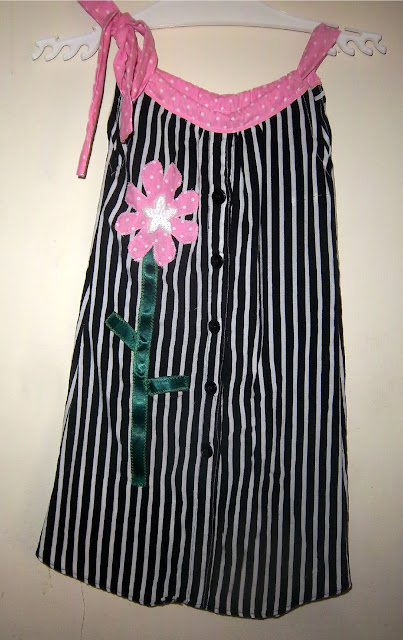
Girls Dress from a Ladies Blouse


When I pulled the blouse from my closet I had originally thought of doing a Tim Burton themed dress, but as I plan on donating it to Dress A Girl Around The World and I didn't want to scare little the little gals that may not understand the reference so I decided to decorate with a cheery flower instead.

This size 4-6 slim girls dress was made using a free pattern and instructions by Dana from "Made" using a women's size 10 blouse, around 1/3 yd of contrasting fabric, green ribbon and a sequin embellishment.

The only variations on this dress is I added I cut two pieces for the front and the back that were 3 inches tall and the width of the top of the pattern and stitched it to the dress to thread the drawstring through to make it easier to adjust and added a flower embellishment on one side.

Items used:

  • Free pattern and instructions from Dana from "Made"
  • Women's blouse (I used a size 10)
  • 2 pieces of fabric 2 1/2 inches by 26 inch fabric for bow
  • 2 pieces of fabric to sew to the top of the dress
  • Printer and paper
  • Black fabric paint
  • Scissors
  • Iron
  • Sewing machine and matching thread 
  • Straight pins
I followed the instructions up to cutting out and stitching armholes and gather stitching to each side and I made it about 2 inches longer than the pattern.


For the flower, I folded a three inch square into quarters and cut the shape to the right and zigzagged  the top of the flower leaving the bottom open on the front of the dress


I then cut two six inch pieces of ribbon and another around 10 inches.  I folded the two six inch pieces in half and pinned them to the back of the long piece to represent leaves and pinned the top piece underneath the flower and zigzagged the stem piece down.

I then finished zigzagging the bottom of the flower down.


For the embellishment in center I used a sequined start I had gotten in a notions grab bag from Michael's and stitched in down using the machine, but a button could be used instead.

I also top stitched near the buttons to keep them closed (they are more for decorative purposes now).

As indicated above, sewed the 3 inch tall pieces (pink polka dotted) to the front and the back using 1/2 inch seams, pressed under 1/2 inch and then top stitched down.

Right sides together, I stitched the sides  then stitched the long bow piece together and used a safety pin to thread through the shoulder on one side then tie in a bow on the other side.


Linking up to:

Saturday, July 14, 2012

Girl's "Froggy" Dress from a T-Shirt

This is another variation of the "Warhol Dress" by Dana from "Made" that I am making for donation to Dress A Girl Around The World, a non-profit organization that distributes the dresses to little girls around the world that do not have any.  I was able to complete this dress in around 3 hours watching television and the cost to make was under $3.
  • Free pattern and instructions from Dana from "Made"
  • Printer and paper
  • T-Shirt (Women's large-had been a promotional t-shirt for a local radio station "Froggy 106.7")
  • 1/2 yard of coordinating fabric
  • Iron on rose (optional)
  • Scissors
  • Iron
  • Sewing machine and thread 
  • Straight pins
  • Saftey Pin (for turning the tie inside out)
I started out with the t-shirt and I folded it in half, making sure the design was centered.

I used the base dress pattern and added 1/2 inch to each side to make it a Size 3-4.  Instead of positioning the pattern at the bottom and using the t-shirt hem as the hem of the dress, I positioned it as close to the neckline as I could as I wanted to use the design on the t-shirt.  I pinned through all layers and cut out the dress and marked the gathering lines with a slight cut at the edge.


I stitched the gathering lines and gathered and pressed under at the armholes 1/2 inch and top stitched in place using contrasting green thread as indicated in the original instructions.

Another modification made was instead of sewing the ties directly to the dress I sewed a piece of the contrasting fabric that was 3 inches tall and around 1/2 inch shorter than width of the dress (1/2 seam allowance).

freeonlinephotoeditor

I turned the edges under on each side and turned the edge under 1/4 of an inch under on the open edge and pressed under and pressed the seam up toward the contrasting fabric.  I pinned the pressed edge to the edge of the seam from the top side and top stitched along the edge on the front side catching the fabric underneath.

For the ties, I cut two pieces of fabric 26 1/2 inches long and 3 inches wide of the contrasting fabric.  I sewed the two pieces, right sides together, using 1/2 inch seam.  I then pressed in half, right sides together and sewed along the edge using 1/2 inch seam and used a safety pin to turn right sides out.

I then threaded each edge through the opening at the left shoulder of the dress and the bow is tied on the right.


For the ruffle at the hem I cut two pieces - both 3 inches tall; one was the length of the fabric, 44 inches and another was 16 inches for a total of 60 inches for the ruffle.

First I pressed a hem up 1/2 inch from the bottom edge and stitched 1/4 of an inch from the edge.

Next,  I made a gathering stitch the entire length up to 1/2 inch away from each edge and gathered the material.  Then, right sides together, stitch the piece together.

Then, pinning with the seam at one edge of the dress, right sides together, evening out the gathers, pin then stitched 1/2 inch from the edge all the way around.

As I noticed there was a slight imperfection below the logo when it was completed, I decided to use an iron-on rosette that I purchased at Walmart that was on clearance for 50 cents as it reminded me a bit of a lilly pad, even thought it is red.

I do have some other craft projects in the works, but have been focusing on the dresses as I plan to mail them out in bulk to Dress A Girl Around The World.


Linking up to:
Funky Junk's Saturday Nite Special


Wednesday, June 20, 2012

Girls Fireflies Dress from a T-Shirt


I always liked fireflies and decided to use up some of my glow-in-the-dark fabric paint to create a fireflies themed dress (girls size 2-3) using a green t-shirt.
Items used:
  • Free pattern and instructions from Dana from "Made"
  • T-Shirt (I used a women's large)
  • Printer and paper
  • Glow-In-The-Dark fabric paint
  • Scissors
  • Iron
  • Sewing machine and matching thread 
  • Straight pins
  • Saftey Pin (for turning the tie inside out)


The "fireflies" were made making a somewhat bottom heavy cross shape in a diagonal pattern on the front and back of the dress before stitching together.


 I adapted the "Warhol Dress" by Dana from "Made" and added 2 1/2 inches to the top of the pattern and folded under 1/2 inch, pressed then stitched down, then 1 1/4 inch, pressed then stitched down 1/4 inch from the edge at the bottom on each side. 


I then stitched the ties together inside out leaving the ends open and used a safety pin to turn right side out the pressed with an iron.
 I then  threaded the ties through to make it more adjustable as I am going to be sending it to Dress A Girl Around the World.


Linking up to:
Rhinestone Beagle

Tuesday, June 19, 2012

Yellow Dress for 6-12 month old

I made this dress entirely out of scraps using a free pattern and instructions from My Measuring Tape
and will fit an infant size 6-12 months.

To add the seam allowance to the pattern I used a popsicle stick for the width on paper, cut a little beyond the line and used a glue stick to glue to the pattern

I varied from the instructions in that I used double fold bias tape to finish the neck and arm holes and instead of using two different fabrics for the panels, I used four and for the bottom I used the hem cut off from a skirt that was too long.   Instead of using a button I sew on a strip of velcro. 

        Free Pattern & Instructions here

Items used:
  • Scraps from 6 other projects/alterations (if buying new under 1/2 yard for the panels and less for bodice and the bottom.
  • Printer and paper
  • Scissors
  • Glue Stick
  • Popsicle Stick (used to measure seam allowance)
  • Sewing machine and matching thread
  • Straight pins
  • Iron
  • Velcro
I also didn't use skirt panel A where it said to cut 8 pieces as I didn't find where it was needed anywhere; perhaps is a variation if you wanted to add below the bodice but before the skirt panels.

This is for Day 18 of 30 Day of Creativity with the theme being "Yellow" and is for donation to Dress A Girl Around The World, a non-profit organization that collects dresses and distributes them to girls around the world.

Wednesday, February 29, 2012

DIY ONE SHOULDER ONE MINUTE NO SEW WRAP DRESS


The above fabulous idea is from another blogger that I follow, Kristen at Glitter 'N Glue.   She made the dress using two yards of fabric and only took her about a minute to wrap and tie for an on-trend, summery look. 

This would be easy to duplicate as no sewing required, although when I think I will put a small hem on the unfinished edges at the top and bottom.   Kristen spent $10 to make this, but if you have a Walmart in your area that still carries fabric, they sometimes have cute, lightweight prints for between $1.50 - $3.00 a yard.

She does wear a tube dress underneath, but I would probably wear a bustier or strapless bra (as I would be to jiggly at the top without them) and pair with half slip underneath.  

Sorry for the lack of posts lately, but between computer problems, vehicle problems and my my son's father being in the hospital just have not had time.  Hopefully things will calm does in the in the next few weeks and I can get back to creating, crafting and cooking.

Hope everyone has a Happy Leap Year Day:)

Tuesday, June 7, 2011

T Shirt To Argyle Drop Waist Dress


See T Shirt To Argyle Drop Waist Dress and 1000's of others - or share your own on Cut Out + Keep


This is for http://30daysofcreativity.com/ and the theme was "Argyle" so I decided to turn a toddler t-shirt into a dress for http://www.dressagirlaroundtheworld.com/howyoucanhelp.htm, which is a non-profit organization that accepts donations of homemade dresses for little girls around the world who don't have one.

As I had only seen Argyle in solid colors before I decided to try with print fabric and stitching instead and attached a skirt in coordinating fabric, putting a decorative black stitch at the hem.  It was simple and fun to make.

I have posted a tutorial over at Cut Out + Keep

Saturday, October 23, 2010

Rue La La - $20 Credit For New Members Through 10/25/10

Rue La La is another of the growing number of sites that you join by invitation by another member where designer duds and upscale items are available at a deep discounts for only 2 days.

They are currently offering a $20 credit  if you join by 10/25/10 and is good through 12/31/10.  Here is my invite link if you are interested http://www.ruelala.com/invite/kmom14

The upside is it is possible to get a deal.  I lucked out and found this pair of PUMA Men's "Benny SN" Leather Sneakers that are available in my son's size and will order if he approves that he likes them.  They  were originally $60 on sale for $35.00; shipping on these is $9.95, so with the $20 credit it will cost around $25 before taxes.


However, things like this Michael Kors dress that had been on sale for $39.00 is sold out already.


As was the pink Cuisinart popcorn popper that was on sale for $25 from by Shop For Good to support breast cancer research.


They do have this ring on sale for $25 but shipping on this too the same as the shoes - $9.95 so after the $20 credit would run around $15 and would help a good cause.


There are other brands such Calvin Klein, A.B.S., Aigle, Brics (duffles and luggage) Nourison, Northwest Getaways (vacation packages), LaSirena Winery (wines), to name a few.  Depending on what your interests and budget may be, it is worth a look.

Monday, March 1, 2010

Too Small Hoodie to Punked Tunic/Mini Dress

A funky punky tunic/mini dress to wear on the weekends from a too small hoodie.


I got the hoodie over a year ago on clearance after Halloween for $2.50 and it had been in my closet since then and when I pulled it out, it was a wee bit too small,so I ended up revamping it into a punked Tunic/Mini Dress.


Items used:
  • Hoodie
  • 1 yd fabric
  • Sewing machine
  • Thread
  • Straight pins
  • Iron


I started on this over month ago cutting the ribbing off the bottom of the hoodie and up the sides and arms and cutting some of insets but wasn't sure about exactly how I wanted to it to look, but got tired of seeing it in my workbasket and just picked it up and winged putting it together last night. 


I used a top that fit as a guideline to figure out how much to add on the sides compared to the hoodie to be revamped and a mini dress for the length.  You could go through a lot of complicated measuring, but it is easier to go do this and cut bigger than you need and trim down what you don't.

I added what I needed to each side, pinning right sides together and sewing, then cut double the width needed for the skirt then sewed a hem in the bottom.  I next sewed basting stitches along the top 1/2 inch away from the edges on the side, then sewed the sides of the skirt together using 1/2 inch seam then gathered the fabric and pinned it to the hoodie, right sides together and stitched it into place.


It seemed lacking so I decided to add a ruffle around the hood.  It is just fabric that is approximately 3 inches wide and double the length of the circumference of the hood folded it in half with wrong sides together then stitched with a basting stitch 1/4 inch from the edge.  I then gathered the fabric and pinned it inside the edge of the hoodie with the stitches facing towards the just far enough in so I would be stitching the drawstring and sewed it into place.

I then pressed pressed the ruffle up towards the edge of the hoodie so it would just peek out the edges.


I like how the hood ended up looking like a ruffled Peter Pan collar, but it did come out big.  I felt a little like a goth Henrietta Hippo from New Zoo Review http://us.imdb.com/title/tt0296385/combined 
when I first tried it on, but is starting to grow on me as it is sort of fun.  I may take it in on the sides and through the sleeves, but then again, I may just leave it as is to wear on a PMS days to grocery.