Bookmark and Share
Showing posts with label T-shirt. Show all posts

Saturday, June 8, 2013

Refashion of Girl's T-Shirt to Dress

This is a dress I made for donation to Dress A Girl Around The World and it for a Size 8 girl.  The skirt is only slightly gathered, but if you wanted a fuller skirt you could double up on the yardage cut two pieces, on for the front and another for the back.

Items used:
  • T-shirt 
  • T-shirt in contrasting color (I was able use the sleeves off of an adult t-shirt)
  • Half a yard of fabric
  • Dollar Store Lei
  • Button
  • 1/2 yard of fabric (more for larger sizes)
  • Sewing machine and thread
  • Scissors
  • Straight Pins
  • Iron
  • Ziplock baggie (optional)
  • Needle
  • Clear or sparkly Nail Polish
This a Size 8 girls t-shirt, but it the same concept could be used to make any size.

First I cut the sleeves and about halfway down on the t-shirt off.

Save the bottom for a different project.


Cut 2 strips of the contrasting fabric 4 inches wide and as long as the width + 1 inch. (1/2 inc for seam allowances.

Right sides together stitch the two strips together. Press seams open.

Pin the right side of the strip to the right side of the t-shirt with the seams at the side of the t-shirt and stitch together.


 For the bottom skirt, fold the right side to the wrong side  1/2 all the way around at the bottom, then fold up  1/2 inch again the top stitch 1/4 inch away from the edge all the way around.
Run a basting stitch 1/4 of an inch and 1/2 inch from the edge at the top up to 1/2 inch from each edge and leaving the threads long so the fabric can be gathered.

Right sides together, pin the long side of the fabric together in and stitch.  Press seam open.

Right sides together pin the back seam at the center back of the t-shirt (find center back by folding t-shirt in back and then insert a straight pin.  Gather and pin then stitch.


Take the Dollar Store Lei apart by clipping the string.   For easier clean up I opened a ziplock baggie and pushed everything off the string into the bag (there are little clear plastic pieces in between each flower that can be hard to see and they can mess up a vacuum cleaner).


To help prevent the edges of the flower from fraying and used sparkly nail polish around the edges of the three flowers I chose and also put a little on the button and allowed the to dry before stacking the flowers on top of each other and pinned them to the dress.

Put the button in the center and hand stitch the flowers/button to the dress.


Linking up to:
30 Days of Creativity


Happy Crafting!


Friday, August 3, 2012

Dress from 3 T-Shirts


This is a good way to use t-shirts that might have an imperfection, stain or logo on them but with the majority of the fabric useable to make a color block t-shirt dress.

The measurements for the dress that I made are for a Girls size 2-3, but could easily be adapted to any size.

Items used:
  • 3 T-shirts
  • T-shirt or tank top that fits
  • Paper and pen
  • Straight Pins
  • Sewing machine
  • Coordinating Thread
  • Iron
  • Scissors
  • Ribbon or double fold bias tape (I used 1 1/2 yds for this size)
  • Safety pin 
  • Measuring tape or ruler
All seams are 1/2 inch wide

For the top part of the dress it would be best to use the bottom part of t-shirt that fits or is slightly larger.

Use the T or tank to that fits as a template to make a pattern - measure from the front neckline to under the bust and add 2 inches for the horizontal measurement.


Fold the t-shirt you are using for the top in half, flip upside down and line up the pattern with the bottom of the shirt and cut out an armhole on the non-folded side (the bottom of the t-shirt will be where you thread the ribbon.).  

Turn the area in the armhole under 1/2 inch and press. Stitch down on all sides.  Stitch sides together.


For the middle part of the shirt measure from under the bust to the waistline and add 1 inch for for the horizontal measurement.

For the width, angle down slightly so is is wider at the bottom.


Pin and stitch to the top part of the dress.


For the bottom part measure from the bottom of the waist to the length that you want the dress to be and add 1 inch for seam allowances and hem.

The width should match the bottom width of the slightly angled middle piece.


Turn under 1/2 inch at the bottom and top stitch the hem down.  Pin and stitch the bottom to the middle part

For the ties, thread the ribbon through one shoulder in the back to the other side using a safety pin and then around to the front and thread through to the other side to tie in a bow.


Happy crafting:)

Linking up to:

Friday, June 22, 2012

Bows 'N Tulle 20 Minute T-Shirt Refashion

 
I wanted to fancy up a t-shirt with a somewhat vintage feel and created this for $2 using only a pair of scissors - no sewing required!  (1st picture is bow tied onel second picture is bow tied twice).

Items used:
  • T-shirt
  • Roll of 6 inch wide tulle (Purchased at Dollar Tree $1 - found in the bridal section)
  • Scissors
  • Seam gauge or ruler
  • 1 piece scrap paper
  • Pencil or marking chalk
  • Safety pin
At the neckline, measure and mark 1/2 inch below the binding and cut.


Using a piece of paper I folded a long triangle with the base being and inch and 1/2 wide and cut it out.  Place up against the bound end of the sleeve with the narrowest part at the top and the widest at the bottom and mark.


At the neckline, measure 3/4 of an inch down and mark all the way around.  Mark the center front and back on the shirt.  One inch from each mark will be where you want to start your 2 inch markings.

 From the 3/4 inch mark, measure two inches down and mark all the way around at two inch intervals.


On the sleeves, starting at the top of the sleeve, also measure 3/4 inch from the edge and mark, then measure two below that mark and mark on the sleeve at two inch intervals.


Make cuts where marked.  I found it easiest to fold the fabric in half on the line marked and begin the cut.  Repeats all the way around the neckline and on the sleeves.


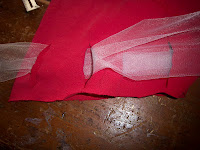
For the neckline, I cut a piece approximately 2 1/2 yards of tulle and folded the bottom up 2 inches and the top down two inches and folded the end over and secured with a safety pin to make it easier to thread through the neckline.


Start threading two cuts below the right hand side on the t-shirt weaving in and out all the way around then tie into a bow.   Trim bow to the length you want.


On the sleeve,  start one cut down from the top and thread all the way around, tie a bow and cut ends to the length you want, repeat on the other sleeve.


This is for Day 22 for 30 Days of Creativity

Wednesday, June 20, 2012

Girls Fireflies Dress from a T-Shirt


I always liked fireflies and decided to use up some of my glow-in-the-dark fabric paint to create a fireflies themed dress (girls size 2-3) using a green t-shirt.
Items used:
  • Free pattern and instructions from Dana from "Made"
  • T-Shirt (I used a women's large)
  • Printer and paper
  • Glow-In-The-Dark fabric paint
  • Scissors
  • Iron
  • Sewing machine and matching thread 
  • Straight pins
  • Saftey Pin (for turning the tie inside out)


The "fireflies" were made making a somewhat bottom heavy cross shape in a diagonal pattern on the front and back of the dress before stitching together.


 I adapted the "Warhol Dress" by Dana from "Made" and added 2 1/2 inches to the top of the pattern and folded under 1/2 inch, pressed then stitched down, then 1 1/4 inch, pressed then stitched down 1/4 inch from the edge at the bottom on each side. 


I then stitched the ties together inside out leaving the ends open and used a safety pin to turn right side out the pressed with an iron.
 I then  threaded the ties through to make it more adjustable as I am going to be sending it to Dress A Girl Around the World.


Linking up to:
Rhinestone Beagle

Thursday, June 14, 2012

Bicycle Dress from T-Shirt

 This size 3-4 girls dress was made using a free pattern and instructions by Dana from "Made" using a large t-shirt.  The only variations that I made is instead of freezer paper stenciling a banana for the "Warhol" dress, I used free clip art from The Graphics Fairy of a Vintage Bicycle and added a ruffle at the bottom using a decorative stitch.

Items used:
  • Free pattern and instructions from Dana from "Made"
  • The Graphics Fairy of a Vintage Bicycle
  • T-Shirt (I used a women's large)
  • 2 pieces of fabric 2 1/2 inches by 26 inch fabric for bow
  • 1 piece of fabric 2 inches by 36 inches for ruffle
  • Printer and paper
  • Black fabric paint
  • Scissors
  • Iron
  • Sewing machine and matching thread 
  • Straight pins 

I followed the instructions up to cutting out and stitching armholes and gather stitching, but before stitching together I printed off a half-page image of the bike then played around with where I wanted to position it on the dress.


 Using the black fabric paint I went over all of the black lines with black paint the positioned it on the t-shirt with the paint side down and lightly patted it down to transfer the image (Note:  it will be a mirror image to whatever image you are transferring, so it won't work with lettering).


For the remainder of the dress, I followed the instructions.

I also added a two inch ruffle (approximately 1 yd wide) at the bottom, using an iron to press up a 1/2 inch hem then stitching down and using a gather stitch at the top.  I then sewed the ends together, pinned underneath the shirt at the hem then applied the decorative stitch to finish.

Linking up to:

Thursday, May 3, 2012

MUMMY VASE OR CANDLE HOLDER

You can turn a glass wine or juice bottle, an old white t-shirt into a mummy vase or candle holder for almost free from items you may already have on hand.

As I have always been creeped out, but at the same time fascinated by mummies I wanted to craft something mummyish as a tribute and came up with this.  It could be used to hold flowers or you could stick a candle in at the top and allow the drippings to collect on the mummy to give it a creepier look.  

Items used:
-   Old white t-shirt
-   Glass bottle
-   Scissors
-   2 large googly eyes (Dollar Tree sells bags with mixed sizes for $1)
-   Glue

 I used a slightly oil stained t-shirt so it was already a bit weathered looking, but if you wanted to give it an aged look you could heat up a few teabags in a large pot an then put the t-shirt in, steep in for a half hour or so then dry it. 

At the bottom of the shirt, start cutting at the bottom around a inch strip, except before you get to the end, angle upward to keep a continuous strip and continue to do so until you have enough to wrap the bottle (I went up to the mid chest on mine)
After cutting the continuous strip, wrap it up into a ball as it will make it easier to work with.


Wrap the end around the bottom then tie a knot.  Start wrapping around the bottom covering the knot and continue upward overlapping a half to a quarter inch to cover the bottle completely.
 When you get to the area that starts curving it will start to pucker, so I start wrapping higher up and go around a few times before you start working your way back down.

Glue the eyes a little below where it starts to curve then continue wrapping, except not as close and leave an area for the eyes to peek out.  I used E-6000 glue as it is sturdy, but any strong glue or a hot glue gun and sticks would work.

When you get to the bottom cut the t-shirt and tuck it in a bit in back then dab with a bit of glue

 Be sure to check out the other participants in this blog hop to see what monster madness and mayhem they have to share:)
 
Show your monster spirit
1. Annie Walls  15. Horror Author Vanessa Morgan  29. blackdragon  
2. Little Gothic Horrors  16. Cayce @ Fighting Dreamer  30. Jurassic Goth  
3. Pensive Pumpkin  17. It Came From The Man Cave  31. Monsterfink's Midnight Monster Spookshow  
4. Queens of the Wild Frontier  18. It's On Random  32. Residentgamer  
5. Lady Bethezda  19. Not This Time, Nayland Smith  33. nitebyrd  
6. Le Professeur Gothique  20. Artwork By Living Dead Girl Nicole  34. Everything You Want  
7. wicKED  21. Metamorphosis  35. Kweeny Todd  
8. Shingle Creek Manor  22. Crafts and Creations with KMOM14  36. Ghost Stories and Haunted Places  
9. Daph's Dark Little Corner  23. skarlett  37. Jess @ Wickedly Bookish  
10. Jenny Krueger  24. Dani Harper, Paranormal Author  38. GingerRead  
11. Holly's Horrorland  25. Manvshorror  39. Lynoire  
12. blackwood  26. Horror Shock Lolipop  40. HorrorSmorgasbord  
13. Punk You  27. Bob @ Beauty in Ruins  41. The Purple Broom  
14. Kharisma Rhayne  28. Precious Monsters  


(Collection closed)
Link tool by inlinkz.com

Saturday, October 23, 2010

Shabby Chic Circle Flower

Great way to turn scraps into something pretty.

I am working through my scraps stash and going to use this particular "flower" to decorate a tote bag, but it could be used for barrettes, pins or statement necklace.

Items used:
  • Soda Can 
  • Scrap of felt
  • Scrap of burlap or heavy textured fabric
  • Scrap of coordinating solid fabric
  • Scrap of coordinating lace or netting
  • Decorative stone or button
  • Seam gauge or ruler
  • Scissors
  • Pen
  • Nail Polish (optional)
Use the pop can to draw a circle on the felt. Cut out.


Using the seam gauge or ruler, measure out 1/4 inch from the edge on the burlap or textured fabric then cut out. Glue together - the felt circle will be the base.


For the next layer on top of the textured fabric, use the soda can to draw a circle and cut out.  Reduce1/4 inch off the edges after drawing using the seam gauge or ruler.  To make it easier I folded it in half then a quarter, measured then cut.  Glue on top of the textured fabric with a glue gun.


Repeat with the netting or lace, except this time I trimmed off 1/2 inch from the edge(keep - will use around the stone).  Use the hot glue gun to glue it down.


I wanted to soften the look up a bit, so I used nail polish and painted the decorative stone to soften the look up. Glue the stone to the center of the flower.


On the piece of netting/lace trimmed off above fold it in half, glue it around the stone.

Sunday, August 22, 2010

MELDED T-SHIRTS


Meld a too small t-shirt front to a t that fits in 20 minutes!

My son is in to car themed t-shirts and when I found one at the thrift store that was too small I decided to meld it to one that fits.  (It looks a little crooked in the picture, but it is how it is hanging on the hangar).

Items used:
  • T-Shirt front that you want to use
  • T-Shirt that fits
  • Heat N Bond
  • Iron
  • Scissors
  • Pen or Tailor's Chalk
  • Sewing Machine and Thread


To get an even rectangle shape, I used a piece of scrapbook paper and drew with a pen around the edges, then moved the square to the left and did drew around the edged on that side to make a rectangle.  You could use a circle a square or freehand it, depending on the design you want to meld onto the other t-shirt.


Cut out where the lines on the t-shirt have been drawn with a pen or Tailor's Chalk.


This step is the biggest time saver - instead of pinning and re-pinning to get the piece straight on the t-shirt you are melding the piece to, use HeatNBond on the edges.  I cut approximately 1 inch strips of the HeatNBond and then on the wrong side of the t-shirt piece approximately 1/4 inch away for them edges.   I placed it 1/4 inch away from the edges at it will curl up a bit on the edges and look more natural, more like a meld than an applique where you would just stitch or zigzag around the edges.  I do not recommend using HeatNBond on the entire piece as it will make the finished product too stiff, unnatural looking and may even be uncomfortable.  The HeatNBond it more to tack it down in place to it can be sewn without having to use any pins.

Using an iron set on medium to high heat (depending on the fiber content in the t-shirts - if polyester blend, go with medium heat, if both are cotton you could use high heat) and set on the strips for 30 seconds pull up, repeat until all strips have been irorned.  Allow to sit until cool to touch (1-2 minutes) then pull off the paperbacking off of each strip.


Flip the t-shirt piece over to the right side and position it on the t-shirt you are melding it to.  Repeat going around the edges and holding the iron in place for 30 seconds, then lifting and going on to the next edge until you have gone all the way around the t-shirt.


Using a sewing machine, stitch around the edges 1/4 inch from the edge all the way around and then you are ready to wear your creations!