Bookmark and Share
Showing posts with label refashion. Show all posts

Sunday, July 6, 2014

T-Shirt to Solar Dress (with link to free pattern)


This fun little casual summer dress was made using a free pattern by Charity Beasley at Indietutes using a thrift t-shirt will be perfect for the dog days of Summer on a little girl.

It was easy to make; I completed it while watching a television show that lasted an hour.

Items used:
  • T-Shirt 
  • Bias tape (under 1 package)
  • Elastic
  • Scraps of fabric for the pockets
  • Sewing machine & thread
  • Tracing wheel and tracing paper
  • Interfacing (optional)
  • Straight Pins 
  • Free printable pattern and instructions from  Indietutes  (Pattern has sizes 2/3, 4/5, and 6/7)
As the complete instructions are on  Indietutes  website, I didn't take picture to repeat here, but as a t-shirt was used instead of fabric, I folded the t-shirt in half and placed the pattern as close to the neckline as possible and made sure the image on the front was centered.  I used a size Large T-Shirt for a 7/8 dress. For smaller sizes you might want to use a smaller t-shirt or one with a smaller image.

For the pocket placement, I used tracing paper on the of the fabric to mark them.

For the pockets, I used interfacing and also lined the pockets on so they will not stretch out and provide stability before pinning them to the right side of fabric and stitching down.


Friday, August 3, 2012

Dress from 3 T-Shirts


This is a good way to use t-shirts that might have an imperfection, stain or logo on them but with the majority of the fabric useable to make a color block t-shirt dress.

The measurements for the dress that I made are for a Girls size 2-3, but could easily be adapted to any size.

Items used:
  • 3 T-shirts
  • T-shirt or tank top that fits
  • Paper and pen
  • Straight Pins
  • Sewing machine
  • Coordinating Thread
  • Iron
  • Scissors
  • Ribbon or double fold bias tape (I used 1 1/2 yds for this size)
  • Safety pin 
  • Measuring tape or ruler
All seams are 1/2 inch wide

For the top part of the dress it would be best to use the bottom part of t-shirt that fits or is slightly larger.

Use the T or tank to that fits as a template to make a pattern - measure from the front neckline to under the bust and add 2 inches for the horizontal measurement.


Fold the t-shirt you are using for the top in half, flip upside down and line up the pattern with the bottom of the shirt and cut out an armhole on the non-folded side (the bottom of the t-shirt will be where you thread the ribbon.).  

Turn the area in the armhole under 1/2 inch and press. Stitch down on all sides.  Stitch sides together.


For the middle part of the shirt measure from under the bust to the waistline and add 1 inch for for the horizontal measurement.

For the width, angle down slightly so is is wider at the bottom.


Pin and stitch to the top part of the dress.


For the bottom part measure from the bottom of the waist to the length that you want the dress to be and add 1 inch for seam allowances and hem.

The width should match the bottom width of the slightly angled middle piece.


Turn under 1/2 inch at the bottom and top stitch the hem down.  Pin and stitch the bottom to the middle part

For the ties, thread the ribbon through one shoulder in the back to the other side using a safety pin and then around to the front and thread through to the other side to tie in a bow.


Happy crafting:)

Linking up to:

Friday, June 22, 2012

Bows 'N Tulle 20 Minute T-Shirt Refashion

 
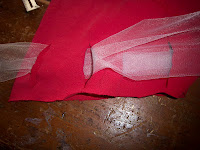
I wanted to fancy up a t-shirt with a somewhat vintage feel and created this for $2 using only a pair of scissors - no sewing required!  (1st picture is bow tied onel second picture is bow tied twice).

Items used:
  • T-shirt
  • Roll of 6 inch wide tulle (Purchased at Dollar Tree $1 - found in the bridal section)
  • Scissors
  • Seam gauge or ruler
  • 1 piece scrap paper
  • Pencil or marking chalk
  • Safety pin
At the neckline, measure and mark 1/2 inch below the binding and cut.


Using a piece of paper I folded a long triangle with the base being and inch and 1/2 wide and cut it out.  Place up against the bound end of the sleeve with the narrowest part at the top and the widest at the bottom and mark.


At the neckline, measure 3/4 of an inch down and mark all the way around.  Mark the center front and back on the shirt.  One inch from each mark will be where you want to start your 2 inch markings.

 From the 3/4 inch mark, measure two inches down and mark all the way around at two inch intervals.


On the sleeves, starting at the top of the sleeve, also measure 3/4 inch from the edge and mark, then measure two below that mark and mark on the sleeve at two inch intervals.


Make cuts where marked.  I found it easiest to fold the fabric in half on the line marked and begin the cut.  Repeats all the way around the neckline and on the sleeves.


For the neckline, I cut a piece approximately 2 1/2 yards of tulle and folded the bottom up 2 inches and the top down two inches and folded the end over and secured with a safety pin to make it easier to thread through the neckline.


Start threading two cuts below the right hand side on the t-shirt weaving in and out all the way around then tie into a bow.   Trim bow to the length you want.


On the sleeve,  start one cut down from the top and thread all the way around, tie a bow and cut ends to the length you want, repeat on the other sleeve.


This is for Day 22 for 30 Days of Creativity

Wednesday, June 20, 2012

Girls Fireflies Dress from a T-Shirt


I always liked fireflies and decided to use up some of my glow-in-the-dark fabric paint to create a fireflies themed dress (girls size 2-3) using a green t-shirt.
Items used:
  • Free pattern and instructions from Dana from "Made"
  • T-Shirt (I used a women's large)
  • Printer and paper
  • Glow-In-The-Dark fabric paint
  • Scissors
  • Iron
  • Sewing machine and matching thread 
  • Straight pins
  • Saftey Pin (for turning the tie inside out)


The "fireflies" were made making a somewhat bottom heavy cross shape in a diagonal pattern on the front and back of the dress before stitching together.


 I adapted the "Warhol Dress" by Dana from "Made" and added 2 1/2 inches to the top of the pattern and folded under 1/2 inch, pressed then stitched down, then 1 1/4 inch, pressed then stitched down 1/4 inch from the edge at the bottom on each side. 


I then stitched the ties together inside out leaving the ends open and used a safety pin to turn right side out the pressed with an iron.
 I then  threaded the ties through to make it more adjustable as I am going to be sending it to Dress A Girl Around the World.


Linking up to:
Rhinestone Beagle

Monday, June 4, 2012

Jeans to Tote Bag


 This is for  30 Days of Creativity and the theme for Day 4 is Trousers, so I decided to turn a pair of jeans into a girly tote bag.   I used tulle as an accent through the belt loops but any fabric or even a belt could be used.

Items used:
  • Jeans or pants with belt loops
  • Scissors
  • Sewing Machine and thread
  • Rope 
  • Tulle (off of a roll from the Dollar Store - approx. 12 inches wide  & 3 yds)

Cut pants off straight across above the crotch.

Zigzag around all edges to prevent fraying.

Turn inside out and pin together at the bottom and stitch 5/8 inch away from the edge.  Trim corners and turn right side out.


For the handle, I cut 2 pieces of rope a little over a yard long each and sewed to the pants 3 inches away from each edged on each side.  If the rope you use is polyester, you can seal the edge using a lighter or candle before applying to the jeans.


Cut the tulle at a diagonal on the edges, thread through the loops and tie in a bow.


Linking up to:

Saturday, March 6, 2010

Review of 99 Ways To Cut, Sew, Trim & Tie Your T-shirt Into Something Special by Justina and Faith Blakeney

99 Ways To Cut, Sew, Trim & Tie Your T-shirt Into Something Special 
By Justina and Faith Blakeney

Overall, it excellent as an inspiration book to jumpstart creativity with its think outside-the-box methods of transforming a single t-shirt into a garment.   There are ideas in the book that I had never have seen before or even thought to do and made me look at t-shirts in a new way.

While they do an excellent job of coming up with original designs using just one t-shirt; however, using just the lone t-shirt is also a pitfall because it doesn't give you much fabric to work with.   If you are the least bit overweight or very well endowed, I estimate that there are less than 5 where the end result that would look presentable and one of those is tote bag.  Those that aren't skimpy are altered to be very form fitting and would accentuate things you would rather not bring attention to.  That doesn't mean you can use the ideas to build and create your own unique design using the ideas as a base - it just means you will have to wing it on the execution of what you decide to add.

If you are looking for inspirations just beyond the standard adding an applique or ruffle to a T-shirt or looking for the perfect gift to give a college age fashionista I would recommend reading this book.

Disclosure:  I checked this book out from the public library and I am not receiving anything for writing this review other than expressing my opinion.

Sunday, February 21, 2010

Revamped Shoes

 
Give new life to an old pair of shoes.

These are my "errand running" shoes that I wear all of the time and unfortunately there was a hole on one of the sides of the shoes but other than that there are in good condition, so I decided to revamp them.


Items used:
  • 1 pair old shoes
  • Amazing Goop Glue
  • 1 yd grommet tape
  • 1 broken zipper (off a zip up hoodie)
  • 2 decorative stones
  • clothespins
  • Scissors
  • Scrap of material
First I cleaned the shoes then used a small scrap of denim and glued it on the inside of the shoe to repair the hole in the side.  I next glued the grommet tape, starting at the back of the shoe around each shoe then secured it with clothespins to hold in in place while it dried.


For the decoration on the top of the shoe I removed a broken zipper from a hoodie.  


I had the decorative stones left over from another project (I got them at Dollar Tree for $1 for a bag) and applied glue around the circumference, teeth side up, and glued the zipper to it wrapping and gluing until I came to the end.  Once it was dry I glued it each to the top of each shoe.

Tuesday, February 16, 2010

Wardrobe Refashion - Signed Up For Another 4 Months

Wardrobe Refashion is a site where users pledge to not buy any "new" manufactured clothing but instead pledge to "refashion, renovate, recycle preloved items" or make with your own two hands for the term you sign up for and you pledge to post what you have created to share with the other refashioners on the site. You can sign of for 2, 4, 6 months or life.

I have a lot of things that I plan on refashioning that I haven't gotten around to yet as I am still digging stuff out of the closets to decide what to keep to refashion before donating the rest to Goodwill or Salvation Army in between job hunting.

Overall it has been positive experience.  It was a little painful not hitting the after holiday clearance items, but it did save me a lot of time as well as money as I didn't even bother checking the racks.

My 16 year old son was rather horrified when we were at the store and wanted me to buy him some new jeans and I told him that I couldn't due to the pledge.  As he wanted a certain pair due to how they looked and fit he spent his money and bought a pair jeans with his Christmas money and gave me several pairs along with a pair of shorts to patch up for him.  

Nicki at Wardrobe Refashions is accepting applications up until 2/28/10 if you want to join in on the fun.  To sign up go to http://nikkishell.typepad.com/wardroberefashion/2010/02/sign-up-now.html.   For more information on the rules go to http://nikkishell.typepad.com/wardroberefashion/the_rules.html.

Even if you aren't up for pledging, I highly recommend checking out all of the creative upcycles over at Wardrobe Refashion as you are likely to get an inspiration to upcycle something you have in your closet.

Saturday, January 16, 2010

$110 Designer Inspired Headband for under $1

This is based on the tutorial over at Carbon Couture of her designer Eugenia Kim's "Wallis" inspired headband without the $110 price tag.   I love the cartoon like quality and I made mine for under $1.

The tutorial is here:  http://carboncouture.blogspot.com/2010/01/buckle-up.html


  • Headband
  • 1 square yellow felt
  • Black Ribbon
  • Scissors
  • Hot Glue Gun


I used an old headband that was 1 inch wide. To draw on the felt I drew it on the diagonal just like in the tutorial, but I put a 1 inch wide and drew on either side with the Sharpie on the wrong side of the felt.


Instead of using a 2 inch wide ribbon, as I didn't have any, I glued 1 inch of black ribbon on each side using the glue gun. I followed the rest of the tutorial and used dot of glue at one end of the headband and stretched the felt to the other side of the headband and dabbed that edge down, then ran a thin line on either side of the headband, cut off the excess (except for about a 1/4th of inch on each end) and glued the ribbon down.

Next I drew the buckle on one side of the headband then added a line on either side then "stitching" and belt holes. 


I am linking this to Just Something I Whipped Up Monday over at The Girl Creative


and