Bookmark and Share
Showing posts with label flower. Show all posts

Sunday, February 17, 2013

Vintage Inspired Convertible Capelet from a Sweater

Give an old sweater a new life!  

I got the sweater as present but never wore it because unless I wore a long sleeve shirt  underneath it was itchy, so I decided to turn it into something more useful with versatility.  

It is convertible in that it can be worn three different ways depending on your mood, but my favorite is the Vintage Inspired Capelet that has sort of a 1930's vibe to it.   Also, the "flower" is put on a pin back and can be used on its own.

Items used:
-  Sweater
-  Sewing machine and thread
-  Scissors
-  Straight Pins
-  Pin back
-  Velcro
-  Cylindrical object (I used a margarine tub lid)
- Seam gauge or ruler
- Paper
- Pen or Pencil
- Hot glue gun or needle and thread.
First flip the sweater upside down and cut straight across off underneath the arms from side to side.

The bottom part is what you will use to make the shrug.

Save the top part can be used to make the band and the flower and the sleeves can be saved for another future project (leg or armwarmers).


For the cut edge, use a zigzag or serger stitch to prevent unraveling all the way around and stitch 5/8 inch away from the edge as another preventative measure.


Turn under on the wrong side and stitch down all the way around and stitch 1/2 inch from the turned under edge

You now have the basic capelet completed (the first smaller picture above).


Now for the flower.  Place the cylindrical object on the paper, draw around it and cut out on  paper cut it out.

Next fold the paper into a quarter then measure in 1/2 inch or so in and cut away.  Repeat.

Pin the outside and middle layers along with the center onto the top portion of the sweater.and cut out each.  You will have 3 descending sizes of circles when you are done.


The large ring is for the bottom of the flower, the medium in the middle and the smallest center is for the top of the flower.

Zigzag or serge around the raw edges on all three circles.


Next, on the top side, using a basting stitch on the machine (or you could also do this by hand) sew a small quarter or other large coin size circle in the middle of each circle and leave  the tails on each end long as you will be gathering them up.


On the bottom side of each circle, gather up the threads and tie in a a knot on each and it will create at "bump" for the center of the flower.   Stack them on top of each other starting with the largest at the bottom, the medium one in the center and the small on on the top and push the "bump" in the center up into the next one.   Stitch around the center "bump" to secure all layers together.

Clip any lose threads and either use a hot glue gun or stitch the flower the pin back.  The pin can be used on this project or to pretty up anything else you would like.


To make the band cut a strip from the top of the sweater that is 8 inches long and 4-5 inches wide.   Zigzag or serger around the edges to keep it from unraveling.

Fold in half, right sides together and stitch one end and the long side together.  Turn inside out and zigzag the open end together (it doesn't look pretty but it isn't going to show as it will be on the inside of the shrug when it is used.    Stitch one side of the velcro to one side, flip over and flip another piece of velcro to the other side.

To use with the shrug, gather up the fabric on the shrug and wrap so the center of the band is on the outside and the two pieces of velcro hook together on the inside (third small picture above).  You can also move the band around to create a different look

For the look in the large picture above, the band was moved off center and the flower pinned to the band through the band the the shrug to secure it in place.)

Although I didn't take a picture of it, you could also use the shrug loose and pin the flower on it somewhere.  It could also be pulled up over the back of the head to create a mobius or scrunched and twisted for a cowl/infinity scarf look.

Thanks for stopping by and have a great day:)

Linking up go:


Thursday, July 26, 2012

Girls Dress from a Ladies Blouse


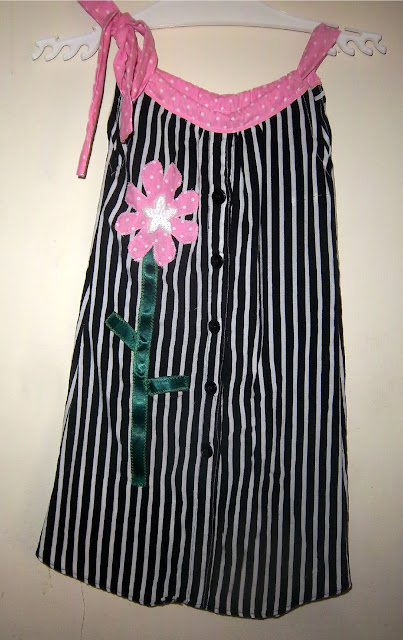
When I pulled the blouse from my closet I had originally thought of doing a Tim Burton themed dress, but as I plan on donating it to Dress A Girl Around The World and I didn't want to scare little the little gals that may not understand the reference so I decided to decorate with a cheery flower instead.

This size 4-6 slim girls dress was made using a free pattern and instructions by Dana from "Made" using a women's size 10 blouse, around 1/3 yd of contrasting fabric, green ribbon and a sequin embellishment.

The only variations on this dress is I added I cut two pieces for the front and the back that were 3 inches tall and the width of the top of the pattern and stitched it to the dress to thread the drawstring through to make it easier to adjust and added a flower embellishment on one side.

Items used:

  • Free pattern and instructions from Dana from "Made"
  • Women's blouse (I used a size 10)
  • 2 pieces of fabric 2 1/2 inches by 26 inch fabric for bow
  • 2 pieces of fabric to sew to the top of the dress
  • Printer and paper
  • Black fabric paint
  • Scissors
  • Iron
  • Sewing machine and matching thread 
  • Straight pins
I followed the instructions up to cutting out and stitching armholes and gather stitching to each side and I made it about 2 inches longer than the pattern.


For the flower, I folded a three inch square into quarters and cut the shape to the right and zigzagged  the top of the flower leaving the bottom open on the front of the dress


I then cut two six inch pieces of ribbon and another around 10 inches.  I folded the two six inch pieces in half and pinned them to the back of the long piece to represent leaves and pinned the top piece underneath the flower and zigzagged the stem piece down.

I then finished zigzagging the bottom of the flower down.


For the embellishment in center I used a sequined start I had gotten in a notions grab bag from Michael's and stitched in down using the machine, but a button could be used instead.

I also top stitched near the buttons to keep them closed (they are more for decorative purposes now).

As indicated above, sewed the 3 inch tall pieces (pink polka dotted) to the front and the back using 1/2 inch seams, pressed under 1/2 inch and then top stitched down.

Right sides together, I stitched the sides  then stitched the long bow piece together and used a safety pin to thread through the shoulder on one side then tie in a bow on the other side.


Linking up to:

Wednesday, May 9, 2012

Black Flower Tote Bag

This tote bag is an existing bag decorated with black flowers made out of scraps and black glitter fabric paint for accents.
  •  Tote bag
  • Scissors
  • Paper and Sharpie Pen
  • Scraps of fabric for flowers
  • Scraps of sturdier fabric for base
  • Glue gun and hot glue
  • Needle and thread (optional)
  • Glittery Fabric Paint
  • Acrylic Paint to match bag  
  • Sponge paintbrush

I used all black scraps from t-shirts and other sewing projects (I used black, but any colors could be used) for the flowers and felt, denim and other sturdy fabrics for the base.

The flowers are the same concept as Twisted and Stoned Flowers except instead of stone in the center, you tie a few knots in the end of the fabric.


For the base, use a soda can or other circular object (I used a soda can and a lid of of a milk jug) to draw a circle on a piece or paper.  Cut out and use a template. Place circle on felt, denim or other sturdy fabric draw around it with a pen or Sharpie then cut out.


Cut fabric for flowers into strips that are approximately 1 inch wide.  Instead of using a stone for the center,  tie a few knots in the end of fabric for the center and the glue down

Use glue gun to glue down fabric and start twisting.  Dab a bit of glue on top of the fabric and glue down the stone.  Twists fabric, dab glue, push down and repeat all the was around the flower, twisting as you go until you reach the out edge.  Repeat until you have enough to cover the bag (I used around 50).


If you start with a plain bag, you can skip this step.

As there was writing on the bag, I used black acrylic paint and sponge paintbrush to cover the writing.  It took about 3 coats. 


Arrange the flowers on the bag, then glue down with the hot glue gun.  I also hand stitched around them to secure them to the bag, but that might not be necessary.


To accentuate the flowers (and cover up any hot glue splotches) with glitter fabric paint if desired.


Happy crafting!

Sunday, August 29, 2010

Hydrangeas Hair Clip


Make a pretty flower hair clip from scraps!

This is based on a tutorial at http://sewingforscarlett.blogspot.com/2010/07/felt-hydrangeas.html where she made Hydrangeas out of felt.  Instead of felt I used scraps of blue cotton and more "petals" on mine.   I used an old hair clip so and a scrap of felt, so the only "new" for this project was the hot glue for the glue gun - other than that, it is an upcycle.

Items used:
  • Fabric Scraps
  • Scrap of felt
  • Scrap of paper
  • Scissors
  • Pen
  • Soda Can
  • Hair clip (or a barrette)
  • Hot glue gun and glue sticks
Place the soda can on a scrap of paper and draw a circle for a template and cut out.  Place the circle on a scrap of felt, draw around it and cut it out.

Cut out little X/petal shapes (like asideways "X") out of the cotton fabric.  I used about 35 little "X"s for this project and found it easier to fold the fabric over several times and cut out the "X"s freehand as opposed to drawing on the fabric and cutting out individually.


Start around the edges and work inward.  I found it easiest to fold up the X so there is a point at the bottom and dab a bit of the hot glue on the point and place it on the felt so you don't burn your fingers with the hot glue - is you want to push it down to secure it, use a pen or pencil.


Once you have glued down all of the pieces and it is fully covered, apply hot glue to the clip then press the flower on top of the clip.


From the  underside, trim around the edges so none of the felt piece is sticking out but without cutting any of the flower pieces off and it is ready to go!

Sunday, April 11, 2010

Plastic Bottle Top Flower


Turn trash into a pretty Anthropologie inspired flower treasure!   

I saw this Anthropolgie window display http://mslk.com/reactions/anthropologie-store-windows/ and decided to give it a go. 

I am participating in the April Stash Bust over at Dollar Store Crafts and in this project used the top of a 2 liter bottle, the cap off a shampoo bottle and spray paint to create the above flower.

Items used:
  • 1 2 liter bottle
  • Craft or Kitchen Scissors
  • Plastic bottle cap
  • Amazing Goop Glue or Hot Glue Gun and Glue sticks
  • Spray pain
  • Plastic bag
  • Cardboard
Rinse out the bottle and remove the label.  Pinch it on one side and cut where there is a ridge all the way around the bottle. 
Cut the approximately 1 inch wide strips all the way around the top of the bottle.   To make sure it was even I cut into quarters first, then cut each quarter into 3 sections for a total of 12 "petals".

Press the cut pieces down to form the flower.


I decided I wanted my petal to be rounded, so I opened up a plastic bag and rounded the edge of each petal over the bag then put the bag in my plastic recycling bin for easy clean up.

Next, I opened up an old frozen pizza box and spray painted the top and allowed it to dry, then flipped it over and painted the other side. 


For the center of the flower, I used the top off of an Axe shampoo bottle, but just about any bottle cap would do.


Place glue around the bottom edge of the cap and place it firmly in the center of the plastic flower and allow it to dry.


Bookmark and Share


Monday, December 28, 2009

Rolled Flowers


Make pretty flowers to embellish crafts or packages from upcycled magazine pages!  This flower is a combination of a loose rolled flower with a tight rolled flower glued in the center.

I knew immediately when I saw the tutorial at Under The Table And Dreaming that I wanted to try to make some of these.  On her blog she makes them in both paper and fabric.


Link to the tutorial:  
http://ourliebertfamily.blogspot.com/2009/12/rolled-flower-gift-toppers.html?showComment=1261626546687_AIe9_BFUplHQvr_vCh6LkSdfSJ2hP73O3Mmk7CcQwvc5JFJAyx3GOkCNMrqW7qK5Cp4Vd3iZ5ps4E8WZzyLL97X6xiFZv_v6aQn8ZKF-dpIMBij1gq_5b26zxiAq-m2DlV0x-8WZWLbw7r4yIBZJB1HXUqVhKhy7tt0G8ekKJNzg9dIc94WQDNeJrwV2qVgV9WmuZ7NZSDBEasDnSL6k7bIoLW53PL2vgTYIamiGD-JbCnOGGLoKFxOz4ruDMU8b80520_jUHFiA#c2988219043799823034

Items I used:
  • 3 pages from a magazine
  • Scissors
  • Pencil
  • Craft Glue
Take 3 pages of  magazine and square them up - I folded them up until they looked square then cut off the excess.


With a small hook in the center, draw an outward spiral on the paper with a pen or pencil and it will look sort of like this (sorry, you couldn't see the pencil on the pic I took so I did this instead).


Cut the spiral on the lines and you will end up with a long squiggle of paper.


Start with the outer edge and roll inward.  I ended up using dabs of glue as I went because the first time I tried making one after gluing the end the center unrolled like a Slinky.   How tightly you roll the flower  and how many layers you use will give the flower a different look.  The large flower below was rolled loosely, lower left tightly and for the small one on the right I only used 1 layer of paper.   For the above flower, a tight roll was glued inside the larger flower.


    Friday, June 26, 2009

    COFFEE FILTER FLOWER

    This makes a great kids craft as the coffee filters hold up much better than tissue paper when making them. Items used:
    • 4 white coffee filters
    • 1 pipe cleaner, cut in half
    • 2 small bowls
    • 3/4 cup water
    • Food coloring
    • Plate, wax paper or plastic surface to dry the filters

    Keep the coffee filter together and press them down flat.

    Fold the coffee filters up accordion style (I folded about an inch in and ended up with three pleats total, but you could make the folds larger or smaller). Continue folding until you get to the end of the filter
    Fold in half an snip the corner in the center diagonally on each side slightly (this will be where you will twist the pipe cleaner later. For now, leave the filters folded.
    Put approximately 1/2 cut water in a bowl and 6 -10 drops of food coloring and mix it up.
    Stick the ends in the food coloring and allow it to saturate for a few minutes.
    Take out and allow to dry.
    Next, mix approx 1/4 cut water in a bowl and 6-10 drops of food coloring
    Stick the folded center into the mixture, allow it to saturate until the color starts to meet up the color from the ends. Remove and unbend at center but leave the pleats folded. Allow to dry.
    Once dry, take the 1/2 piece of pipe cleaner and twist around the center to make the stamens. You can leave up or twist the two sides into loops.
    Start separating the layers on one side of the pipe cleaner, pulling the top layer to the right, the 2nd layer to the left, the 3rd layer to the right and 4th layer to right. Repeat on the other side of the pipe cleaner and you are done.