Bookmark and Share
Showing posts with label glue. Show all posts

Thursday, May 3, 2012

MUMMY VASE OR CANDLE HOLDER

You can turn a glass wine or juice bottle, an old white t-shirt into a mummy vase or candle holder for almost free from items you may already have on hand.

As I have always been creeped out, but at the same time fascinated by mummies I wanted to craft something mummyish as a tribute and came up with this.  It could be used to hold flowers or you could stick a candle in at the top and allow the drippings to collect on the mummy to give it a creepier look.  

Items used:
-   Old white t-shirt
-   Glass bottle
-   Scissors
-   2 large googly eyes (Dollar Tree sells bags with mixed sizes for $1)
-   Glue

 I used a slightly oil stained t-shirt so it was already a bit weathered looking, but if you wanted to give it an aged look you could heat up a few teabags in a large pot an then put the t-shirt in, steep in for a half hour or so then dry it. 

At the bottom of the shirt, start cutting at the bottom around a inch strip, except before you get to the end, angle upward to keep a continuous strip and continue to do so until you have enough to wrap the bottle (I went up to the mid chest on mine)
After cutting the continuous strip, wrap it up into a ball as it will make it easier to work with.


Wrap the end around the bottom then tie a knot.  Start wrapping around the bottom covering the knot and continue upward overlapping a half to a quarter inch to cover the bottle completely.
 When you get to the area that starts curving it will start to pucker, so I start wrapping higher up and go around a few times before you start working your way back down.

Glue the eyes a little below where it starts to curve then continue wrapping, except not as close and leave an area for the eyes to peek out.  I used E-6000 glue as it is sturdy, but any strong glue or a hot glue gun and sticks would work.

When you get to the bottom cut the t-shirt and tuck it in a bit in back then dab with a bit of glue

 Be sure to check out the other participants in this blog hop to see what monster madness and mayhem they have to share:)
 
Show your monster spirit
1. Annie Walls  15. Horror Author Vanessa Morgan  29. blackdragon  
2. Little Gothic Horrors  16. Cayce @ Fighting Dreamer  30. Jurassic Goth  
3. Pensive Pumpkin  17. It Came From The Man Cave  31. Monsterfink's Midnight Monster Spookshow  
4. Queens of the Wild Frontier  18. It's On Random  32. Residentgamer  
5. Lady Bethezda  19. Not This Time, Nayland Smith  33. nitebyrd  
6. Le Professeur Gothique  20. Artwork By Living Dead Girl Nicole  34. Everything You Want  
7. wicKED  21. Metamorphosis  35. Kweeny Todd  
8. Shingle Creek Manor  22. Crafts and Creations with KMOM14  36. Ghost Stories and Haunted Places  
9. Daph's Dark Little Corner  23. skarlett  37. Jess @ Wickedly Bookish  
10. Jenny Krueger  24. Dani Harper, Paranormal Author  38. GingerRead  
11. Holly's Horrorland  25. Manvshorror  39. Lynoire  
12. blackwood  26. Horror Shock Lolipop  40. HorrorSmorgasbord  
13. Punk You  27. Bob @ Beauty in Ruins  41. The Purple Broom  
14. Kharisma Rhayne  28. Precious Monsters  


(Collection closed)
Link tool by inlinkz.com

Monday, July 6, 2009

Retro Warhol '60's Inspired Shoes

I made this for the "Picture This" challenge entry at Craftster.org. http://www.craftster.org/forum/index.php?topic=311893.0 I wanted to dress up thrift store sandals (.99 cents marked down 50%) into something retro-kitschy cool, yet somewhat personalized, and came up with this project to use a photo of my son and turn it into a Warholian collage then put it on some fashion accessories in different forms. Total cost for this project was under $2 out-of-pocket. Items used for project:
  • Sandals
  • Photo collage (see below-.19 cents each through Snapfish developed at Walgreens)
  • 1/8 inch black ribbon (.50 cents a roll, Walmart)
  • Amazing Goop Glue (on hand, but to buy new is about $3)
  • Packing tape (on hand, but to buy new is $1 at Walmart of the Dollar store)
  • Black Gloss fabric paint (on hand, but to buy new less than $1 at most craft stores)

Here is link on how I made the photo for the project using free software from Picnik.com:

http://craftsandcreationswithkathy.blogspot.com/2009/07/warholian-photo-collage-part-2.html

I then used packing tape over the top of the entire photo to seal and protect it.

I then cut the pictures into strip and put the glue good on the back. I used my finger to smooth it, but it got real messy, I would recommend using a popsicle stick or maybe a Q-tip. I took one strip and put it flush against the outside edge, then angled it over to the other side - it went over the edge a bit on the other side, on one end, but I trimmed it off. Smooth is down and hold the edges in place until is it sticks without the edges lifting up (about 2-3 mins). Do the same with the other piece. Put a small line of glue on the top edge of the photo, starting with the outside edge and all the way across, then attach the ribbon, pressing into place as you go and cut off when you get to the other edge. Repeat for the bottom of the photo, then repeat the entire sequence for the other shoe.

I then put a small line of blue around the bottom edge of the sandal and glued down the ribbon all of the way around. I then used black gloss fabrib paint and went around all of the edges of the shoe to outline it.

Tuesday, May 19, 2009

PUZZLE PIECES PHOTO FRAME

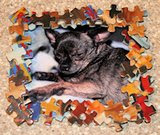
I did not create this craft, I submitted the idea to familycrafts.about.com for the Monday challenge of what to do with stray puzzle pieces as it was a craft my son did when he was in early grade school and it was selected to be featured. (Pic is not mine, it is of Sherri Osbourn's creation at the following website as she created the idead that I submitted) http://familycrafts.about.com/od/puzzlegamepiececrafts/a/puzzleframe.htm Items used:
  • 4 Craft Sticks (or popsicle sticks that have been washed)
  • Puzzle Pieces
  • Photo
  • Tab From a Soda Can
  • Glue
  • Scissors

Glue the sticks together at the edges to make a frame.

Glue the puzzle pieces around the craft stick frame.

Trim the photo to the same size as the frame and then glue it to the back side of the frame.

Finally, glue the pop tab to the back to use as a hanger.

Thursday, April 9, 2009

DIVA DESIGNER EASTER EGG - LACOSTE

Izod Lacoste was THE trend when I was in college, so I decided to make a Lacoste themed Easter Egg to add to our basket.

Items used:

  • Green Easter Egg

  • Lacoste ad (I found this in the current issue of "Interview" magazine)
  • Scissors
  • Craft Glue
  • Fabric paint (I used Tulip brankd Glitter with gold sparks)
Cut what you want to put on the egg and decide how you want to position it.
Glue the items to egg.
Outline the items glued to the egg with fabric paint, then write "Lacoste" in fabric paint where there are bare spots on the egg. NOTE: You will need to do this one side at at time to allow the fabric paint to dry on the egg.

Thursday, March 12, 2009

CUTTING CORNERS 2.0 - Decorated Durable Bookmark

This was inspired by "Cutting Corners" by Anna the Ewok here on CO+K but takes it to the next level.
I didn't take pictures of the process as I was going along as this was more of a trial run, but when I make another one I will add them. Based on an original project in a book available here
Items needed:

Estimated cost to make: Under 5 cents

Cut the corners off of the envelope. Prior to cutting, I lined mine up with the edge of the book, folded it up and cut along the fold.
Pick out the images that you want to put on the corner, cut them out and set them aside. I used pictures and description from a sales flier on mine.
Pick out the background you want for the images. I flipped through a magazine until I found what I wanted then put the cut corner over the edge of the magazine page, then cut along the edge. Do this twice I you will need a background for each side of the bookmark.
Glue the background pieces to the envelope corners.Then glue the images cut out that you selected and glue them on top of the background pieces.Allow to dry for a few minutes.
Straighten up any stray edges or uneven edges with the scissors.
Apply packing tape to the images on both side to protect them for smearing, smudges, wear and tear. One tape is applied to both side, you are done!