Bookmark and Share
Showing posts with label nail polish. Show all posts

Tuesday, January 29, 2013

Revamp Rhinestones with Nail Polish


I was inspired to change the color of a rhinestone hair claw on Ebay for under $3 a with some nail after seeing this post guest posted by  Aunt Peaches on  Elizabeth Banks website where she not only used nail polish, but also Sharpies to color in a clear rhinestone necklace to give it a unique look.

I was able to change the color several times within minutes just by painting on one layer of nail polish and allowing it to dry.

Thursday, October 18, 2012

Blazing Black Nails

In honor of Halloween, and also because I don't think there are enough different types of black nail polish on he market, I created this look using 2 coast of black nail polish as the base (I used Sinful Colors "Secret Admirer" and 2 coats gold and red glitter nail polish on top (I used Sinful Colors "Pumpkin Spice". 

I know it is hard to tell by the picture, but the color looks different depending on how the light catches it, sort of like a burning fire.

Thursday, January 5, 2012

Zoya Nail Polish - Get 2 Bottles Free, Just Pay $6.95 Shipping

 Photo:  Zoya

I spotted this deal over at LocoBuys and from now until 1/9/12 you can get 2 bottles of Zoya nail polish (regular price - $8 per bottle - will show up until code entered at checkout) for free using the code "ZOYA2012" at the checkout ,  just pay $6.95 shipping, so it works out to be around $3.48 a bottle.

I have not used this brand before; however, they have been featured in major magazine and they do tout being toxin free and vegan friendly.  
Disclaimer:  I have received no consideration or renumeration for this post -  I just sharing a deal that I found

Saturday, October 23, 2010

Shabby Chic Circle Flower

Great way to turn scraps into something pretty.

I am working through my scraps stash and going to use this particular "flower" to decorate a tote bag, but it could be used for barrettes, pins or statement necklace.

Items used:
  • Soda Can 
  • Scrap of felt
  • Scrap of burlap or heavy textured fabric
  • Scrap of coordinating solid fabric
  • Scrap of coordinating lace or netting
  • Decorative stone or button
  • Seam gauge or ruler
  • Scissors
  • Pen
  • Nail Polish (optional)
Use the pop can to draw a circle on the felt. Cut out.


Using the seam gauge or ruler, measure out 1/4 inch from the edge on the burlap or textured fabric then cut out. Glue together - the felt circle will be the base.


For the next layer on top of the textured fabric, use the soda can to draw a circle and cut out.  Reduce1/4 inch off the edges after drawing using the seam gauge or ruler.  To make it easier I folded it in half then a quarter, measured then cut.  Glue on top of the textured fabric with a glue gun.


Repeat with the netting or lace, except this time I trimmed off 1/2 inch from the edge(keep - will use around the stone).  Use the hot glue gun to glue it down.


I wanted to soften the look up a bit, so I used nail polish and painted the decorative stone to soften the look up. Glue the stone to the center of the flower.


On the piece of netting/lace trimmed off above fold it in half, glue it around the stone.

Friday, October 22, 2010

Spider Web Nails


See Spider Web Nails and 1000's of others - or share your own on Cut Out + Keep

This look was created using Orange nail polish and a black nail art pen and the how-to is posted over at Cut Out + Keep as I am not HTML savvy and have a terrible time getting the formatting to work on Blogger.

It is is based on the video tutorial by JulieG713 where she used red and gave it a more "Spiderman" look.  Above is my first attempt at trying this and I got a little heavy handed with the black lines and I think the middle finger look more like a wagon wheel) but surprisingly, I received a couple of compliments at the grocery store in spite of that.  It is not difficult and would be easy enough for a grade school girl's Halloween sleepover.

Wednesday, February 11, 2009

HEART THUMB PRINT NECKLACE

Close up of heart (indentation is the thumb print
Close up of back of heart
I made this to be more of kid's project for a child to do for a loved one, but it could be made into a more grown-up version by using jump rings, clasps and a chain instead of ribbon.
The pictures I took really do not do it justice because it looks much better in person and you can easily see the ridges of the finger print.
Cost for each necklace is less than 50 cents each.
************************************************************************ Materials:
- 1 block Fimo Clay - makes 4 hearts (on sale at Michael's .99)
- Hearts ice cube tray ($1.00 from Dollar Tree)
- 18-24 inches of 1/8th inch wide Ribbon (97 cents per spool from Walmart), depending on length preferred
- 2 beads with 1/8th inch opening or pony beads (on hand from broken Dollar store watch) for each necklace
- Straw from bagged juice drink like Capri Sun (free as it was a used one)
- Aluminum pie pan to bake the fimo (free as it was a used one)
Optional: Nodi Nail laquer pink with stars or ($1.00 from Dollar Plus) or any other nail polish
****************************************************************************************
Works out best to divide the fimo into segments then kneed each piece in your hands for a few minutes to make it more pliabe, then press it into the mold and smooth off the top of it.
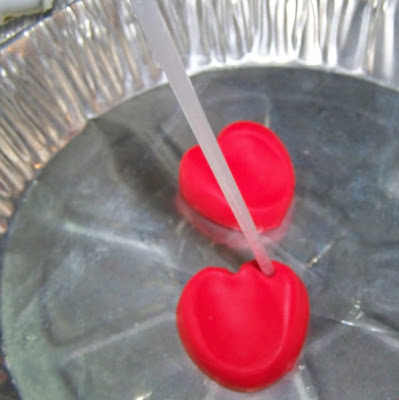
Take out of the mold and place in the aluminum pie pan right side up. Have the child press their thumb print into the center of the heart. They will need to press very hard to make an indentation.
You may need to shape the crease in the center of the hear on top up a little as the pressing will flatten it out. Use the side of the straw to press the crease back in the heart.
Use the straw to punch a hole in the upper right hand side of the heart.
Bake the fimo clay in the oven at 275 degrees for 15 mins. Do not overbake.
Use the nail lacquer to paint the heart
Thread ribbon through heart front to back, then tie in a knot at the top.
Close up of bead to show size of opening
Thread one bead on each side of the ribbon.
Tie a knot at the end of the the two pieces of ribbon and you are done!