Bookmark and Share
Showing posts with label glue gun. Show all posts

Thursday, June 23, 2011

Scrappy Bracelet

This is for Day 23 of 30 Days of Creativity and today's theme is "Plaid". 

I decided to craft a bracelet based on this tutorial by Peekadot for a scrappy bracelet, but instead of using a purchased bracelet, I used a hot knife on a water bottle to cut a 1/2 strip from it.  I then using scraps of plaid fabric about 1/2 inch wide and glue gun and wrapped the fabric around the plastic strip to make this no cost bracelet.

Sunday, September 12, 2010

CRAYON BARRETTE


See Crayon Barrette and 1000's of others - or share your own on Cut Out + Keep
This was an entry for the "Pencil and Crayon Hoopla" over at Craftster where you used a pencil or crayon to create something.  I made hair accessories and in addition to this I made the Skully Hair Stick out of a pencil and used pencil to make the face of the skull.

For a step-by-step on how to make, please see the tutorial over at Cutout + Keep.

Friday, July 30, 2010

TWISTED STONED FLOWERS FROM SCRAPS

Make pretty flowers with from scraps and dollar store decorative stones.

This is super simple, quick and easy.  You can use them to create a statement necklace, barrette, pin...anything you like (I haven't decided yet what I want to do with them).

Items used:
  • Soda Can
  • Paper
  • Paper
  • Pen or Sharpie
  • Scissors
  • Scrap of felt or other sturdy fabric
  • Ruler or seam gauge (optional)
  • Scraps of fabric
  • Decorative stone - small 
  • Hot Glue Gun


Use a soda can or other circular object to draw a circle on a piece or paper.  Cut out and use a template. Place circle on felt, draw around it with a pen or Sharpie then cut out.


I measured off 1 inch of a piece of scrap fabric that was 22 inches long, cut then tore as I wanted a jagged edge - what you use is up to you.  Total I used 2 pieces of 22 inches of fabric for this item.


Use glue gun to glue down fabric and start twisting.  Dab a bit of glue on top of the fabric and glue down the stone.  Twists fabric, dab glue, push down and repeat all the was around the flower, twisting as you go.


Keep on dotting glue at intervals and tacking down - if you run out of the scrap, add another piece of the same or contrasting fabric that you would like or trim the edges and use as is.  I added another length of fabric and trimmed on this one.  On the yellow flower, I dotted glue on the fabric and glued down even after I had gone beyond the circle.

Thursday, September 10, 2009

Fairy Commode

Make a fairy commode out of sea shells because fairies need to answer the call of Mother Nature too.
Items used:
  • 1 bag of shells
  • Hot glue gun and glue sticks

I got the bag of decorative shells for $1 from the dollar store. Pick out the shells that you want to use - I used 3 small scallop shells and 1 small conical shell.

Stand on of the scallob shells on its side and turn the other one upside down to make the lid and bowl.

Turn the other scallop shell upside down to make a base and glue the bottom of the bowl to the base, then glue the conical shell on one of the sides to create a flush handle.

Saturday, September 5, 2009

Frog Pond

This is another decoration for my fairy/whimsy garden.
Items used:
  • CD or DVD
  • Large plastic lid
  • Decorative Stones
  • Silk leaf
  • Craft Scissors and/or an X-Acto knife
  • Frog (purchased, or link to make a rock frog below)
  • Hot glue gun and glue stick

Glue the silk leaf to the center of the CD.

Cut a hole in the plastic lid that is smaller than the circumference of the and poke holes around the edge to allow water to drain.

Glue CD in the center and glue the decorative stones around the CD. I then glued the frog to the leaf. If you want to make a rock frog instead of using a purchased frog, The steps to make the frog are here. http://craftsandcreationswithkathy.blogspot.com/2009/09/rock-frog.html

Tuesday, August 11, 2009

PAPER BAG MUSHROOM

Make a low-to-no cost lawn decoration using an small paper bag. I saw this project over at one of my favorite blogs, Dollar Store Crafts, and knew this would be perfect for the decorating the outside of our house. http://dollarstorecrafts.com/2009/07/make-paper-bag-mushrooms/ Items used:
  • Small paper bag or lunch sack
  • Bamboo skewers or sticks
  • Hot glue gun
  • Scissors

Probaby goes without saying that you wouldn't want to use a lunch sack that had any sort of anything that leaked, dripped or permeated the bag as it would attract bugs and varmits, but I have teen in my house that unless you indicate things explictly, he tries to get me on the technicality "but you never said that!" so I will just go ahead and say it.

There is a detailed photo tutorial at the following:http://www.dougrhodehamel.com/how_to_make_mushrooms.php

I varied mine slighly as I did not use any rubber bands as I wanted mine more poofy and offbeat for what is going to turn into the fairy garden under the eaves outside of my garage, but rubber bands would likely produce a more true-to-life looking one.

I also cut the bottom 2 inches off of the bag as I wanted it shorter and used a wooden skewer that is used for holding carmel apples.

Sunday, June 21, 2009

CD CAMPFIRE

I found this gem over at http://crafts.kaboose.com/cd-campfire.html and it is a wonderful play accessory for Barbie or GI Joe!
Items used:
  • CD
  • Dark Brown felt
  • Stones
  • Sticks (3-4 inches long)
  • White craft glue
  • Hot glue gun and glue sticks
  • Small scraps of red and yellow tissue paper
  • Toothpick
  • Scissors
  • Pen

Lay the CD on the piece of brown felt, draw around it and cut it out.

Use craft glue and smear it on the CD then glue the piece of felt on top of it.

Glue the stones around the edge of the CD on top of the felt (I started out using craft glue and switched to hot glue from a glue gun) Place sticks on in the center in sort of teepee style gluing them down with the hot glue gun as you go. Tear the tissue paper into 1-2 inch squares. Put the toothpick in the center of a piece of tissue paper and twist it around the toothpick. Dip the end in a bit of craft glue and insert it into the sticks and continue until the fire looks how you want it to.

Saturday, June 13, 2009

FELT YO-YO FLOWERS WITH MILK CAP COVERED BUTTON

This was inspired by a tutorial for making felt flowers at the following site:
As I wanted my to be more 3-D with a Dr. Suessish cartoon like quality, I added a milk cap fabric colored button for the center.
Items used:
  • 2 pieces of felt
  • sewing machine or needle and thread
  • scissors
  • pen
  • hot glue gun and glue
You start out by main basic yo-yo by starting with a circle. I used a margarine lid and this circle is little over 5 inches in diameter.
Based close to the edge all the way around and be sure to leave enough thread at the end to be able to pull to gather the stitching - I stitched about 1/2 in from the edge, but for a regular yo-yo you would want to stitch even closer to th edge.
Gather up the stitching and then flatten out to make a circle.
Cut small wedges around the edges about 1/2 inch or so apart.
To make the fabric covered milk cap button use a small glass or can that it about 3 inches around and draw a circle on the felt the same and repeat the first 3 steps above, putting the milk cap in the center and drawing the fabric up around it and then stitch the the bottom shut.
Use a hot glue gun to glue the button to the center of the flower.

Monday, June 1, 2009

"Shades" Sunglasses Case

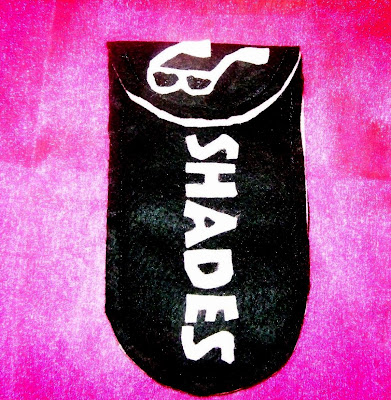
This is a pattern that I created for Jenny Garland's pattern design craft challenge. I wanted to come up with something that would be easy for someone to re-create, low cost, and could be adapted for either females or males and even kids to make and use (We will probably use brown and tan to make to a case for my son's Dad for Father's Day). It holds a pair of sunglasses and has another compartment hidey hole to put anything else you would like in it (tissues, gum, a comb, a few dollars, etc.) but not scratch the sunglasses.
This is the first time I have ever designed a pattern for someone else to make and if you have any questions or if I need to clear any thing up, please let me know.
Items used for this project:
  • 1 piece of black felt for the outside (you could choose any color you like).
  • 1 piece of light pink felt for the inside and trim (you could choose any color you like)
  • Scissors
  • Tissue paper to draw the pattern on to (I used yellow - optional if you printed off the pieces off a printer - you could just use the printer paper)
  • Straight pins to pin the pattern to the felt
  • Sewing machine (if you don't have one you could use a hot glue gun to put together)
  • Hot glue gun and glue sticks (if you don't have one of these but have a sewing machine, you could sew the entire thing)
  • Hand stitch needle and thimble (you could hand stitch the entire thing if you don't have sewing machine or glue gun - this would be a better option for grade school kids to try to made on their own).
  • Black thread (to match the outside color - you could use contrasting thread or if you just glue the the entire thing, thread would be optional).
  • Clear tape to tape over the "Shades" lettering and the sunglasses to stablize for cutting
  • Black fabric paint (to color in the lens on the shades instead of cutting them out)
  • 1 set velcro closure (I used the self-stick, but still used a glue gun to attach them - you can get several sets from the Dollar Store or craft stores).

Here is the pattern. As don't have a scanner to make it to scale, I have posted the piece individually and you could get them to scale using a the Paint program that is on most computers under Accessories, or copy and pasting into a Word program.

This piece is the main pattern piece - cut two of the main color and 1 of the contrast color and one of the main color (disregard the instructions on the pattern below -I cut 2 black and 1 pink and ended up with an extra black piece). Made small cut on the contrast (pink) piece on each corner where the dotted line).
The pieces are 10 inches wide and 4 1/4 inches tall.
This is the front of the case. You are only going to need to cut 1 of these in the main fabric color. (I cut 1 black). It is 8 inches wide and 4 1/4 inches tall.
This is for the "Shades" lettering - it is 5 inches wide and 1 1/4 inches tall in contrast color (I used pink).
The lettering for "SHADES" is font CENTURTY GOTHIC and the size is 86 (as there is no drop down for this - you type in 86 in the font box) you could just type this in a notepad or word program and print it off instead of trying to copy this from the picture below.
Here is the pattern for the sunglasses. It is 3 inches wide and 1 1/2 inches tall and cut out in the contrast color (I used pink).
Instead of cutting out the center for lens of the glasses, you could use fabric paint to color it in. I originally tried putting a sequin in the middle, but would not recommend doing that as it made it look like a burlesque bra (although I do suppose you could adapt the case for pasties holder if you are a burlesque dancer or have a person on your Christmas last that is).
This is what the pieces looked like cut out.
On the Shades lettering and the sunglasses, I stablized the paper with clear tape to make it easier to cut out so it wouldn't rip or tear. I used craft scissors on these pieces instead of my fabric scissors and I didn't want to dull the fabric scissors, but that is a personal choice.
Cutting out the "Shades" lettering can be tricky -grade school children would need assistance with this and may need to use smaller scissors if you have them. To cut out the center of the A and the D I folded the felt slightly then made a small cut in the center, then put the tip of the scissors through the hold and carefully snipped around the edges. This is what it looked like when I was done.
Unpin the felt from the tissue the put the main full felt piece (black) on the bottom, put the contrast piece (pink) on top of it, then cut the contrast piece where you have made the snips on each side and put it slightly over the edge of the black fabric, then put the shorter body top piece (black) on top of the pink, then pin the edges and sew the bottom edge edges all the way around, then the top edge all the way around (if you are going to use hot glue, you would want to glue each layer separately).
In this photo the top of the case is to the left and the bottom on the right.
For the "SHADES" lettering and the velcro closure, I used hot glue. Before gluing, lay out the letters and the closure to see where you want to position them, then attach glue to the back and glue each piece down one by one.
For the sunglasses, position this on the top where you want to then apply hot glue to the back of the glasses then glue it down and use the black fabric paint to color in the lens of the shades.
If you like what you see, please take a minute to vote for this project at Jenny Garland http://www.typepad.com/services/trackback/6a010535924717970b01156fbeff7b970c
If anyone does make this, I would love to see your creation/interpretation!
Happy crafting!

Sunday, May 24, 2009

RETRO OWL SUNGLASSES CASE

I found this awesome tutorial at CO+K by Peptogirl for this retro cool sunglasses case and knew I had to make a version of it!
I made my version out of fleece for the body and left over felt for the embellishments, then used googly eyes instead of felt ones and put the entire thing together with hot glue instead of sewing. For the closure, I used velcro circles.

Thursday, May 21, 2009

POP ART JOURNAL

I wanted to keep a journal to jot down ideas and lists of things and have it sort of pop artish, but the ones that I found in the stores started about about $12 and went up from there, so I decided to make my own.
This worked out even better and everything but the felt and the glue on this is recycled/upcycled cardboard and paper and my cost out of pocket was under 25 cents.
As this was my first attempt at something like this, it is a little rough, but I do plan on making more for these for Christmas presents.
  • Fruit By The Foot box
  • Diet Coke 12 pack box
  • 1 piece red felt
  • Lots of scrap 8 1/2 x 11 paper cut or torn into quarters
  • Craft Glue
  • Hot Glue Gun and glue sticks

I started with th Fruit by the Foot box as it is just a bit bigger than a quarter sheet of 8 1/2 x 11 sheet of paper and the right size for this project, but you could start with a cereal or other small box and adjust the size or make the paper a different size.

Cut the top, bottom, and right hand side off from the Fruit by the Foot box.
You could skip adding the outside box for reinforement and decoration if you wanted to, but I wanted my journal to be sturdy and I wanted the Diet Coke for the outside of the journal, so I cut the top, bottom, and right hand side off from the Fruit by the Foot box.
I then cut the pieces from the Diet Coke box that was at least 1/4 of an inch wider on the each side.
Then fold the egdes over then cutting the corners off and glued it to the Fruit By the Foot Box with craft glue on the outside and hot glue on the inside edges.
NOTE: I pieced mine together from several pieces off the Diet Coke box, but it would be easier and you would get a more professional looking results if you just a single piece from the Diet Coke box (after seeing the picture I did attempt to straightern the edge a bit more, but didn't take a pic - another thing to note is if you have any sort of digital camera, take a picture of your projects and then check them for anything you might need to adjust - your eye tends to forgive the project you put love and time into; the camera doesn't and will give you a strangers eye view of the project).
For inside front and back, I cut 2 pieces from the felt that were approximately 1/8th of an inch shorter on the top, bottoms and sides with the piece closest to the spine flush with the bend for the spine and glued it down to the inside cover with a hot glue gun. I would recommend doing this slowly and in stages, starting at the top edge and working down, otherwise the glue dries too fast and it can wrinkle up the fabric.
Next, square up the pages of scrap paper and make sure that if there is printing on one side, that it is facing the back fo the book, then glue in small sections at a time to the spine of the book.