Bookmark and Share
Showing posts with label kids craft. Show all posts

Sunday, October 31, 2010

Leaf Skull Rubbing N Ghosts Wreath

Fun decoration for kid's to make for Halloween paper craft using leaves for texturing and handprints for ghost shapes. 

This was inspired by Crafty Lady Abby's Leaf Rubbing Tutorial http://craftyladyabby.blogspot.com/2010/09/skull-day-40-tutorial-18-leaf-rubbing.html.  The ghosts were inspired by Crafts by Amanda http://www.craftsbyamanda.com/2010/09/halloween-hand-print-ghoul-banner.html

Items used:
  • Paper
  • Printer
  • Image to color (I used this one)
  • Crayons
  • Leaves
  • Scissors
  • Cardboard circle from a frozen pizza
  • Glue or Gluestick
  • Tape
  • Pop Tab (optional)
Gather up a few leaves


Print off the image that you want to color. Put the leaves underneath and rub the crayon back and forth horizontally to pick up the veins in the leaves to give it a more spooky effect.


Place the cardboard circle on top of the picture, draw around the edges and cut off the excess.  Use glue of a gluestick to glue the picture to the cardboard.


Next would be to draw the hand print "ghosts" by drawing around the hand on white paper and cutting it out.

The hand print I used for this project was for template of my son's hand when he was a year old.   I used 3 sheets of white paper and got 8 "hand prints" on each page, but how many you need to go around the cardboard circle to make the wreath will vary depending on the size of hand used.


Make faces on the ghosts.  For these just two circles for the eyes and one for the mouth were colored with a black crayon.


Glue on the ghost; I started at the top and overlapped slightly and bent up a bit to give it more dimension. and so you could see the lettering.  On the sides I slid the ghost underneath slightly and and glued down.  On the bottom overlapped the ghosts similar to the top.

If you want to hang up on a nail, glue a pop can tab at the top edge in back so the larger hole peaks over teh top, then tape over the bottom part to secure it.

Friday, December 18, 2009

"Pop Art" Hand Wreath


Use recycled items to quench your thirst for crafting your own unique, trendy wreath.

This wreath is based on the Hand Wreath I made previously, except this is much fuller and hand outlines are drawn on cardboard from 3 cases (24 packs) of Diet Coke.

Items used for this project:
  • Cardboard from soda pop cases  
  • Cardboard circle from frozen pizza
  • Hot Glue Gun 
  • Silver Acrylic Paint
  • Paintbrush
  • Pop tab 
  • Silver Bell Ornament made from top of plastic soda bottle
  • Red and Gold Fabric Paint
  • Ribbon
Click on the hyperlinks for tutorials.

Tuesday, December 8, 2009

Hand Wreath


This was inspired by an hand wreath my son made when he was in grade school, except I used fun foam sheets instead of construction paper to make it more durable as it is going to his Dad's house and will probably still be up come July.   Total cost was under $2.

Items used:
  • Fun foam craft, construction paper, cardboard or paper
  • Scissors
  • Pen
  • 9-12 inch cardboard circle (cardboard bottom of a frozen pizza)
  • 1 yd. ribbon
  • Decorative pick or picture
  • Tab off the top of a pop can
  • Craft glue and/or hot glue gun 
  • Acrylic paint
  • Paint brush
  • Tape
Place hand flat on surface used and draw around it with a pen.  The hand used of this wreath is that of my 16 year old son whose hands at least a fingertip length longer than mine and we only needed to draw a few.  I used 1 large and 1 small sheet of craft foam.


If smaller hands are used, you may just want to draw one on cardboard and use the cardboard as a template to draw the rest of the hands.   Number of handprints needed depend on the size of the hand and how full you want the wreath to be. Cut around pen line with scissors.

After the hand prints have been cut out position them around the cardboard circle to ensure you have enough and get an idea of how you want them placed.  I wanted to see the handprints plainly, but for a fuller wreath, you can overlap the hand prints.


Paint the cardboard circle with acrylic paint (I chose gold) and allow to dry.


Put glue around the outer edges of the cardboard circle, then position the hands the way you want them on the cardboard.  If you choose to layer the hand prints, start at the top and glue each at the edge separately.


In the past have used a hand print in the center and fav picture in center of that handprint, which is cute for younger children.  On this wreath I used a decorative pick I got for .35 cents last year on clearance for a slightly more grown up look.   I stuck the bottom of the pick hear the edge of the bottom handprint and pushed in slightly, then taped in down in the back.

Tie the ribbon around the pick to make a bow.


 Add glue to the back of the pick.


Glue pop tab to top back edge of the cardboard so the wreath can be hung.  I also taped applied tape over the glue after it dried.


Wednesday, February 11, 2009

HEART THUMB PRINT NECKLACE

Close up of heart (indentation is the thumb print
Close up of back of heart
I made this to be more of kid's project for a child to do for a loved one, but it could be made into a more grown-up version by using jump rings, clasps and a chain instead of ribbon.
The pictures I took really do not do it justice because it looks much better in person and you can easily see the ridges of the finger print.
Cost for each necklace is less than 50 cents each.
************************************************************************ Materials:
- 1 block Fimo Clay - makes 4 hearts (on sale at Michael's .99)
- Hearts ice cube tray ($1.00 from Dollar Tree)
- 18-24 inches of 1/8th inch wide Ribbon (97 cents per spool from Walmart), depending on length preferred
- 2 beads with 1/8th inch opening or pony beads (on hand from broken Dollar store watch) for each necklace
- Straw from bagged juice drink like Capri Sun (free as it was a used one)
- Aluminum pie pan to bake the fimo (free as it was a used one)
Optional: Nodi Nail laquer pink with stars or ($1.00 from Dollar Plus) or any other nail polish
****************************************************************************************
Works out best to divide the fimo into segments then kneed each piece in your hands for a few minutes to make it more pliabe, then press it into the mold and smooth off the top of it.
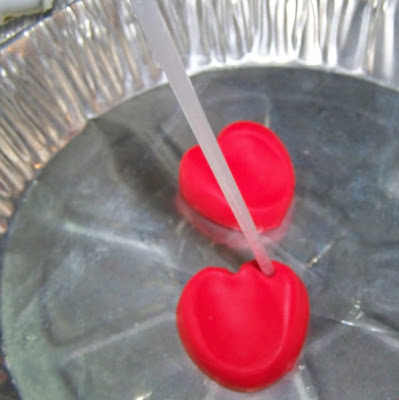
Take out of the mold and place in the aluminum pie pan right side up. Have the child press their thumb print into the center of the heart. They will need to press very hard to make an indentation.
You may need to shape the crease in the center of the hear on top up a little as the pressing will flatten it out. Use the side of the straw to press the crease back in the heart.
Use the straw to punch a hole in the upper right hand side of the heart.
Bake the fimo clay in the oven at 275 degrees for 15 mins. Do not overbake.
Use the nail lacquer to paint the heart
Thread ribbon through heart front to back, then tie in a knot at the top.
Close up of bead to show size of opening
Thread one bead on each side of the ribbon.
Tie a knot at the end of the the two pieces of ribbon and you are done!