Bookmark and Share
Showing posts with label Birthday. Show all posts

Saturday, December 31, 2011

LAST MINUTE NOISEMAKERS

Make a noisemaker for New Year's or Birthday party with stuff you likely already have on hand.

This was made 15 years ago by my then 3 year old son at Science Central, a local science museum on New Year's eve, but it can easily be made at home from youngsters on up with the following:
  •  2 Plastic cups
  • Clear Packing Tape
  • Dried peas, bean, rice, aquarium gravel, leftover jingle bells or any other small object.
  • Markers, stickers or anything else to embellish the cup.
  1. Decorate the cup with marker or stickers keeping in mind one is going to be stacked upside down on the other one.
  2. Fill the bottom inch or so of the bottom of the cup with the dried peas, bean, rice, aquarium gravel, leftover jingle bells or any other small objects.
  3. Stack the other cup upside down on top of the bottom cup then secure at the center with packing tape.
Shake to make noise.
    Hope that everyone has a happy and safe New Year!
    Decorate

    Tuesday, August 11, 2009

    Customized Digital Collage Birthday Card

    This is a customized digital collage that I put on my son's Facebook wall for his 16th birthday. I used the free online software at Picnik.com and the basic steps used in the project, except I used a 3 photo template under the "Brag Book" option: http://craftsandcreationswithkathy.blogspot.com/2009/07/create-custom-birthday-card.html I also added a sticker with a key and a car in yellow, then overlayed it in black. The meaning of the "A's =" and the key and car is a subliminal prod to remind him although he will be old enough to get his learners permit in a month, he won't be getting it unless his grades are good in school.

    Tuesday, July 28, 2009

    Create A Custom Birthday Card

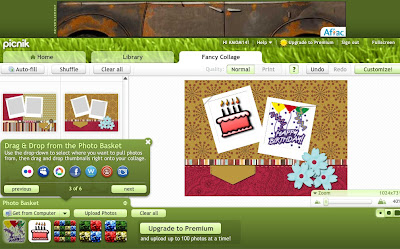
    Create a personalized birthday card to print, post or send using free online clipart and software.
    The program used to create the card is the the "Fancy Collage" option at www.picnik.com
    The images that I used are free clipart from the following site (right click the image and save it), but you could use photos instead.
    Go to the "Fancy Collage" area and pick from the drop down menu on the left hand side the collage format you want to use (I used the free "Brag Book" option), then upload your pictures and drag and drop them into the picture area on the collage. To add the personalized greeting, click on the "Create" tab, click on the "Text" option, then go to the drop down menu on the left hand side of the screen and select the font that you want to use and then type your message. You can then drag the message anywhere on the screen that you want to.
    To chose the color of the wording, drag the mouse onto the color you want to use and it gives you a preview of what it will be as you do it. There are also other things you can add, like stickers and frames, but I didn't use it for this card.
    When the card looks the way that you want it to, go to the "Save and Share" tab then name your project and save it to your computer and it is ready to print, post or send via an attachment to your intended recipient.