Bookmark and Share
Showing posts with label Valentine's Day. Show all posts

Saturday, February 13, 2010

Valentines Goody Box from Ice Cream Container


Upcycle and ice cream container into a cute goody box for Valentine's Day!

I am using this a cookie container to give out cookies for Valentine's Day treats and it can be used for storing other things once it is empty.   It took about 10 minutes and costs almost nothing to make.


Items used:
  • Ice Cream Container - empty, washed
  • 2 colors Decorative gift wrap or scrapbook paper
  • Marker or pen
  • Scissors
  • 1/4 inch ribbon - 20 inches
  • Pre-made bow or bow made from wire edged ribbon ribbon
  • Glue stick or craft glue
  • Glue Gun and glue stick
Lay the container on the paper, putting it on the corner end and flipping over until it will cover the circumference of the container.   Mark on the paper then cut.


I used a Blue Bunny Brand container which is made of plastic and narrower at the bottom than it is at the top, so I did end up cutting the paper into two segments and then overlapped on the sides. 


Rub a glue stick on the container (or use craft glue) and glue the paper to the container.  I do not recommend using the glue gun as it give a lumpy appearance.   I used mylar gift wrap from Dollar Tree, but other themed wrap or scrapbook paper could be used.  Glue the paper to the container. 


For the front, I cut out the letters "LOVE" freehand from the mylar, but any different paper from the wrap applied to the container would do.   Glue on with glue stick or craft glue.


For the back I cut out a heart freehand and glued it down with a glue stick.


For the top,  put the paper right side down and put the lid on top of it and trace around it with a marker or pen, then cut out and glue to the top with a glue stick or craft glue.


Starting at one of the edges on the lid, apply a bit of hot glue on the lid at a time and glue the ribbon around the edge.  I used a silver grey ribbon.


Apply hot glue to the bottom of the the pre-made bow or to make you own, use wire wrapped ribbon and fold over itself into approx. 4 inch long strip, wrap around the center with a string and tie off the pull each piece of the bow out.


Glue the ribbon to the lid and it is ready to fill with goodies.

Saturday, February 6, 2010

Valetines Day Sweatshirt

 
 This is something I made a long time ago for my son, but I wanted to participate in Crafts In Bloom project to re-fashion an article of clothing and I wasn't able to get what I had planned to make done.   He is 16 now and is horrified at thought that I ever dressed him to look "cute"

I posted a how-to over at http://www.cutoutandkeep.net/projects/valentineCut Out and Keeps-day-sweatshirt.   It is super simple and very inexpensive and doesn't require any sewing; just used Heat'n Bond and ironed on the appliques/hearts and red and white fabric paint to finish the edges and lettering.

Tuesday, February 2, 2010

Heart Shaped Bon Bons


I saw the cake bon bons over at Sumo's Sweet Stuff - http://sumossweetstuff.blogspot.com/2010/01/mouth-watering-wednesday-bon-bons.html and it was my inspiration to make heart shaped ones.

Items needed:
  • 1 box cake mix
  • Eggs
  • Vegetable Oil
  • Water
  • Non-stick Spray
  • 1 can of frosting
  • Heart shaped tray(s) or cookie cutter 
  • Potato Masher or large spoon
  • Candy hearts, colored sugar, chocolate sprinkles or other decorations
  • 1 small ziplock bag
  • Freezer
  • Wax paper
Makes approx 3 1/2 dozen.

Mix cake according to package. I used a Strawberry cake mix which used the mix 3 eggs, 1/3 Cup oil, 1 cup water and bake at 350 degrees for 32-36 min for 13x9 inch pan. Allow to cool.

In a large bowl, spoon the cake and all but 2 tablespoons of the frosting (keep for decoration).

With a potato masher or large spoon, mash the icing and the cake mixture together until it is sticky.

In the bottom of a heart shaped mold (or sprinkle cookie sheet if spooning into a cookie cutter) sprinkle candy hearts , sugar or chocolate sprinkles. I got my mold from Dollar Tree and I only used one and repeated the process.

Spoon dough into the mold (or spoon onto cookie sheet and cut with cookie cutter). Place in freezer for approximately 10 minutes.

Line a 13x9 pan with was paper. Remove from mold (if mold used); flip right side up.

Spoon 2 tablespoons of frosting into a ziplock bag and close it. Smoosh it to one corner than make a small snip in the corner and squiggle it over the hearts.


After there are icing squiggles on the hearts, place pan in the freezer for 10 minutes before putting on serving plate to make it easier to work with (otherwise will be smooshy).

I am linking this up to Today's Creative Blog. Currently there are over 200 other projects linked up.


I am also linking up to Show And Tell over at Blue Cricket Design.  
 
Go over and check out all of the other crafty creations!

Friday, February 13, 2009

Valentine's Day Kool-Aid Pie No-Cook Pie


I made this last night for supper and have posted the how-to at Instructables and entered it into the "Sweet Treats" contest for Valentine' s Day.
If you see it and like it, I hope you vote for it!

Wednesday, February 11, 2009

HEART THUMB PRINT NECKLACE

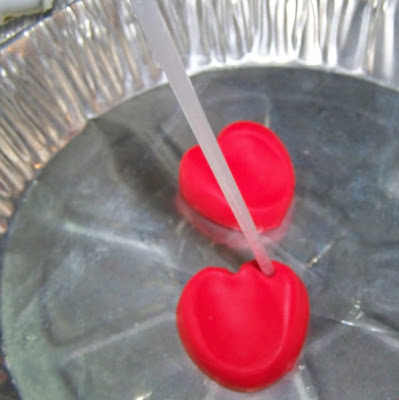
Close up of heart (indentation is the thumb print
Close up of back of heart
I made this to be more of kid's project for a child to do for a loved one, but it could be made into a more grown-up version by using jump rings, clasps and a chain instead of ribbon.
The pictures I took really do not do it justice because it looks much better in person and you can easily see the ridges of the finger print.
Cost for each necklace is less than 50 cents each.
************************************************************************ Materials:
- 1 block Fimo Clay - makes 4 hearts (on sale at Michael's .99)
- Hearts ice cube tray ($1.00 from Dollar Tree)
- 18-24 inches of 1/8th inch wide Ribbon (97 cents per spool from Walmart), depending on length preferred
- 2 beads with 1/8th inch opening or pony beads (on hand from broken Dollar store watch) for each necklace
- Straw from bagged juice drink like Capri Sun (free as it was a used one)
- Aluminum pie pan to bake the fimo (free as it was a used one)
Optional: Nodi Nail laquer pink with stars or ($1.00 from Dollar Plus) or any other nail polish
****************************************************************************************
Works out best to divide the fimo into segments then kneed each piece in your hands for a few minutes to make it more pliabe, then press it into the mold and smooth off the top of it.
Take out of the mold and place in the aluminum pie pan right side up. Have the child press their thumb print into the center of the heart. They will need to press very hard to make an indentation.
You may need to shape the crease in the center of the hear on top up a little as the pressing will flatten it out. Use the side of the straw to press the crease back in the heart.
Use the straw to punch a hole in the upper right hand side of the heart.
Bake the fimo clay in the oven at 275 degrees for 15 mins. Do not overbake.
Use the nail lacquer to paint the heart
Thread ribbon through heart front to back, then tie in a knot at the top.
Close up of bead to show size of opening
Thread one bead on each side of the ribbon.
Tie a knot at the end of the the two pieces of ribbon and you are done!

Saturday, February 7, 2009

HEART HEADBAND FOR VALENTINE'S DAY

TOTAL COST: Under 50cents TOTAL TIME: 15 MINS This in my first ever attempt at re-vamping a headband. I bought 1/8th of yard of the hearts fabric a week or so ago with this project in mind. The fabric was $2.44/yd. so with tax worked out to be about .35 cents and I still have enough left to make other small project like hair ribbons or scrunchies. I have found that people the cut fabric are very curious about what you are going to make when you request less than a yard of fabric. In this case I was glad I had an idea and ready answer because sometime the real reason is I like the fabric but I am on a tight budget and I will just have to figure out what I am going to use it for later. I chose this fabric as I wanted something for Valentine's Day, but also something that I could wear year round without looking it was just for Valentine's Day - this fabric was perfect as it has hearts but some of them are black, so it has a touch of goth. I had an old headband that was in good condition except the white was looking a little more like grey even after an attempt at washing it. I stripped of the black felt strip that was down the middle the underside of the headband then hot glue gunned the fabric to the headband then re-glued the felt strip. It turned out ok and I will wear it, but there are a few little puckers that no matter how much I pulled and glued and burned my fingers, it would just not go straight. When I try this project again, I will cut the fabric wider and cut little notches in it so it will go over the curves better.