Bookmark and Share

Monday, March 29, 2010

Pre-Employment Drug Test Tips


The tips that I am sharing below are ones that I learned the hard way when I went for a pre-employment drug test because what should have taken no more than 15 minutes ended up being an over 2 hour ordeal where I was stuck in the lobby with actual sick people and caught whatever bug going around.  The last thing you need when starting a new job is to go in sick the first day and infect all of your new co-workers.
  • Call the place you are going to be tested - Confirm what paperwork and identification is needed, if you don't have paperwork confirm that you are on the list and confirm the hours of operations.   In this case the testing facility misplaced the request and I waited in the lobby for a half hour for authorization for testing, could not "hold it in" any longer and relieved myself and when I informed them I would come back later they advised the employer was calling them back now and confirmed testing was needed.   When I tried to give a "sample" I was not able to produce enough and had to drink 40 oz of water and wait in the lobby for 1 hour and told I could not leave (they also had my drivers license and held it until the test was finished) before I could try again.  Also, on a prior test that I took 5 years ago for a different job, the lab closed from 12-1 pm and I had to wait 30 minutes for them to open. 
  • Have the necessary ID and as little else as possible -  The test prohibited having anything in my pockets or taking any items in the restroom.   It was bad enough that I had to fork over my drivers license for them to hold until the test was complete, but it was even more painful being forced to leave my keys and my purse full of my life on the counter with the nurse conducting the test.  I would not recommend locking a purse or wallet in a car as it can easily be stolen (I and several co-workers had that happen at a company Christmas party) - if you know ahead of time, take only what you need and leave the rest at home.
  • Drink plenty of fluids 45 to 30 minutes before the test - that way you should have enough to give enough for the required sample, but still not be too uncomfortable if you have to wait a few minutes in the waiting room.
Other tips I have been told in the past:
  • Indicate any prescription and over the counter medications taken recently- indicate the name,  the strength if prescription, and when taken recently as some can produce a false positive reading, but if they know what you have taken they can run further test to check and rule out anything elicit.
  • Don't eat anything with poppy seeds in it or drink tonic water up 24 hours before a test.  I was told that these items could result in a false positive.  If you have consumed either within the prior 24 hours, you may want to ask the test administrator if this could cause any problems with the test.

Sunday, March 28, 2010

Version of "Personalized" Photo Plate - Maxx


This is a version of the http://craftsandcreationswithkathy.blogspot.com/2010/03/personalized-face-plate.html that I made for my son for his dog that went to heaven recently.

I purchased the plate at the Dollar Tree and made drew the picture, but it did not "sink" into the plate like the previous one that I had made, maybe due to it being a high gloss finish to begin with???  I tried "curing" the plate in the oven on 250 degrees for a few hours, yet, when it cooled I still could easily scrub off the picture.

I chose to put a clear coat of paint on it and deemed it for "decoration only" to preserve the image and gave my son the option of keeping it as a plate to for decoration in his room or find out if he wanted to include it on the gravesite of his dog...he still has not decided, but what I can say is if you want to make a personalized face plate, chose a plate that does not have a high gloss on it to paint your image.

The DIY Show Off

Thursday, March 25, 2010

Dried Beef Gravy

This is my all time favorite breakfast comfort food from my childhood and it is cheap and easy to make and can be served over biscuits, bread, hash browns or mashed potatoes.

When I was young my Mom made her living at babysitting and would accept "drop ins" and many times had to stretch breakfast to serve more children and it was easy to do with this recipe.  It is a basic white sauce and for every cup of milk used, you use 2 Tablespoons of margarine or butter and 2 Tablespoons flour and a few extra dashes of salt and pepper as desired.  

This recipe makes enough to cover 8 biscuits split in two generously, depending on appetites, can feed a family of four (or 2 adults and 1 teen boy) for $2-3 dollars (depending on the prices of ingredients where you live)..

Items used:
  • 1/2 cup butter or margarine
  • 1/2 cup flour
  • 4 cups Milk
  • 1 3oz package dried beef
  • 1 tsp salt (more of less as desired)
  • 1/2 tsp pepper (more of less as desired)
In a saucepan over low heat, melt the butter or margarine and then add the flour, salt and pepper.  This is what it will look like.


Remove from heat and add milk, 1 cup at time, stirring constantly and mixing thoroughly to avoid the gravy getting lumpy.  Continue until all milk mixed in.


Tear up dried beef into small bits and put in the gravy mixture.
Put back on stove at medium to medium high heat, stirring constantly until it is a gravy consistency - actual varies greatly depending on what stove you use, but usually 1-4 minutes it will thicken up.  If you get a gravy that just won't seem to thicken up for whatever reason after about 7-8 minutes, you can thicken it up by adding a few tablespoons of instant potato flakes.

Wednesday, March 17, 2010

Red Rose Umbrella


This project was inspired by an umbrella that I saw over at Chic Steals.  Although the flowers on the edges class it up a bit, I like how it looked sort of like a vase of roses when it was closed even more.

Items used:
  • Umbrella 
  • 1/2 yard fabric
  • Needle and thread
  • Straight pins
  • Clear glue adhesive
  • Clothespins
This cost me around $3 to make.  I bought the umbrella at the Dollar Tree for $1 and the fabric as a remnant for $1.18.  I used Amazing Goop for the clear glue, but any clear glue fabric adhesive would do.  I had originally planned to hand stitch all of the flowers in place but worried it would make the underside look ugly so I decided to use the clear glue instead.

Cut the fabric into approximately 1" x 22 1/2" strips (I ended up with 28 strips and used 24 on the project).  Thread a needle and put a knot in the end  and baste stitch at the bottom at around 1 inch intervals and then gather up loosely.


Start rolling from the edge that has the knot to create a rose.   The one below is tightly wrapped, but for the majority of the project rolled it much more loosely.  Stitch together to hold it in place at the bottom of the flower.


Repeat on the remaining strips of fabric.


Pin a flower by each of the spokes.

Pin a flower in the center between each of the two flowers at the spokes.   Remove flowers one by one, apply clear glue to the bottom, firmly place back on the umbrella where it was removed from and use a clothespin to hold it in place while it dries, repeat until all flowers are glued on.


As the "roses" on the umbrella are made of rolled up "ruffles" I am entering this in Disney's

Friday, March 12, 2010

Polymer Clay Giveway at Craft Test Dummies

One of the blogs I follow, Craft Test Dummies, is having a polymer clay giveaway.   I am only a novice in working with polymer clay, but I do know that the items are unique to most of things that are offered at my local craft stores where I have not seen several of the items before.  If you are into or interested in polymer clays, it is worth checking out the link as you may want to enter to win.
http://www.crafttestdummies.com/commenttary/national-crafting-month-giveaway-2/

Best of luck to everyone!

Sunday, March 7, 2010

Personalized Face Plate


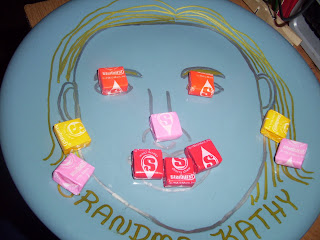
A fun food plate for kids.

This was based on Kallen at At Second Street entry for "Food on The Go" for the So You Think You Are Crafty competition http://atsecondstreet.blogspot.com/2010/03/food-face-how-to.htm.  I loved the idea and decided to make one for my "Project Grandma Box" for future grandchildren.  My son is only 16 and although I hope he isn't a father until he has at least graduated college, I have started the Grandma box as a "just in case" something would happen to me  before he has children so they will know Grandma loves them even if we never get to meet in person.

Items used:
  • Ceramic or Porcelain Plate
  • Ceramic or Porcelain Pen
  • Photo 
  • Photo Editing Program
  • Printer
  • Scissors
  • Pencil
For this project a blue ceramic plate that I got from a thrift store for 35 cents and I used Prange Metallic markers in silver and gold as I had already purchased them for another project (used 40% off coupon at Hobby Lobby and got them for around $2.75), but there are other brands, such as Porcelaine 150 and they are available at most hobby stores or online.

Find a photo with clear facial features and use a photo editing program to change it to black and white and then blow it up to the size you want.  If you don't have a photo editing program, there are several free ones, such as Fotoflexer or Picnik where you just upload your picture, edit then save it.  I used Irfanview for this project, which is a free progam to download.   I made mine so was the size of my hand, which I think came out a little too big - you may want to go smaller.


Draw around the face, eyebrows, eyes, nose, ears, and mouth with a pen.
Cut out the head shape.  Guess I now know what I would look like if I pulled a Brittney Spears and shaved my head.   Draw around the face shape with a pencil on the plate,  remove the cutout then go over it with the ceramic pen and freeahand the edge of the ears.
Next, cut out the eyebrows, eyes, nose and mouth.  Sort of looks like a Picasso now.
Put the cutout back on the plate and go over the cutout areas of the eyebrows, eyes, nose and mouth with a pencil.   Remove the cutout and draw over the penciled in lines with a ceramic pen.
For the eyes, I put the cutout pieces on the plate next to the eye as a guideline and freehanded each one onto the plate.
Color in eyebrows, eyes, and add hair if desired.   For the name I just wrote in freehand with the pen.
I washed it off and then it was ready for play.   I had to do it quickly as my son spotted Starburst and called dibs on half of them.


Saturday, March 6, 2010

Feria Multi-Facted Shimmering Hair Color by L'Oreal


Dilled Green Beans


A trick to make canned green beans taste better.

I saw at Kroger's last week where a name brand canned vegetable supplier now offers Green Beans with Dill for $1.41 a can and had to laugh as I have been DIYing my own with generic green beans for years to make them taste better and at less than half the cost of what they are selling it at the store for now.

Items used:
  • 1 15 oz can Green Beans
  • 2 tablespoons Margarine
  • 1 teaspoon Dill
Put the green beans, margarine and dill in the saucepan and turn the stove up to low-medium heat and heat up the green beans and melt the margarine (5-8 mins).

Review of 99 Ways To Cut, Sew, Trim & Tie Your T-shirt Into Something Special by Justina and Faith Blakeney

99 Ways To Cut, Sew, Trim & Tie Your T-shirt Into Something Special 
By Justina and Faith Blakeney

Overall, it excellent as an inspiration book to jumpstart creativity with its think outside-the-box methods of transforming a single t-shirt into a garment.   There are ideas in the book that I had never have seen before or even thought to do and made me look at t-shirts in a new way.

While they do an excellent job of coming up with original designs using just one t-shirt; however, using just the lone t-shirt is also a pitfall because it doesn't give you much fabric to work with.   If you are the least bit overweight or very well endowed, I estimate that there are less than 5 where the end result that would look presentable and one of those is tote bag.  Those that aren't skimpy are altered to be very form fitting and would accentuate things you would rather not bring attention to.  That doesn't mean you can use the ideas to build and create your own unique design using the ideas as a base - it just means you will have to wing it on the execution of what you decide to add.

If you are looking for inspirations just beyond the standard adding an applique or ruffle to a T-shirt or looking for the perfect gift to give a college age fashionista I would recommend reading this book.

Disclosure:  I checked this book out from the public library and I am not receiving anything for writing this review other than expressing my opinion.

Thursday, March 4, 2010

Artichoke & Parmesan Pasta Casserole


A lighter pasta dish with a hint of artichoke and cheese.   This recipe is from
http://www.blisstree.com/bakingdelights/artichoke-parmesan-pasta/
and the reviews for it are mixed.  My son loved it, especially the cheese layer on the top.    I like a more creamy, cheesy pasta dish and I would prefer it with a little garlic, but than again, I am garlic lover.  I am also conditioned that if a casserole goes in the oven, it must be topped with crushed crackers, but I do admit I like the light but a bit crunchy taste that the cheese topping brings.  If you are looking for a lighter pasta than the standard cream based, this is worth trying.

  • 1 lb pasta
  • 1 1/2 cups mozzarella
  • 1/2 cup Parmesan
  • 1 large can chopped artichoke hearts
  • 1 onion, chopped
  • 1 cup milk or half and half
  • Non-Stick Coating Spray
  • Salt and pepper to taste

Pre-heat the oven to 350 degrees.  Cook the pasta according to the package - I used Meijer's brand Farfelle which required bringing water with salt to boiling then add pasta, and cook for 11 minute, but pastas seem to vary by brand and type.  Once cooked to Al dente, drain pasta.   I spritzed the pasta with non-cook spray and tossed, but that is optional.


Chop onion and artichoke.  The original recipe called for sauteing the onion in a little olive oil until transparent, but I used the onion raw instead. 

Mix the onion, artichoke and milk in with the pasta together.   Add a few dashes of salt and pepper.

 
 Spray the baking dish with non-stick coating, then transfer the mixture from the pan to the baking dish.
 
Put Mozzarella cheese and Parmesan cheese on top of the pasta and put in the oven..
Bake for approximately 30 minutes or until the cheese starts browning a little on the top.  I cut into 9 large pieces as it was the main dish, but we still had plenty left over and it should freeze well if you didn't want leftover the next day. 

Wednesday, March 3, 2010

Patching Jeans


While distressed jeans are in fashion, so are patches this season. If you wanted a distressed look but still wanted to keep the cold out, this is a good option. This is good for using on any area except around the zipper of the inside of the legs.

Items used:
Jeans
Jeans fabric scrap for patch
HeatNBond Iron on adhesive
Steam iron
Scissors
Pen
Sewing machine (optional)
Thread (optional)

Put piece of jean materials over area that needs patched and make sure it is at least an inch wider on each side than what needs to be patched and cut to fit.

Put the scrap fabric top of the paper side of the HeatNBond and draw around the edges with a pen, then cut.


On the right side of the scrap fabric, but the shiny side down on the HeatNBond (the paper side will be up) and iron with steam setting until set (about 30 seconds).   Let set a few minutes to cool off - when cool paper should be easy to remove.


Turn the pants inside out.  Position the patch right side (now will be shiny side) of patch to the wrong side of the jeans over the area to be patched and iron on using steam.

Optional - if you want to make it extra secure, you could turn the jeans right side out and stitch around the the distressed area at the edges where it is distressed.  I do this when the area is right around the pockets in the back around the edges up to, but not on, the pocket itself.

Patching Jeans Near a Zipper

Repairing jeans or camouflage pants or shorts with patches using the reverse applique method.

While patched jeans are in trend this year http://www.fabsugar.com/Trend-Alert-Patch-Jeans-6911177 and this method could work for that, but my reasons for doing this are more utilitarian.  I had several pairs of jeans that my son and his Dad asked me to repair because either very worn or completely ripped out near the zipper (which is why the the pictures look different depending on which pair I was patching.  No sooner did I get them patched, they wanted to wear them so I would have to start pictures with the next pair.)  I used a reverse applique method instead of an over the top patch because when I asked my son which one he said a patch over the top was too obvious and people might stare at his crotch -  I sure didn't want that happening!
Items used:
  • Pants that need patched
  • Similar scrap fabric for the patch
  • Scissors
  • HeatNBond Iron on adhesive
  • Steam iron
  • Sewing machine or needle
  • Thread
Turn the pants wrong side out on an ironing board, if torn, scrunch the torn edges together so the edges meet.  Lay a piece of the scrap fabric over the top so that it is an inch or more away from the area that needs to be patched on all sides.
 
Turn the patch right side up and cut pieces of  HeatNBond to put around the edges only - I used scraps that were left over from other projects which is why this one looks so patchy, but it is just to keep it in place to make it easier to sew the patch down without having to mess around with breaking a needle or getting pricked by straight pins.  I would not recommend putting the HeatNBond over the entire patch - I did this once and was told that it made the area too stiff and uncomfortable.

Put the HeatNBond pieces with the shiny side down, paper side up on top of the patch and use a steam iron to iron them to the patch.  I use the setting a notch below the maximum on my iron, but it may vary depending on the fabric content - that might be too hot if there is a high polyester content in the fabric.   Wait a few minutes to allow the strip to cool until they are easy to peel off.
 
After pulling off the paper, flip the patch so the right side of the patch is down on the wrong side of the jeans, position in place. If ripped, be sure to line up the edges of the rip as close as possible.  If a piece goes over a seam on the leg that is not necessary, trim it off, and then iron down with a steam iron.
 
 Turn the pants right side out and stitch around the edges of the worn area or the ripped area.

  Turn the pants inside out again and if there are and loose corners or area near the stitching, trim them off.

Monday, March 1, 2010

Too Small Hoodie to Punked Tunic/Mini Dress

A funky punky tunic/mini dress to wear on the weekends from a too small hoodie.


I got the hoodie over a year ago on clearance after Halloween for $2.50 and it had been in my closet since then and when I pulled it out, it was a wee bit too small,so I ended up revamping it into a punked Tunic/Mini Dress.


Items used:
  • Hoodie
  • 1 yd fabric
  • Sewing machine
  • Thread
  • Straight pins
  • Iron


I started on this over month ago cutting the ribbing off the bottom of the hoodie and up the sides and arms and cutting some of insets but wasn't sure about exactly how I wanted to it to look, but got tired of seeing it in my workbasket and just picked it up and winged putting it together last night. 


I used a top that fit as a guideline to figure out how much to add on the sides compared to the hoodie to be revamped and a mini dress for the length.  You could go through a lot of complicated measuring, but it is easier to go do this and cut bigger than you need and trim down what you don't.

I added what I needed to each side, pinning right sides together and sewing, then cut double the width needed for the skirt then sewed a hem in the bottom.  I next sewed basting stitches along the top 1/2 inch away from the edges on the side, then sewed the sides of the skirt together using 1/2 inch seam then gathered the fabric and pinned it to the hoodie, right sides together and stitched it into place.


It seemed lacking so I decided to add a ruffle around the hood.  It is just fabric that is approximately 3 inches wide and double the length of the circumference of the hood folded it in half with wrong sides together then stitched with a basting stitch 1/4 inch from the edge.  I then gathered the fabric and pinned it inside the edge of the hoodie with the stitches facing towards the just far enough in so I would be stitching the drawstring and sewed it into place.

I then pressed pressed the ruffle up towards the edge of the hoodie so it would just peek out the edges.


I like how the hood ended up looking like a ruffled Peter Pan collar, but it did come out big.  I felt a little like a goth Henrietta Hippo from New Zoo Review http://us.imdb.com/title/tt0296385/combined 
when I first tried it on, but is starting to grow on me as it is sort of fun.  I may take it in on the sides and through the sleeves, but then again, I may just leave it as is to wear on a PMS days to grocery.