Bookmark and Share

Thursday, July 30, 2009

FAIRY HOUSE

A great way to upcycle an old laundry bottle into something creative. This project is based on the fairy houses made over at Filth Wizardry. http://filthwizardry.blogspot.com/2009/07/fairy-houses-and-fairy-wings-for-your.html While a child could decorate it after it is cut out, I would not recommend allowing children to do any of the cutting and if it was to be used in play, sanding down the edges or covering with duct tape. I am using mine as an outdoor decoration under my eaves outside of the garage as it is protected by the elements by the eaves and nearby bushes (and nothing I have ever planted there has grown). Items used:
  • Liquid Laundry detergent bottle
  • X-Acto knife and/or craft scissors
  • Markers
  • Clear Acrylic spray (optional)

Throughly wash and rinse the laundry bottle, remove any labels that you can, then cut a hole in the front. I tried to follow the curves of the bottom.

On the back and side, draw any type of window that you would like.

Use the X-acto knife to cut out the windows.

I made arched windows and a paned one in the back, but you could make them any way you would like.

Decorate the bottle however you would like. I used black market to outline the door and windows.

I also drew squiggles on the bottle in green to represent vines the drew on small "V" shapes to represent leaves.

It is hard to see on the bottle itself, but you can see on the lid that I colored in flowers with a hot pink marker just above the leaves that I had drawn in. I then sprayed the bottle with clear acrylic spray to seal it, but this would be optional. If you use it, go easy on the spray because if you get too much the marker will start to run and bleed.

Your fairy house is now ready for occupancy. I put a small rabbit that I got a thrift store.

Wednesday, July 29, 2009

"PENWHEEL"

Functional and decorative. My son is always running off with my pen, so I decided to craft one he is less likely to do so with and decorate the desk all at the same time. Items used:
  • 1 stick ink pen
  • 1 push pen
  • 1 spool of thread
  • Scissors
  • Printer - pick out a pattern/template at

http://www.craftjr.com/paper-crafts-printable-pinwheels/

  • Markers

Pick out the template that you want to use - I used the ocean print one, but didn't use a color printer http://www.craftjr.com/paper-crafts-printable-pinwheels/ocean-print-pinwheel/ .

Cut out the template. If you used used a black and white printer, color both sides of the paper - if a color printer is used, just color in the back of the template.

Fold acording to the directions on the template, put a push pin in the middle and push it into the end of the pen, the remove the cap and put the tip of the ink pen in a spool of thread.

Tuesday, July 28, 2009

Create A Custom Birthday Card

Create a personalized birthday card to print, post or send using free online clipart and software.
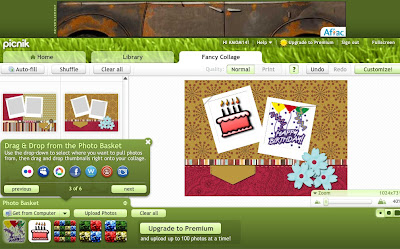
The program used to create the card is the the "Fancy Collage" option at www.picnik.com
The images that I used are free clipart from the following site (right click the image and save it), but you could use photos instead.
Go to the "Fancy Collage" area and pick from the drop down menu on the left hand side the collage format you want to use (I used the free "Brag Book" option), then upload your pictures and drag and drop them into the picture area on the collage. To add the personalized greeting, click on the "Create" tab, click on the "Text" option, then go to the drop down menu on the left hand side of the screen and select the font that you want to use and then type your message. You can then drag the message anywhere on the screen that you want to.
To chose the color of the wording, drag the mouse onto the color you want to use and it gives you a preview of what it will be as you do it. There are also other things you can add, like stickers and frames, but I didn't use it for this card.
When the card looks the way that you want it to, go to the "Save and Share" tab then name your project and save it to your computer and it is ready to print, post or send via an attachment to your intended recipient.

Monday, July 20, 2009

15 Minute Sea Creature Cookies

For when you want to bake special cookies and take and/or serve, but just don't have the time. Clean up is minimal as you slice the cookies on parchment paper right on the baking sheet and mix the food coloring right in the can of frosting. Items used:
  • Refrigerated sugar cookie dough
  • 1 can vanilla frosting
  • Gummy sea creatures
  • Blue Food coloring
  • Baking Parchment paper
  • Knife

I used a bag of octopus and there were 10 of them and ended up with 13 cookies, but you could use any type of gummy sea creatures. Our local Walmart has sharks and even some "Finding Nemo" ones.

Preheat oven to temperature indicated on package, place baking parchment paper, slice into 1 inch slices and place approximately 2 inches apart then place in oven to bake according to package.

While cookies are baking, open up can of frosting and add approximately 15 drops of blue food coloring and mix in the can using knife.

Remove the cookies from the oven and allow to cool, or you can speed up the process by sticking them in the fridge for a few minutes if you have shelf space.

I know, cookies are not suppossed to be square - the reason these turned out this was as that I left the dough out of fridge too long before slicing them - wait until you are ready to start the project before taking out of the fridge to avoid this.

Once cookies are cool, frost them with the blue frosting.

Put your sea creature(s) on the top and you are done!

Saturday, July 18, 2009

Sugar Snap Peas and Mushrooms

If you like ginger, you will love this light crisp pea and mushroom side dish.
I got this receipe at Recipezaar as I wanted to try something other than the standard bacon and/or potatoes with peas.
It got mixed reviews - I loved it as I love ginger in general and this was a light, fresh alternative with almost an Asian flair, but my son didn't care for it because it wasn't the tried and true savory standard of bacon and/or potatoes.
I will depend on your preferences, but I would recommend at least giving this a try as it is quick, easy and something a little different that the same old - same old.
Ingredients:
  • 1 24 oz bag frozen (or 2 cups fresh) Sugar Snap or Snow Peas
  • 1 13-14 oz can (or approx 1 cup fresh) mushroom pieces
  • 1 shallot, thinly chopped or grated
  • 4 TBSP margarine
  • 1 small ginger root (approx 1 1/3 TBSP)
  • A few dashes of salt and pepper

Prepare the peas according to the bag or if fresh, add approx 1/2 cups water, bring to boil then cover with a lid and steam for a few minutes.

While the peas are cooking, chop or grate 1 shallot

Finely chop or grate the ginger

Melt the margarine in a pan and add a few dashes of salt and pepper.

Open the can of mushrooms and drain the liquid.

Add the mushrooms to the butter and cook on medium heat for approx 2 mins.

Mix in the shallots and ginger then add the peas and toss for about 30 seconds and then it will be ready to serve.

Friday, July 17, 2009

Warhol 60's Inspired Tote Bag

Turn a photo in to a retro work of art to carry your groceries in! Items used:
  • 1 tote bag
  • 6 photos
  • Craft Glue
  • Packing Tape
  • Scissors

I used a Walgreens bag that I got on sale for .33 cents (they are normally .99 cents not on sale) and it was larg enough to hold 2 pictures across and 3 pictures down.

The photos are of my son checking out a guitar at a local guitar store and is one of his favorite memories, and they were created using free software at Picnik.com and the basic tutorial on how to tint and make collages is posted here: http://www.cutoutandkeep.net/projects/pop_art_portrait_2/versions/6/edit

I had originally intended on putting pictures over the entire bag and use the four picture collage; however, when I went to pick up the pictures from Walgreens where I had them developed, the head were chopped off on all of the 4 picture collages and none were useable, so I went with what I had left. I chose 6 photos, 1 black and white, 1 tinted, 1 with 50% tint and three with tinted 3 picture collages.

Lay them out how you want them to be on the bag.

I used packing tape across the front of the pictures to protect them, then put glue on the back of the photos 2 at a time and made sure it was long enough on each side to slighly overlap the edge.

Trim off the extra tape from the edge and allow to dry.

Thursday, July 16, 2009

Mint Limeaid

A cool, refreshing summer drink!
I made this twice as the first pitcher was consumed almost immediately after it was made. The first time around I chopped up the mint and then crushed it against the side of the pitcher, but even after I removed most of it my son said he liked the taste, but not the bits of mint in the drink, so the second time I used mint extract and just garnished with mint leaves that he can pick out.
Items used:
  • 3 12 oz cans (or 4 1/2 cups) of Sprite Zero or other lemon/lime drink.
  • 1 Can Frozen Limeaid or 3 fresh limes
  • 1/2-1 tsp Mint Extract or approx. 1/4 cup of fresh mint leaves
  • Ice
  • 1 lime (for garnishment)
  • A few mint leaves (for garnishment)
  • 1 large pitcher
  • 1 large spoon

If using fresh mint leaves, put them in the pitcher first.

Pour the can of limeaid (I let it thaw in the fridge first to make it easier to mix) into the pitcher Pour in the cans of Sprite Zero

Add in the 1/2 tsp-1 tsp (I used 1/2 tsp) to the pitcher.

Chop up the lime, then add it and the mint leaves to the pitcher for garnishing.

Wednesday, July 15, 2009

Garden Guardian Angel Ornament

Make a garden angel ornament using a clear plastic bottle and an angel ornament.
The inspiration for this project was the little plastic angel that did not make it back in the box when the Christmas items were put up and has been sitting on my desk for 6 months, but I have also seen ones at the dollar store that would work as well.
Items used:
  • Clear Plastic Bottle
  • Small Plastic or Glass Angel
  • Decorative Stones
  • 1 Large Jump ring
  • Gold Acrylic Paint
  • Small sponge brush
  • Cardboard
  • Clear Acrylic Spray (optional)
  • Caulk (I used a single use caulk)
  • Clear Glue (I used Amazing Goop)
  • Box Cutter
  • Craft Scissors
  • Push Pin

The bottle you use depends on the size of angel that you have as it needs to be able to fit in the bottom. Remove the labels from the clear plastic bottle.

Paint top of the lid of the bottle with the gold paint. When dry spray with the clear acrylic sealant.

Paint a cross on the cardboard using a brush, allow it to dry then cut it out.

Flip it over and paint the other side.

For this side, which is the side I used facing out, I textured the paint by dabbing it with the sponge brush and squishing it down.

Use a box cutter (I tried using a regular knife and it was not sturdy enough and scratch the front) to start a cut along about an inch from the bottom, then use the craft scissors to cut the shape of a door.

This is what it will look like when you are done.

Put the cross in the bottle (you may have to trim it to fit).

Apply the clear glue to the edges to hold the cross in place.

Squeeze the caulk into the bottom of the bottle and distribute it evenly using the end of the sponge brush.

I put a decorative stone on the back of each edge of the bottle.

Put the angel in the bottle and press it down slightly into the caulk.

Use a push pin to make a hole in the door and a hole just to the right of the door.

Put the large jump ring through the hole and bend to close and you are done.

I put mine out on a piece of marble and put 4 decorative stones in the front, but you could put it wherever you like.