Bookmark and Share
Showing posts with label MADE. Show all posts

Thursday, July 26, 2012

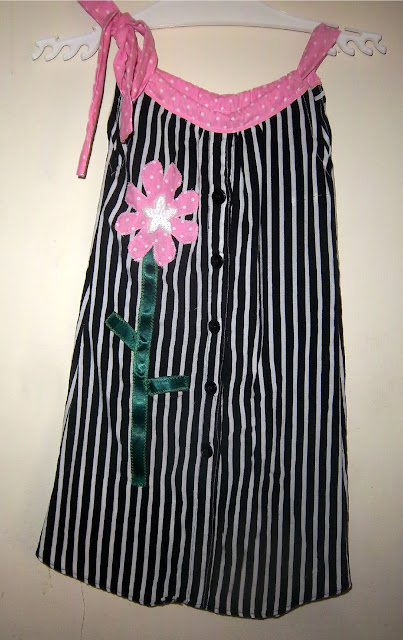
Girls Dress from a Ladies Blouse


When I pulled the blouse from my closet I had originally thought of doing a Tim Burton themed dress, but as I plan on donating it to Dress A Girl Around The World and I didn't want to scare little the little gals that may not understand the reference so I decided to decorate with a cheery flower instead.

This size 4-6 slim girls dress was made using a free pattern and instructions by Dana from "Made" using a women's size 10 blouse, around 1/3 yd of contrasting fabric, green ribbon and a sequin embellishment.

The only variations on this dress is I added I cut two pieces for the front and the back that were 3 inches tall and the width of the top of the pattern and stitched it to the dress to thread the drawstring through to make it easier to adjust and added a flower embellishment on one side.

Items used:

  • Free pattern and instructions from Dana from "Made"
  • Women's blouse (I used a size 10)
  • 2 pieces of fabric 2 1/2 inches by 26 inch fabric for bow
  • 2 pieces of fabric to sew to the top of the dress
  • Printer and paper
  • Black fabric paint
  • Scissors
  • Iron
  • Sewing machine and matching thread 
  • Straight pins
I followed the instructions up to cutting out and stitching armholes and gather stitching to each side and I made it about 2 inches longer than the pattern.


For the flower, I folded a three inch square into quarters and cut the shape to the right and zigzagged  the top of the flower leaving the bottom open on the front of the dress


I then cut two six inch pieces of ribbon and another around 10 inches.  I folded the two six inch pieces in half and pinned them to the back of the long piece to represent leaves and pinned the top piece underneath the flower and zigzagged the stem piece down.

I then finished zigzagging the bottom of the flower down.


For the embellishment in center I used a sequined start I had gotten in a notions grab bag from Michael's and stitched in down using the machine, but a button could be used instead.

I also top stitched near the buttons to keep them closed (they are more for decorative purposes now).

As indicated above, sewed the 3 inch tall pieces (pink polka dotted) to the front and the back using 1/2 inch seams, pressed under 1/2 inch and then top stitched down.

Right sides together, I stitched the sides  then stitched the long bow piece together and used a safety pin to thread through the shoulder on one side then tie in a bow on the other side.


Linking up to:

Saturday, July 14, 2012

Girl's "Froggy" Dress from a T-Shirt

This is another variation of the "Warhol Dress" by Dana from "Made" that I am making for donation to Dress A Girl Around The World, a non-profit organization that distributes the dresses to little girls around the world that do not have any.  I was able to complete this dress in around 3 hours watching television and the cost to make was under $3.
  • Free pattern and instructions from Dana from "Made"
  • Printer and paper
  • T-Shirt (Women's large-had been a promotional t-shirt for a local radio station "Froggy 106.7")
  • 1/2 yard of coordinating fabric
  • Iron on rose (optional)
  • Scissors
  • Iron
  • Sewing machine and thread 
  • Straight pins
  • Saftey Pin (for turning the tie inside out)
I started out with the t-shirt and I folded it in half, making sure the design was centered.

I used the base dress pattern and added 1/2 inch to each side to make it a Size 3-4.  Instead of positioning the pattern at the bottom and using the t-shirt hem as the hem of the dress, I positioned it as close to the neckline as I could as I wanted to use the design on the t-shirt.  I pinned through all layers and cut out the dress and marked the gathering lines with a slight cut at the edge.


I stitched the gathering lines and gathered and pressed under at the armholes 1/2 inch and top stitched in place using contrasting green thread as indicated in the original instructions.

Another modification made was instead of sewing the ties directly to the dress I sewed a piece of the contrasting fabric that was 3 inches tall and around 1/2 inch shorter than width of the dress (1/2 seam allowance).
freeonlinephotoeditor

I turned the edges under on each side and turned the edge under 1/4 of an inch under on the open edge and pressed under and pressed the seam up toward the contrasting fabric.  I pinned the pressed edge to the edge of the seam from the top side and top stitched along the edge on the front side catching the fabric underneath.

For the ties, I cut two pieces of fabric 26 1/2 inches long and 3 inches wide of the contrasting fabric.  I sewed the two pieces, right sides together, using 1/2 inch seam.  I then pressed in half, right sides together and sewed along the edge using 1/2 inch seam and used a safety pin to turn right sides out.

I then threaded each edge through the opening at the left shoulder of the dress and the bow is tied on the right.


For the ruffle at the hem I cut two pieces - both 3 inches tall; one was the length of the fabric, 44 inches and another was 16 inches for a total of 60 inches for the ruffle.

First I pressed a hem up 1/2 inch from the bottom edge and stitched 1/4 of an inch from the edge.

Next,  I made a gathering stitch the entire length up to 1/2 inch away from each edge and gathered the material.  Then, right sides together, stitch the piece together.

Then, pinning with the seam at one edge of the dress, right sides together, evening out the gathers, pin then stitched 1/2 inch from the edge all the way around.

As I noticed there was a slight imperfection below the logo when it was completed, I decided to use an iron-on rosette that I purchased at Walmart that was on clearance for 50 cents as it reminded me a bit of a lilly pad, even thought it is red.

I do have some other craft projects in the works, but have been focusing on the dresses as I plan to mail them out in bulk to Dress A Girl Around The World.


Linking up to:
Funky Junk's Saturday Nite Special


Thursday, June 14, 2012

Bicycle Dress from T-Shirt

 This size 3-4 girls dress was made using a free pattern and instructions by Dana from "Made" using a large t-shirt.  The only variations that I made is instead of freezer paper stenciling a banana for the "Warhol" dress, I used free clip art from The Graphics Fairy of a Vintage Bicycle and added a ruffle at the bottom using a decorative stitch.

Items used:
  • Free pattern and instructions from Dana from "Made"
  • The Graphics Fairy of a Vintage Bicycle
  • T-Shirt (I used a women's large)
  • 2 pieces of fabric 2 1/2 inches by 26 inch fabric for bow
  • 1 piece of fabric 2 inches by 36 inches for ruffle
  • Printer and paper
  • Black fabric paint
  • Scissors
  • Iron
  • Sewing machine and matching thread 
  • Straight pins 

I followed the instructions up to cutting out and stitching armholes and gather stitching, but before stitching together I printed off a half-page image of the bike then played around with where I wanted to position it on the dress.


 Using the black fabric paint I went over all of the black lines with black paint the positioned it on the t-shirt with the paint side down and lightly patted it down to transfer the image (Note:  it will be a mirror image to whatever image you are transferring, so it won't work with lettering).


For the remainder of the dress, I followed the instructions.

I also added a two inch ruffle (approximately 1 yd wide) at the bottom, using an iron to press up a 1/2 inch hem then stitching down and using a gather stitch at the top.  I then sewed the ends together, pinned underneath the shirt at the hem then applied the decorative stitch to finish.

Linking up to: