Bookmark and Share

Saturday, January 30, 2010

Presto Pasta Nights #148

 
 I am participating in Presto Pasta Nights being hosted this week over at Sweet and Savory.  I am contributing my Frugal Quattro Formaggi Plus.   If you are a pasta lover, go over and check out all of the other tasty links.over at Presto Pasta Nights.

Thursday, January 28, 2010

Banana Nut Chip Bread


A new twist on an old favorite!   I had several ripe bananas that I needed to use and went in search of a different banana bread recipe and found this one by Ray Lux over at All Recipes http://allrecipes.com/recipe/banana-nut-chip-bread/detail.

 Ingredients
  • 4-5 Ripe Bananas
  • 1 1/4 Cups Sugar
  • 3 Eggs
  • 1/3 Cup Vegetable Oil
  • 1 TBSP Vanilla Extract
  • 2 1/4 Cups Flour
  • 3/4 Cup Quick-Cook Oats
  • 2 tsp Ground Cinnamon
  • 1 tsp Baking Powder
  • 1 tsp Baking Soda
  • 1 tsp Salt
  • 1/4 tsp Ground Nutmeg
  • 1 Cup Semisweet Chocolate Chips
  • 3/4 Cup Chopped Walnuts 
  • Non-stick coating spray
Makes 2 loaves
Bake time:  50-55 minutes

Preheat oven to 350 degrees.  2 loaf pans are needed - recommended size is 8x4 inch each.   


Puree Bananas in food processor.  If you don't have a food processor, you could just mash the bananas.


Add the eggs, vegetable oil, vanilla and sugar to the bananas and mix throughly.
In a large bowl, mix together flour, oats, cinnamon, baking powder, baking soda, salt and nutmeg


Add banana mixture to the bowl and mix thoroughly.


Add in the chocolate chips and the nuts


Spray both pans with non-stick coating


Pour batter in the pans.  Since I used disposable pans, I put them on a cookie sheet before putting them in the oven.
Bake 50-55 minutes - until you can put a toothpick or fork in the center and it comes out clean.  Remove and allow to cool for 10 minutes, then serve. 


I am also linking this up to Creative Jewish Mom's Craft Schooling Sundays

Click on the hyperlink and go check out all the wonderful creations by others!
 

Saturday, January 23, 2010

Warhol Inspired 60's Gift then Tote Bag


This was made a gift bag for a birthday for someone who had seen one I had made similar to this and then it can function as a tote bag afterward.  This is similar to a bag I had made previously here:

http://craftsandcreationswithkathy.blogspot.com/2009/07/warhol-60s-inspired-tote-bag.html.   

Items used:
  • Tote Bag
  • 1/2 yd. Clear Plastic Sheeting
  • Amazing Goop or Craft Glue
  • Hot Glue Gun
  • Scissors
  • Pen 
  • 11-12 collage photos*

The tote bag is one that I got at Meijers awhile back and the plastic sheeting was a remnant from Walmart's fabric department for 50 cents, but I have also found plastic sheeting before at sometime in hardware stores.


*The photo collages for this project are similar to the tutorial here using the free software at www.picnik.com:   http://www.cutoutandkeep.net/projects/pop_art_portrait_2/versions/6/edit.   


One thing I found out the hard way was when I had prints made up for with four pictures collage that the top was cut off from the top and  of the picture on the top row and the bottom of the picture on the bottom row.  To fix this I used free software from http://www.irfanview.com/ to get a black background then used a screen capture program (http://download.cnet.com/ScreenShot/3000-2192_4-10423334.html - it is a free download) and made the screenshot approximately 550 pixels tall and 785 wide.

This is what it looked like after doing this and I didn't have any problems with the top or bottom being cut off when I had the photos printed off at Walgreens.

Use Amazing Goop or craft glue to glue the pictures on the tote bag.  I used 6 on the back and 5 on the front because the tote bag I got from Meijers had a pocket on the front and I only put pictures on up to the pocket.  Allow time for the glue to dry. 


Next put the bag on the plastic sheeting and trace the bag  around it twice.  It is better that it is a bit bigger than the bag and you can trim off any excess.  Cut along the lines.

Position the plastic o the bag and use hot glue on the edged on the bag then press the plastic into place doing a little bit at a time.

Do the same thing on the front of the bag.    
Once the plastic is glued down on both sides, trim any plastic that is hanging over the edges with a pair of scissors.


I am linking this up to Creative Jewish Mom's first Craft School Sunday Blog.  http://www.typepad.com/services/trackback/6a011570601a80970b0120a803d82a970b.   Every Sunday she will be hosting where crafters and foodies from around the world can share their links via a McLinky.

Also linking up to

Making

Tuesday, January 19, 2010

Adding Translation to another language in Blogger

Add script to blogger to translate your blog into 54 different languages by clicking on the country's flag.

I am trying to become more blog literate and when I had trouble with getting pictures to upload I got tips from  The Real Real Blogger Status.   There is now code and instructions on how to add a translation option to your blog here:

Pictures always help me with trying to learn something new, so I will include some.

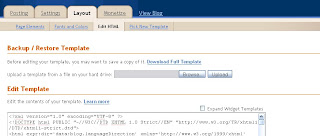
Before you do anything to change your layout ever (and one I learned the hard way) go to the Layout tab, then click "Edit HTML" and highlight and copy everything in the box and save it to a text document and save it.  If something goes completely awry because you have gotten distracted and deleted/added something you can copy the original layout back and start over.


Click on the "Layout" tab in Blogger (is the third tab over) then click on "Add A Gadget"

It will take you to another screen, click on the  "HTML/Java Script" option.


It will take you to the Configure HTML/JavaScript screen.   I titled mine "Translator" and typed that it, but you could type in what you want.

Go to http://blogging.nitecruzr.net/2008/02/make-your-blog-speak-more-languages.html and highlight and copy the text indicated exactly indicated in the post and paste into in the box.


The only thing you need to change is a few lines down you will see


Delete what is highlighted in red (it will not be red in the box, this is just to show you the text to delete) and where that text was insert your blog's web address.

Save and go check out the new tool for your blog.  Click on the flag and it will translate your blog into that country's language.   To check the language, hover over the flag and it will come up. I played around with and so far have found the links on all of the flags to work.  The only thing is that you cannot jump from one flag to another, you have to hit the back button and go back to your blog to try a new flag/language.