Pages

Saturday, June 15, 2013

Campfire Starter

Easy to make campfire starters from items you normally throw away.

Some former co-workers and I are going to go on an overnight camping trip in July, which is going to be an adventure for me as the closest I have ever been to camping is staying at Motel 6, but I remembered making these at Girl Scout daycamp when I was young and they are useful for starting a campfire.


Items used:
  • -   Toilet Paper Tube
  • -    Dryer Lint
  • -    Scrap paper or Napkin
  • -    String


Stuff the dryer lint inside the toilet paper then wrap the paper or napkin around the toilet paper tube.


Scrunch the ends into the end of each tube and then tie string around the end to secure.


Linking up to:
30 Days of Creativity
Stutt Your Stuff Saturday at Six Sisters Stuff

Friday, June 14, 2013

1 Minute Pen Makeover With Duck Tape

Quick and easy way to turn a plain ball point pen into a snazzy pen.

This was inspired by a desk set my supervisor has at work that she and her granddaughter made using one of the many wonderful print Duck Tapes that are now on the market.

Items used:

-   Ball Point Pen
-   Duck Tape
-   Scissors

The Duck tape I bought was more the consistency of packing tape and I got off of a clearance rack at Walgreens for .79 cents, but I think any Duck (or Duct) tape would work.


To be sure the cap still fit on both ends I laid out the tape and cut to length leaving some of the original pen exposed on both ends, laid the pen and one end of the tape as pictured and carefully rolled it up.

For the cap (not picture) I cut a small piece to wrap around the handle area of the cap first, then piece that was long enough to fit up to just where the handle meets the cap and wrap it around, then a piece fit from the top of the handle to a little over the top of the pen, wrap it around, pinch the tape shut at the top and then snip off the remaining excess at the end.

Linking up to:
30 Days of Creativity


Sunday, June 9, 2013

Coin Catcher

This is for a Father's Day present next week and cost under 20 cents to make.

This is another incarnation of Soap Dish from Bottom of 2 Liter Bottle except the purpose is for it to be a catchall for change or perhaps a wallet and cell phone.

To make follow the instructions from here except that instead of rhintestones you will need 18 pennies to glue around the edge.

You will also want to let it dry upside down as the weight from the pennies will cause it to slide down if upright; this way they are nice and neat against the edge.


Linking up to:

Unicorn and a Rainbow Notebook

As it seems my son will use whatever notebook is handy as his own, I decided to come up with one there is no way he would want to be seen.

It was painted with a layer of blue acrylic paint then glued on with craft glue a unicorn drawn on a scrap of fabric with black fabric paint and outlined in dimensional paint.   The rainbow consists of nail polishes from my stash as some of my Sharpies have gone dry.

After taking the picture I wrote "Happy Thoughts" in the lower right hand corner with a purple Sharpie to balance it out a little more

Nope, he won't be toting to his automotive classes.  

Linking to
30 Days of Creativty

Saturday, June 8, 2013

Refashion of Girl's T-Shirt to Dress

This is a dress I made for donation to Dress A Girl Around The World and it for a Size 8 girl.  The skirt is only slightly gathered, but if you wanted a fuller skirt you could double up on the yardage cut two pieces, on for the front and another for the back.

Items used:
  • T-shirt 
  • T-shirt in contrasting color (I was able use the sleeves off of an adult t-shirt)
  • Half a yard of fabric
  • Dollar Store Lei
  • Button
  • 1/2 yard of fabric (more for larger sizes)
  • Sewing machine and thread
  • Scissors
  • Straight Pins
  • Iron
  • Ziplock baggie (optional)
  • Needle
  • Clear or sparkly Nail Polish
This a Size 8 girls t-shirt, but it the same concept could be used to make any size.

First I cut the sleeves and about halfway down on the t-shirt off.

Save the bottom for a different project.


Cut 2 strips of the contrasting fabric 4 inches wide and as long as the width + 1 inch. (1/2 inc for seam allowances.

Right sides together stitch the two strips together. Press seams open.

Pin the right side of the strip to the right side of the t-shirt with the seams at the side of the t-shirt and stitch together.


 For the bottom skirt, fold the right side to the wrong side  1/2 all the way around at the bottom, then fold up  1/2 inch again the top stitch 1/4 inch away from the edge all the way around.
Run a basting stitch 1/4 of an inch and 1/2 inch from the edge at the top up to 1/2 inch from each edge and leaving the threads long so the fabric can be gathered.

Right sides together, pin the long side of the fabric together in and stitch.  Press seam open.

Right sides together pin the back seam at the center back of the t-shirt (find center back by folding t-shirt in back and then insert a straight pin.  Gather and pin then stitch.


Take the Dollar Store Lei apart by clipping the string.   For easier clean up I opened a ziplock baggie and pushed everything off the string into the bag (there are little clear plastic pieces in between each flower that can be hard to see and they can mess up a vacuum cleaner).


To help prevent the edges of the flower from fraying and used sparkly nail polish around the edges of the three flowers I chose and also put a little on the button and allowed the to dry before stacking the flowers on top of each other and pinned them to the dress.

Put the button in the center and hand stitch the flowers/button to the dress.


Linking up to:
30 Days of Creativity


Happy Crafting!


Sunday, June 2, 2013

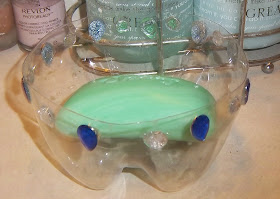
Soap Dish from bottom of 2 liter bottle


I was inspired by a post at Alessia's Scrap Craft to create my own version of the bottom of 2 liter plastic bottle into a soap dish, although I made mine taller.  Not only does it cost almost nothing to make, it keeps the soap from getting soggy and gross on the bottom.

Items used:
  • 2 litter plastic bottle
  • Kitchen shears, Xacto Knife, box cutter or some other method to cut the bottle
  • Rhinestones 
  • E6000 or other strong clear glue
  1. Decide how tall you want your soap dish to be.  I used a line that was already on the bottle below the label for a guide.
  2. Cut the bottom off of the bottle (I used kitchen shears as I found I have better control over keeping the even, to start the cut, pinch the plastic slightly, cut, then insert one of the blades inside the bottle).
  3. Glue rhinestones around the edge - I alternated blue and clear about and put them the length of 2nd bend in my index finger as a rough guide, but you could glue them wherever you wanted.
Happy crafting!

Linking up to:
30 Days of Creativity

Saturday, June 1, 2013

Ruffles and Bow Baby Blanket

This is a baby blanket I made for great-niece, Tegan.  Isn't she a cutie?
I wanted to make something befitting of a little princess and came up with a ruffles and a bow baby blanket and large enough to last her through the toddler years.
  • 1 yard stretch fleece (I bought at Hancock Fabric, but any colorful fleece would work)
  • 1 yard fleece coordinating or contrast fleece for the ruffles and the bow 
  • Matching Thread
  • Sewing Machine
  • Straight Pins
  • Scissors
  • Iron
Cut the coordinating fleece into into seven 4 1/2 inch strips.

Sew six of the strips together using a half inch for the seam and sewing the two ends together to make a circle.

On one edge use a gathering stitch (I broke mine into several sections for more uniform gathering).

Pin and gather around the edges of the stretch fleece evenly and stitch together.

To finish off the edges, press the seam allowance toward the blanket, pin and iron, then top stitch all the way around the trim off the edges underneath up to the top stitching.  It will look like the picture to the side.


For the bow:
Cut a 24 inch piece off of the remaining strip.  Stitch the two ends together then fold so that the stitched part is in the center, right sides together.  Pin and stitch one side, then part of the other side, but leave a small opening large enough to turn inside out then  hand stitch the opening shut.


In the center on the back side of the bow fold each edge towards the center and pin.  Stitch down approximately 1/2 inch away from the center seam in back to secure the pleats.

Cut a piece off of the remaining strip about six inches long fold each end in to create a strip, wrap it around the bow and stitch it to the bow then stitch it to the blanket.


Linking up to

30 Days of Creativity