Bookmark and Share
Showing posts with label sewing. Show all posts

Sunday, February 17, 2013

Vintage Inspired Convertible Capelet from a Sweater

Give an old sweater a new life!  

I got the sweater as present but never wore it because unless I wore a long sleeve shirt  underneath it was itchy, so I decided to turn it into something more useful with versatility.  

It is convertible in that it can be worn three different ways depending on your mood, but my favorite is the Vintage Inspired Capelet that has sort of a 1930's vibe to it.   Also, the "flower" is put on a pin back and can be used on its own.

Items used:
-  Sweater
-  Sewing machine and thread
-  Scissors
-  Straight Pins
-  Pin back
-  Velcro
-  Cylindrical object (I used a margarine tub lid)
- Seam gauge or ruler
- Paper
- Pen or Pencil
- Hot glue gun or needle and thread.
First flip the sweater upside down and cut straight across off underneath the arms from side to side.

The bottom part is what you will use to make the shrug.

Save the top part can be used to make the band and the flower and the sleeves can be saved for another future project (leg or armwarmers).


For the cut edge, use a zigzag or serger stitch to prevent unraveling all the way around and stitch 5/8 inch away from the edge as another preventative measure.


Turn under on the wrong side and stitch down all the way around and stitch 1/2 inch from the turned under edge

You now have the basic capelet completed (the first smaller picture above).


Now for the flower.  Place the cylindrical object on the paper, draw around it and cut out on  paper cut it out.

Next fold the paper into a quarter then measure in 1/2 inch or so in and cut away.  Repeat.

Pin the outside and middle layers along with the center onto the top portion of the sweater.and cut out each.  You will have 3 descending sizes of circles when you are done.


The large ring is for the bottom of the flower, the medium in the middle and the smallest center is for the top of the flower.

Zigzag or serge around the raw edges on all three circles.


Next, on the top side, using a basting stitch on the machine (or you could also do this by hand) sew a small quarter or other large coin size circle in the middle of each circle and leave  the tails on each end long as you will be gathering them up.


On the bottom side of each circle, gather up the threads and tie in a a knot on each and it will create at "bump" for the center of the flower.   Stack them on top of each other starting with the largest at the bottom, the medium one in the center and the small on on the top and push the "bump" in the center up into the next one.   Stitch around the center "bump" to secure all layers together.

Clip any lose threads and either use a hot glue gun or stitch the flower the pin back.  The pin can be used on this project or to pretty up anything else you would like.


To make the band cut a strip from the top of the sweater that is 8 inches long and 4-5 inches wide.   Zigzag or serger around the edges to keep it from unraveling.

Fold in half, right sides together and stitch one end and the long side together.  Turn inside out and zigzag the open end together (it doesn't look pretty but it isn't going to show as it will be on the inside of the shrug when it is used.    Stitch one side of the velcro to one side, flip over and flip another piece of velcro to the other side.

To use with the shrug, gather up the fabric on the shrug and wrap so the center of the band is on the outside and the two pieces of velcro hook together on the inside (third small picture above).  You can also move the band around to create a different look

For the look in the large picture above, the band was moved off center and the flower pinned to the band through the band the the shrug to secure it in place.)

Although I didn't take a picture of it, you could also use the shrug loose and pin the flower on it somewhere.  It could also be pulled up over the back of the head to create a mobius or scrunched and twisted for a cowl/infinity scarf look.

Thanks for stopping by and have a great day:)

Linking up go:


Tuesday, June 19, 2012

Yellow Dress for 6-12 month old

I made this dress entirely out of scraps using a free pattern and instructions from My Measuring Tape
and will fit an infant size 6-12 months.

To add the seam allowance to the pattern I used a popsicle stick for the width on paper, cut a little beyond the line and used a glue stick to glue to the pattern

I varied from the instructions in that I used double fold bias tape to finish the neck and arm holes and instead of using two different fabrics for the panels, I used four and for the bottom I used the hem cut off from a skirt that was too long.   Instead of using a button I sew on a strip of velcro. 

        Free Pattern & Instructions here

Items used:
  • Scraps from 6 other projects/alterations (if buying new under 1/2 yard for the panels and less for bodice and the bottom.
  • Printer and paper
  • Scissors
  • Glue Stick
  • Popsicle Stick (used to measure seam allowance)
  • Sewing machine and matching thread
  • Straight pins
  • Iron
  • Velcro
I also didn't use skirt panel A where it said to cut 8 pieces as I didn't find where it was needed anywhere; perhaps is a variation if you wanted to add below the bodice but before the skirt panels.

This is for Day 18 of 30 Day of Creativity with the theme being "Yellow" and is for donation to Dress A Girl Around The World, a non-profit organization that collects dresses and distributes them to girls around the world.

Thursday, June 14, 2012

Bicycle Dress from T-Shirt

 This size 3-4 girls dress was made using a free pattern and instructions by Dana from "Made" using a large t-shirt.  The only variations that I made is instead of freezer paper stenciling a banana for the "Warhol" dress, I used free clip art from The Graphics Fairy of a Vintage Bicycle and added a ruffle at the bottom using a decorative stitch.

Items used:
  • Free pattern and instructions from Dana from "Made"
  • The Graphics Fairy of a Vintage Bicycle
  • T-Shirt (I used a women's large)
  • 2 pieces of fabric 2 1/2 inches by 26 inch fabric for bow
  • 1 piece of fabric 2 inches by 36 inches for ruffle
  • Printer and paper
  • Black fabric paint
  • Scissors
  • Iron
  • Sewing machine and matching thread 
  • Straight pins 

I followed the instructions up to cutting out and stitching armholes and gather stitching, but before stitching together I printed off a half-page image of the bike then played around with where I wanted to position it on the dress.


 Using the black fabric paint I went over all of the black lines with black paint the positioned it on the t-shirt with the paint side down and lightly patted it down to transfer the image (Note:  it will be a mirror image to whatever image you are transferring, so it won't work with lettering).


For the remainder of the dress, I followed the instructions.

I also added a two inch ruffle (approximately 1 yd wide) at the bottom, using an iron to press up a 1/2 inch hem then stitching down and using a gather stitch at the top.  I then sewed the ends together, pinned underneath the shirt at the hem then applied the decorative stitch to finish.

Linking up to:

Monday, June 4, 2012

Jeans to Tote Bag


 This is for  30 Days of Creativity and the theme for Day 4 is Trousers, so I decided to turn a pair of jeans into a girly tote bag.   I used tulle as an accent through the belt loops but any fabric or even a belt could be used.

Items used:
  • Jeans or pants with belt loops
  • Scissors
  • Sewing Machine and thread
  • Rope 
  • Tulle (off of a roll from the Dollar Store - approx. 12 inches wide  & 3 yds)

Cut pants off straight across above the crotch.

Zigzag around all edges to prevent fraying.

Turn inside out and pin together at the bottom and stitch 5/8 inch away from the edge.  Trim corners and turn right side out.


For the handle, I cut 2 pieces of rope a little over a yard long each and sewed to the pants 3 inches away from each edged on each side.  If the rope you use is polyester, you can seal the edge using a lighter or candle before applying to the jeans.


Cut the tulle at a diagonal on the edges, thread through the loops and tie in a bow.


Linking up to:

Wednesday, May 16, 2012

Free Online "Sewing Machine 911" Class at Craftsy


Craftsy is currently offering a free online sewing class "Sewing Machine 911" with Claudia Miller.

I signed up and have gotten up to the first lesson and even though I have been sewing since I was in grade school and somewhere above but not quite intermediate sewer, I did learn a thing or two that I did not know before.

There are 5 segments:

1) Introduction
2) Parts
3) Types of Machines
4) Troubleshooting
5) Machine Hygiene


In addition to the online video, you have the opportunity to type in questions and others that are taking the class can answer them (and vice versa) to have a more interactive experience.  You can also take "notes" while you are watching the video that you can refer to later.

If you take watch the entire course online it will take about 80 minutes.  I would recommend it for beginners or anyone wanting to brush up on knowing more about sewing machines.

To sign up for the class click here

Disclaimer:  I have no affiliation with Craftsy and have and will received nothing for this post or referring anyone to Craftsy.

Monday, September 26, 2011

FREE PATTERN DRAFTING BOOK DOWNLOAD

One of the blogs that I follow, Off The Cuff ~Sewing Style~ posted the link below for a download of the above book Modern Pattern Design: The Complete Guide to the Creation of Patterns as a Means of Designing Smart Wearing Apparel,  by Harriet Pepin (1942).

In looking over the download, it is very comprehensive and even though it is from 1942 and would be great for vintage sewing, but it is not limited to that as many of the techniques could be incorporated into a project to give it a modern look.

For the link to the free download, please visit:
Off The Cuff ~Sewing Style

EDIT:  7/31/12 - link now appears to be dead, but I did find an online version at  Vintage Sewing Info and one from a Spanish blog here, although the text is in English.

Saturday, May 7, 2011

EASTER VEST

Photobucket

Photobucket
I thought I would share this oversized vest I made when my son was little to wear around Easter and I thought I would share as I have gotten lots of compliments on it over the years.

This is a vest made out of pre-printed fabric and fabric, but the pictures are simple and the ideas could easily translated using fabric scraps and fabric paints.  Use an existing vest as a template for the sizing (or make it bigger if you like (be sure to add 1/2 inch all the way around for the seams.  


For the pink flower on the front just use a piece of fabric around 10 inches long and four inches wide, sew a gathering stitch at the bottom, gather and roll into a flower and hand sew where you would like.  

The 2 ties in back are about 10 inches long by 3 inches wide.


I chose to line mine using an old sheet, but you could leave it unlined.  Before sewing the vest together I used the pieces cut out for the front and the back, pinned them to the sheet and then cut out.   I then sewed the vest then and then lining then put the right sides together and stitched all the way around the vest (except for the armhole) leaving an approximate 4 inch opening at the bottom.  I then turned right sides out and hand stitched the edges together at the bottom. 

For the arm holes I pressed the seams under 1/2 inch on each arm hole and hand stitched together, but you could machine stitch 1/4 inch from the edge to save time.

Monday, December 20, 2010

LIMITED SELECTION OF FREE SEWING PATTERN DOWNLOADS AT HOMESPUN THREADS

For a limited time only, Homespun Threads is offering patterns a limited selection of  sewing patterns with instructions to download and print for free.

There are several cute baby items, totes, and bags.  I downloaded some baby shoes, the pocket bib and the Sash Handbag  that I plan to make after the Holidays are over.


Image: Aleksandr Kutsayev / FreeDigitalPhotos.net

Wednesday, March 3, 2010

Patching Jeans


While distressed jeans are in fashion, so are patches this season. If you wanted a distressed look but still wanted to keep the cold out, this is a good option. This is good for using on any area except around the zipper of the inside of the legs.

Items used:
Jeans
Jeans fabric scrap for patch
HeatNBond Iron on adhesive
Steam iron
Scissors
Pen
Sewing machine (optional)
Thread (optional)

Put piece of jean materials over area that needs patched and make sure it is at least an inch wider on each side than what needs to be patched and cut to fit.

Put the scrap fabric top of the paper side of the HeatNBond and draw around the edges with a pen, then cut.


On the right side of the scrap fabric, but the shiny side down on the HeatNBond (the paper side will be up) and iron with steam setting until set (about 30 seconds).   Let set a few minutes to cool off - when cool paper should be easy to remove.


Turn the pants inside out.  Position the patch right side (now will be shiny side) of patch to the wrong side of the jeans over the area to be patched and iron on using steam.

Optional - if you want to make it extra secure, you could turn the jeans right side out and stitch around the the distressed area at the edges where it is distressed.  I do this when the area is right around the pockets in the back around the edges up to, but not on, the pocket itself.

Patching Jeans Near a Zipper

Repairing jeans or camouflage pants or shorts with patches using the reverse applique method.

While patched jeans are in trend this year http://www.fabsugar.com/Trend-Alert-Patch-Jeans-6911177 and this method could work for that, but my reasons for doing this are more utilitarian.  I had several pairs of jeans that my son and his Dad asked me to repair because either very worn or completely ripped out near the zipper (which is why the the pictures look different depending on which pair I was patching.  No sooner did I get them patched, they wanted to wear them so I would have to start pictures with the next pair.)  I used a reverse applique method instead of an over the top patch because when I asked my son which one he said a patch over the top was too obvious and people might stare at his crotch -  I sure didn't want that happening!
Items used:
  • Pants that need patched
  • Similar scrap fabric for the patch
  • Scissors
  • HeatNBond Iron on adhesive
  • Steam iron
  • Sewing machine or needle
  • Thread
Turn the pants wrong side out on an ironing board, if torn, scrunch the torn edges together so the edges meet.  Lay a piece of the scrap fabric over the top so that it is an inch or more away from the area that needs to be patched on all sides.
 
Turn the patch right side up and cut pieces of  HeatNBond to put around the edges only - I used scraps that were left over from other projects which is why this one looks so patchy, but it is just to keep it in place to make it easier to sew the patch down without having to mess around with breaking a needle or getting pricked by straight pins.  I would not recommend putting the HeatNBond over the entire patch - I did this once and was told that it made the area too stiff and uncomfortable.

Put the HeatNBond pieces with the shiny side down, paper side up on top of the patch and use a steam iron to iron them to the patch.  I use the setting a notch below the maximum on my iron, but it may vary depending on the fabric content - that might be too hot if there is a high polyester content in the fabric.   Wait a few minutes to allow the strip to cool until they are easy to peel off.
 
After pulling off the paper, flip the patch so the right side of the patch is down on the wrong side of the jeans, position in place. If ripped, be sure to line up the edges of the rip as close as possible.  If a piece goes over a seam on the leg that is not necessary, trim it off, and then iron down with a steam iron.
 
 Turn the pants right side out and stitch around the edges of the worn area or the ripped area.

  Turn the pants inside out again and if there are and loose corners or area near the stitching, trim them off.

Monday, June 8, 2009

SEA MONSTER GLOVE PUPPET

This craft was created for Sherry at About.com Family Crafts challenge on what to make with a lonely glove that had lost its mate and I am proud that it has been featured on her site: http://familycrafts.about.com/od/glovecrafts/a/seaglovepuppet.htm

When my son was little he had a whole collection of "glove puppets" that he enjoyed playing with (although is favorite was mosquito that he nicknamed "Nipper"). I was pressed for time, so I made this simple project to demonstrate what you can make with a lonely glove.

Items used:

  • 1 glove
  • Scraps of fabric or felt
  • Scissors
  • Needle and thread
  • Sewing machine (optional)
  • Fiberfill (optional, can use scraps of fabric)
  • Piece of scrap cardboard
  • Fabric paints
  • Lid off a margarine tub

To make the head, I used the lid of a small tub or margarine to cut out a circle.

I then ran a basting stitch all the way around the edge, then gathered it up slightly and stuffed it with fabric scraps and finished gathering it up until there was only about 1/2 inch gap. (I did mine on the sewing machine, but you could hand baste instead). To prep the glove prior to hand-stictching the head on, a piece of cardboard was inserted so as not to stitch through to the bottom layer by accident. Position the head just above where the fingers meet the body of the glove on the top and hand-stitch the head down.

He was then painted with lavender fabric paint dots (one side at a time then allowed to dry) and then the circles were outlined with blue glitter fabric paint, then a face was drawn on with black, white and red fabric paint (but you could use any colors you wanted).

Monday, June 1, 2009

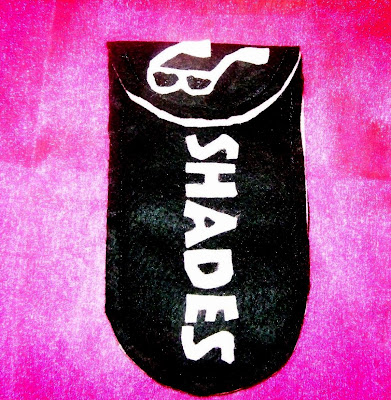
"Shades" Sunglasses Case

This is a pattern that I created for Jenny Garland's pattern design craft challenge. I wanted to come up with something that would be easy for someone to re-create, low cost, and could be adapted for either females or males and even kids to make and use (We will probably use brown and tan to make to a case for my son's Dad for Father's Day). It holds a pair of sunglasses and has another compartment hidey hole to put anything else you would like in it (tissues, gum, a comb, a few dollars, etc.) but not scratch the sunglasses.
This is the first time I have ever designed a pattern for someone else to make and if you have any questions or if I need to clear any thing up, please let me know.
Items used for this project:
  • 1 piece of black felt for the outside (you could choose any color you like).
  • 1 piece of light pink felt for the inside and trim (you could choose any color you like)
  • Scissors
  • Tissue paper to draw the pattern on to (I used yellow - optional if you printed off the pieces off a printer - you could just use the printer paper)
  • Straight pins to pin the pattern to the felt
  • Sewing machine (if you don't have one you could use a hot glue gun to put together)
  • Hot glue gun and glue sticks (if you don't have one of these but have a sewing machine, you could sew the entire thing)
  • Hand stitch needle and thimble (you could hand stitch the entire thing if you don't have sewing machine or glue gun - this would be a better option for grade school kids to try to made on their own).
  • Black thread (to match the outside color - you could use contrasting thread or if you just glue the the entire thing, thread would be optional).
  • Clear tape to tape over the "Shades" lettering and the sunglasses to stablize for cutting
  • Black fabric paint (to color in the lens on the shades instead of cutting them out)
  • 1 set velcro closure (I used the self-stick, but still used a glue gun to attach them - you can get several sets from the Dollar Store or craft stores).

Here is the pattern. As don't have a scanner to make it to scale, I have posted the piece individually and you could get them to scale using a the Paint program that is on most computers under Accessories, or copy and pasting into a Word program.

This piece is the main pattern piece - cut two of the main color and 1 of the contrast color and one of the main color (disregard the instructions on the pattern below -I cut 2 black and 1 pink and ended up with an extra black piece). Made small cut on the contrast (pink) piece on each corner where the dotted line).
The pieces are 10 inches wide and 4 1/4 inches tall.
This is the front of the case. You are only going to need to cut 1 of these in the main fabric color. (I cut 1 black). It is 8 inches wide and 4 1/4 inches tall.
This is for the "Shades" lettering - it is 5 inches wide and 1 1/4 inches tall in contrast color (I used pink).
The lettering for "SHADES" is font CENTURTY GOTHIC and the size is 86 (as there is no drop down for this - you type in 86 in the font box) you could just type this in a notepad or word program and print it off instead of trying to copy this from the picture below.
Here is the pattern for the sunglasses. It is 3 inches wide and 1 1/2 inches tall and cut out in the contrast color (I used pink).
Instead of cutting out the center for lens of the glasses, you could use fabric paint to color it in. I originally tried putting a sequin in the middle, but would not recommend doing that as it made it look like a burlesque bra (although I do suppose you could adapt the case for pasties holder if you are a burlesque dancer or have a person on your Christmas last that is).
This is what the pieces looked like cut out.
On the Shades lettering and the sunglasses, I stablized the paper with clear tape to make it easier to cut out so it wouldn't rip or tear. I used craft scissors on these pieces instead of my fabric scissors and I didn't want to dull the fabric scissors, but that is a personal choice.
Cutting out the "Shades" lettering can be tricky -grade school children would need assistance with this and may need to use smaller scissors if you have them. To cut out the center of the A and the D I folded the felt slightly then made a small cut in the center, then put the tip of the scissors through the hold and carefully snipped around the edges. This is what it looked like when I was done.
Unpin the felt from the tissue the put the main full felt piece (black) on the bottom, put the contrast piece (pink) on top of it, then cut the contrast piece where you have made the snips on each side and put it slightly over the edge of the black fabric, then put the shorter body top piece (black) on top of the pink, then pin the edges and sew the bottom edge edges all the way around, then the top edge all the way around (if you are going to use hot glue, you would want to glue each layer separately).
In this photo the top of the case is to the left and the bottom on the right.
For the "SHADES" lettering and the velcro closure, I used hot glue. Before gluing, lay out the letters and the closure to see where you want to position them, then attach glue to the back and glue each piece down one by one.
For the sunglasses, position this on the top where you want to then apply hot glue to the back of the glasses then glue it down and use the black fabric paint to color in the lens of the shades.
If you like what you see, please take a minute to vote for this project at Jenny Garland http://www.typepad.com/services/trackback/6a010535924717970b01156fbeff7b970c
If anyone does make this, I would love to see your creation/interpretation!
Happy crafting!