
Give an old sweater a new life!
I got the sweater as present but never wore it because unless I wore a long sleeve shirt underneath it was itchy, so I decided to turn it into something more useful with versatility.
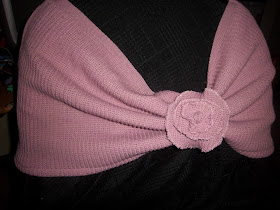
It is convertible in that it can be worn three different ways depending on your mood, but my favorite is the Vintage Inspired Capelet that has sort of a 1930's vibe to it. Also, the "flower" is put on a pin back and can be used on its own.
Items used:
- Sweater
- Sewing machine and thread
- Scissors
- Straight Pins
- Pin back
- Velcro
- Cylindrical object (I used a margarine tub lid)
- Seam gauge or ruler
- Paper
- Pen or Pencil
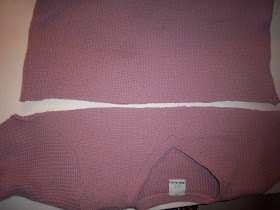
 First flip the sweater upside down and cut straight across off underneath the arms from side to side.
 The bottom part is what you will use to make the shrug.
Save the top part can be used to make the band and the flower and the sleeves can be saved for another future project (leg or armwarmers).
For the cut edge, use a zigzag or serger stitch to prevent unraveling all the way around and stitch 5/8 inch away from the edge as another preventative measure.
Turn under on the wrong side and stitch down all the way around and stitch 1/2 inch from the turned under edge
You now have the basic capelet completed (the first smaller picture above).
 Now for the flower. Place the cylindrical object on the paper, draw around it and cut out on paper cut it out.
 Next fold the paper into a quarter then measure in 1/2 inch or so in and cut away. Repeat.
Pin the outside and middle layers along with the center onto the top portion of the sweater.and cut out each. You will have 3 descending sizes of circles when you are done.
The large ring is for the bottom of the flower, the medium in the middle and the smallest center is for the top of the flower.
Zigzag or serge around the raw edges on all three circles.
Next, on the top side, using a basting stitch on the machine (or you could also do this by hand) sew a small quarter or other large coin size circle in the middle of each circle and leave the tails on each end long as you will be gathering them up.
On the bottom side of each circle, gather up the threads and tie in a a knot on each and it will create at "bump" for the center of the flower. Stack them on top of each other starting with the largest at the bottom, the medium one in the center and the small on on the top and push the "bump" in the center up into the next one. Stitch around the center "bump" to secure all layers together.
Clip any lose threads and either use a hot glue gun or stitch the flower the pin back. The pin can be used on this project or to pretty up anything else you would like.
To make the band cut a strip from the top of the sweater that is 8 inches long and 4-5 inches wide. Zigzag or serger around the edges to keep it from unraveling.
Fold in half, right sides together and stitch one end and the long side together. Turn inside out and zigzag the open end together (it doesn't look pretty but it isn't going to show as it will be on the inside of the shrug when it is used. Stitch one side of the velcro to one side, flip over and flip another piece of velcro to the other side.
To use with the shrug, gather up the fabric on the shrug and wrap so the center of the band is on the outside and the two pieces of velcro hook together on the inside (third small picture above). You can also move the band around to create a different look
For the look in the large picture above, the band was moved off center and the flower pinned to the band through the band the the shrug to secure it in place.)
Although I didn't take a picture of it, you could also use the shrug loose and pin the flower on it somewhere. It could also be pulled up over the back of the head to create a mobius or scrunched and twisted for a cowl/infinity scarf look.
Thanks for stopping by and have a great day:)
Linking up go:


Wonderful tutorial! I loved the outcome! So, so cute!!!
ReplyDeleteGreat post!! I included it in my post Βόλτα στη Γειτονιά #23 :)
Have a great week!!