Pages

Thursday, December 23, 2010

Butterfly Gift Topper

This is super simple and made out of pages out of pages from a magazine.  It was inspired by a page in a magazine that had a butterfly on, but it turned out a bit big to use on that package so I ended up using it on another one instead.

All you need is
  • Magazine, catalog pages or other paper
  • Glue
  • Scissors

Just cut a butterfly shape the width that you want it to be (this is about 6 inches at the widest point) then cut a version that is about 1/4-1/2 inch shorter around the edges and the same with the top layer.  Put together and fold at the center. 

Take the layers apart, apply a fine line of glue in the center of the bottom piece, put the middle piece on top of it.  Put another fine line of glue on the middle piece down the center and put the top piece on top.  Allow to dry for a few minutes.   Once dry apply a thin line of glue on the bottom of the butterfly and glue it to the package, bending up each side.

Monday, December 20, 2010

LIMITED SELECTION OF FREE SEWING PATTERN DOWNLOADS AT HOMESPUN THREADS

For a limited time only, Homespun Threads is offering patterns a limited selection of  sewing patterns with instructions to download and print for free.

There are several cute baby items, totes, and bags.  I downloaded some baby shoes, the pocket bib and the Sash Handbag  that I plan to make after the Holidays are over.


Image: Aleksandr Kutsayev / FreeDigitalPhotos.net

Saturday, December 18, 2010

Reindeer Bags


While it looks pretty funky under the tree, these are fun to make.

These are just paper lunch bags with a partial outline of hand for the antlers and parts cut of of magazines and pasted to the bag to make the reindeer and names. 

I made one for a Christmas Throwdown challenge for exchanging our Secret Santa gifts and it was "Kate Moss the Burberry Reindeer" (sorry, I don't have a picture of it).

I used a red button for her nose and glued it to her nose and then created a necklace with a paper bead in the center for necklace. For the antlers I used a partial handprint on the edge of the magazine that had a perfume sample strip and it was even scented!  I wrote "Merry Christmas" at the bottom with gold paper paint and it did look cute and got a few chuckles. 

Thursday, November 25, 2010

Say Thank You To Your Stylist, Help Save The Environment and Get a Free Sample of Biolage

As today is Thanksgiving and a day to give thinks, I thought is appropriate to post about promotion by Matrix Biolage as by giving thanks to your stylist, Matrix Biolage returns the thanks by donating $1 to The Conservation Fund, a group that goal is conservation of the environment.  As an added bonus they also thank you by offering free samples of their products.  

To participate click here.

Hope everyone has a wonderful Thanksgiving!

Sunday, November 21, 2010

OUTFIT CHALLENGE POST - CASUAL FRIDAY

This is part of a challenge posted by Carly at Chic Steals For more information click here.

The sweater is one that I have had since my son was young and got it because he has always been crazy about cars and I did literally forgot that I still had it until I stared pulling from the back of the closet for this challenge.  It is a Lisa Nichols that I purchased at resale garment shop for around $5.

The jeans are Old Navy "The Diva" boot cut jeans which are still sold here.   I don't wear them often as they sit about an inch lower than the natural waistline and are bit big.

The shoes are Kenneth Cole Reaction from a few years back.  They are bit plan, but very comfortable and have lasted up very well.

The necklace is my DIY Silly Bands necklace with the tutorial here.

The shirt underneath the sweater is at St. John's Bay T-Shirt from K-Mart. 

Saturday, November 13, 2010

OUTFIT CHALLENGE POST

As I wrote in this post,  this is part of an outfit post challenge by Carly at Chic Steals  to wear a previously forgotten outfit and throwing in a DIYed item.

As she has commented, and I agree, it does get you out a comfort zone to wear the tried and true favorites, but it also can open up new possibilities - it has made me realize that I basically graze the first foot of my closet for an outfit wear and it has made me dig out clothes I had truly forgotten that I owned.

The blazer is a Karen Scott (Macy's)that I had forgot I owned and had not worn in about 6 years.

The Phillip Lim nautical inspired top is my DIY'ed item made using an old white t-shirt, beaded rope trim and decorative stones from the dollar store.   It turned out very pretty, but the stones are a bit heavy - getting plastic jewels like the project that inspired me Carbon Couture  is a better long term option.

The skirt is "Requirements" - do not recall exactly where I got it - I think it was from a consignment shop several years ago.  

The shoes are "Kathy Lee" from Walmart from over 10 years ago - after the "sweatshop" scandal was cleaned up and - still think of when I wear them so don't wear them often even though the are comfortable.

I have never worn all of these pieces together before and while the skirt will be stored for he Winter, the blazer for sure is going into future outfits.

In the spirit of Thanksgiving and being thankful for what you already have, I would encourage other to push their comfort zone, even if just for one day, and wear a "rediscovered" wardrobe item; if you find it is just not your style anymore, donate it to charity for someone else to enjoy.

Saturday, November 6, 2010

CHIC STEALS 30 DAYS OF OUTFITS CHALLENGE

Carly at Chic Steals and has challenged herself during the month of November to wear a previously forgotten outfit and also include 1 project she made herself in the post and has invited other to join her for whatever period of time that they would like .  For more information click here.

I know I won't be able to with any degree of consistency, but I will try to see what I can come up with during the rest of the month.  This outfit was one I wore running errands and grocery shopping today.

The sweater is an overly large one from Fashion Bug from a few years back.  It is very long and baggy and could almost be a dress.  I do wear this all the time during the winters, but usually just around the house. 

The pants are a maroon stretch velvet that I bought on Ebay about several years ago as part of an outfit with cutouts at the neck and hemline. 


The shoes are Basic Editions from K-Mart.  They are not the most fashionable, but they are comfortable if you are going to be on your feet all day.  I wear 10W and it is hard to find shoes that fit.

The scarf was from a thrift store find and it didn't have any tags. 

The headband was a DIY that I made here with items from a dollar store headband and fabric leaves using a hot glue gun.


Although I wore this nail polish last month, I don't have a lot of orange and not likely to wear it often in my wardrobe I wore that today also.   It is Sinful Colors in Courtney Orange and they sell it at Walgreen for $1.99, but sometimes they will have it on sale for .99 cents.


I also wore a lip gloss I had not previously worn from the "Girls Just Want It" from Bedhead and it is the 5th shade over from the left called "Gossip".   While the set does have a nifty little mirror inside so you can apply the lip color, it did not come with a lip brush and I am usually too rushed in the morning to try to dig another one I have out and I don't want to use my finger and have it end up on my clothing.

If you would like to participate and challenge yourself to expand your wardrobe boundries, click here 
for more info.

Sunday, October 31, 2010

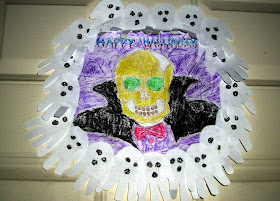
Leaf Skull Rubbing N Ghosts Wreath

Fun decoration for kid's to make for Halloween paper craft using leaves for texturing and handprints for ghost shapes. 

This was inspired by Crafty Lady Abby's Leaf Rubbing Tutorial http://craftyladyabby.blogspot.com/2010/09/skull-day-40-tutorial-18-leaf-rubbing.html.  The ghosts were inspired by Crafts by Amanda http://www.craftsbyamanda.com/2010/09/halloween-hand-print-ghoul-banner.html

Items used:
  • Paper
  • Printer
  • Image to color (I used this one)
  • Crayons
  • Leaves
  • Scissors
  • Cardboard circle from a frozen pizza
  • Glue or Gluestick
  • Tape
  • Pop Tab (optional)
Gather up a few leaves


Print off the image that you want to color. Put the leaves underneath and rub the crayon back and forth horizontally to pick up the veins in the leaves to give it a more spooky effect.


Place the cardboard circle on top of the picture, draw around the edges and cut off the excess.  Use glue of a gluestick to glue the picture to the cardboard.


Next would be to draw the hand print "ghosts" by drawing around the hand on white paper and cutting it out.

The hand print I used for this project was for template of my son's hand when he was a year old.   I used 3 sheets of white paper and got 8 "hand prints" on each page, but how many you need to go around the cardboard circle to make the wreath will vary depending on the size of hand used.


Make faces on the ghosts.  For these just two circles for the eyes and one for the mouth were colored with a black crayon.


Glue on the ghost; I started at the top and overlapped slightly and bent up a bit to give it more dimension. and so you could see the lettering.  On the sides I slid the ghost underneath slightly and and glued down.  On the bottom overlapped the ghosts similar to the top.

If you want to hang up on a nail, glue a pop can tab at the top edge in back so the larger hole peaks over teh top, then tape over the bottom part to secure it.

Saturday, October 23, 2010

Rue La La - $20 Credit For New Members Through 10/25/10

Rue La La is another of the growing number of sites that you join by invitation by another member where designer duds and upscale items are available at a deep discounts for only 2 days.

They are currently offering a $20 credit  if you join by 10/25/10 and is good through 12/31/10.  Here is my invite link if you are interested http://www.ruelala.com/invite/kmom14

The upside is it is possible to get a deal.  I lucked out and found this pair of PUMA Men's "Benny SN" Leather Sneakers that are available in my son's size and will order if he approves that he likes them.  They  were originally $60 on sale for $35.00; shipping on these is $9.95, so with the $20 credit it will cost around $25 before taxes.


However, things like this Michael Kors dress that had been on sale for $39.00 is sold out already.


As was the pink Cuisinart popcorn popper that was on sale for $25 from by Shop For Good to support breast cancer research.


They do have this ring on sale for $25 but shipping on this too the same as the shoes - $9.95 so after the $20 credit would run around $15 and would help a good cause.


There are other brands such Calvin Klein, A.B.S., Aigle, Brics (duffles and luggage) Nourison, Northwest Getaways (vacation packages), LaSirena Winery (wines), to name a few.  Depending on what your interests and budget may be, it is worth a look.

Shabby Chic Circle Flower

Great way to turn scraps into something pretty.

I am working through my scraps stash and going to use this particular "flower" to decorate a tote bag, but it could be used for barrettes, pins or statement necklace.

Items used:
  • Soda Can 
  • Scrap of felt
  • Scrap of burlap or heavy textured fabric
  • Scrap of coordinating solid fabric
  • Scrap of coordinating lace or netting
  • Decorative stone or button
  • Seam gauge or ruler
  • Scissors
  • Pen
  • Nail Polish (optional)
Use the pop can to draw a circle on the felt. Cut out.


Using the seam gauge or ruler, measure out 1/4 inch from the edge on the burlap or textured fabric then cut out. Glue together - the felt circle will be the base.


For the next layer on top of the textured fabric, use the soda can to draw a circle and cut out.  Reduce1/4 inch off the edges after drawing using the seam gauge or ruler.  To make it easier I folded it in half then a quarter, measured then cut.  Glue on top of the textured fabric with a glue gun.


Repeat with the netting or lace, except this time I trimmed off 1/2 inch from the edge(keep - will use around the stone).  Use the hot glue gun to glue it down.


I wanted to soften the look up a bit, so I used nail polish and painted the decorative stone to soften the look up. Glue the stone to the center of the flower.


On the piece of netting/lace trimmed off above fold it in half, glue it around the stone.

Friday, October 22, 2010

Spider Web Nails


See Spider Web Nails and 1000's of others - or share your own on Cut Out + Keep

This look was created using Orange nail polish and a black nail art pen and the how-to is posted over at Cut Out + Keep as I am not HTML savvy and have a terrible time getting the formatting to work on Blogger.

It is is based on the video tutorial by JulieG713 where she used red and gave it a more "Spiderman" look.  Above is my first attempt at trying this and I got a little heavy handed with the black lines and I think the middle finger look more like a wagon wheel) but surprisingly, I received a couple of compliments at the grocery store in spite of that.  It is not difficult and would be easy enough for a grade school girl's Halloween sleepover.

Thursday, October 14, 2010

BOTTLE OF BOOs


This bottle of "BOOs" is a cute Halloween decoration that you can make for free using upcycled materials!  For the how-to visit my other blog Unique Interesting or Unusual.

Monday, October 11, 2010

GARLIC MAYO


DIY you own gourmet condiment!

This is becoming common in upscale deli sandwiches and a major retailer even now makes "Garlic Mayonnaise" but you can DIY your own with version quick and easy at a lower price.

This makes 1/2 cup finished garlic mayo. I like to use it to dip my fries as well as use on a sandwich.  Depending on how "garlicy" you like your mayo determines how much garlic you want to add - for a subtle flavor stick with the 1/2 tsp garlic and 1/4 tsp lemon juice.
  • 1/2 cup mayonnaise (I used commercially prepared from a jar)
  • 1/2 - 1 tsp minced garlic (or 1-2 cloves fresh chopped up, depending on size of clove)
  • 1/4 - 1/2 tsp lemon juice (I used RealLemon from a bottle - use fresh if on hand)


Measure out 1/2 cup mayo.


Add the minced garlic


Add 1/4 to 1/2 tsp of lemon juice on top of the garlic.  Stir together and refrigerate at least two hours before serving to allow the flavor of the garlic to meld with the mayo.  Keep up from 7 to10 days in the fridge.

Thursday, September 30, 2010

SILLY BANDS NECKLACE


Super simple fun accessory!

Where I live one of the latest crazes for kids is "Silly Bands", which is basically colored silicone material in fun shapes from words to themed shapes such as trucks, sea creatures, dinosaurs and girly items and even some celebrity shapes. I bought a package of 12 dinosaur ones at Kroger for $.99 cents, but if you don't have them where you live they are sold on E-Bay http://shop.ebay.com/?_from=R40&_trksid=p3907.m570.l1313&_nkw=SILLY+BANDS&_sacat=See-All-Categories.   As they were too small for my wrist, I crafted them into a necklace.  It is a fun piece to wear but one word of caution is that if you have long hair, you might want it wear it up if you wear this necklace because the ends can get tangled and snagged in the bands.


Items used:
  • 10 Silly Bands
  • 30 10mm Jump Rings
  • Jump Ring Tool, purchased or or DIYed or two pairs of needlenose pliers
 Pick out which shapes you want to use and how you want the positioned on the necklace.


Use the jump ring tool or the pair of pliers to twist each of the jump rings open

 Hook one jump ring to each end of the Silly Bank then use the jump ring tool or pliers to close.
 Then use a jump ring to connect the jump ring on each end of the Silly Band.  To make sure they stayed connected and pushed the rings together with my fingers so they overlapped a wee bit and it was ready to wear in about 10 minutes!


I am linking this to

Go check out all of the cool things other have crafted, sewn, cooked, baked or decorated!

Monday, September 27, 2010

DIY JUMP RING TOOL


See Diy Jump Ring Tool and 1000's of others - or share your own on Cut Out + Keep

For the picture tutorial on how to make this see http://www.cutoutandkeep.net/projects/diy-jump-ring-tool

I has purchased jump ring ring tool off of E-Bay and couldn't locate it when I went to work on a project so I decided to DIY my own using the top off of a 20 oz soda bottle.

To use, you put the jump ring in the opening and twist to open. Same thing to close it; put it in the opening and then twist back.

Saturday, September 25, 2010

Getting Nail Art to Last


See Nail Art and 1000's of others - or share your own on Cut Out + Keep\

As commercial nail art/stickers can be a bit pricey, here is how to make it last a bit longer. I did these nails before we went on vacation and it last 10 days (until I took it off) with no touch ups.

The hardest part of this is being patient enough to allow the polish to dry completely between coats.
I posted a picture tutorial at  http://www.cutoutandkeep.net/projects/nail-art-4 here is the quick and dirty version.

  1. Clean Nails.  Use nail polish removal to remove any prior nail polish so you will start with a clean nail.
  2. Base Coat.    Use clear nail polish/hardener/varnish on nails before applying nail polish to fill in ridges so you will start with an even surface.  Allow to dry completely.
  3. Apply Nail Polish.   Depending on the brand you use, use one to two coats.  I use cheaper nail polish and usually use two coats.  Allow to dry completely.
  4. Apply Nail Art.   Apply stickers and/or any other decoration (if glued on, such as rhinestones, allow to dry.)
  5. Apply 2-3 coats of Top Coat.  Use clear nail polish/hardener/varnish on nails to seal and protect the polish and art on your nail.  Allow to dry completely between each coat.

Monday, September 20, 2010

Leaves Headband


See Leaves Headband and 1000's of others - or share your own on Cut Out + Keep

Direct link to project  Leave Headband

I made this to be a fun fall themed headband, but it could be used as part of "Mother Nature" or "Fall Fairy" costume.

I made this using a pack of silk "leaves" from the Dollar Store and a fabric headband that was approximately 1 1/2 inches wide at its widest point, but it would be easy to make your own leaves out of scraps of fabric on hand and have included a pattern and instructions for that also.

See the "How-To" at Cut + Keep

Sunday, September 12, 2010

CRAYON BARRETTE


See Crayon Barrette and 1000's of others - or share your own on Cut Out + Keep
This was an entry for the "Pencil and Crayon Hoopla" over at Craftster where you used a pencil or crayon to create something.  I made hair accessories and in addition to this I made the Skully Hair Stick out of a pencil and used pencil to make the face of the skull.

For a step-by-step on how to make, please see the tutorial over at Cutout + Keep.

The "Love" Game Roster

I was invited by the crafty and creative Violetta at  Violet Elephant to play the "Love" Game.  Thanks for the invite!

The rules are:
-name the person who invited you
-list 1O things you LOVE
-invite 1O other people to play

The Lord


Because there would be nothing without Him.  However, I am not a fan of organized religion , even within my own I am shunned because I am divorced and told I am going to hell. In that case I have to think of it as the delayed entry program as I think my son has had a happier life and his father and I have gotten along better in the 16 years we have been divorced more than 6 years we were married.    I also am tolerant of other religions and believe people have the right to believe and worship according to their own faith.  I am thankful the Lord and the laws where I live allow free will.

My son
He is my favorite person in the whole world.  He is turned wonderful young man even though he thinks I don't listen or understand him.  I listen and understand him fine, he just doesn't like it when the answer is "no".


Working
I enjoy working - I learn something new everyday and it expands my horizons.  Goals in the business realm are achievable through effort (not always so in the personal realm).

Electricity


It is one of those things you take for granted until you don't have it.  As we live on a winding road and there are a lot of accidents that take out the utility poles, that happens about every other month for a few hours.

Also year or so ago we had a bad ice storm in town and we were without electricity for a few days and even then lucky because we are on the same grid with a lot of businesses in the area so a higher priority.  My ex was not and without electricity for over a week.   Absolutely nothing in my place worked without electricity.

Thank you Mr. Edison and Mr. Telsa!


Sewing and Crafting  
 I love sewing and crafting things.

Baking
I love the smell of foods baking in the oven during cold months as much as I do consuming the end result.


 The Computer and the Internet

With the internet we have the world at our fingertips and I love reading blogs. 


Having a vehicle to drive
I actually hate this car as there is always something going wrong with it, but I love the freedom and ability to get where I am going.   My Mom didn't have a car or learn how to drive until I was 11, which is probably why I bought a car when I was 15 before I even had a driver's license and have had a vehicle ever since.

Movies
I love watching movies on the big screen or the small screen.  Through movies we can vicariously experience a imaginary slice of someone else's life and the world of possibilities.

Thrift Stores and Garage Sales


Because someone's cast offs become my treasure, which is how the majority of the scarves were acquired.

Now comes the hard part in limiting the list to just 10 people to tag as there are so many blogs that I read on a regular basis so I had to so with sort of picking at random.

From Glitter to Gumdrops
Frugal Family Blog
Drollgirl
blah to TADA
Happy Together
Lucille's Crafts and Designs
Barbara's Beat
Chic Steals
Closet Cooking
Darling Petunia

If you want to share your top ten "love"s and you are not listed above, feel free to create a post and post a link in the comments section and I would love to check it out!

Happy crafting and creating!

Friday, September 10, 2010

Skully Hair Stick


See Skully Hair Stick and 1000's of others - or share your own on Cut Out + Keep

I came up with this for the Pencil and Crayon Challenge over at  Craftster.

I posted the "How-To" over at Cut Out + Keep at the above link.

Monday, September 6, 2010

Chanel Inspired Nails


See Chanel Inspired Nails and 1000's of others - or share your own on Cut Out + Keep
These were inspired by Heidi Montog's Chanel nails from about year ago that were white on black. I wanted to change mine up a bit so I did mine as black on white instead.  

I posted the "how-to" at Cut Out + Keep at the above link.

Sunday, September 5, 2010

REVAMPED FANNY PACK


See Revamped Fanny Pack and 1000's of others - or share your own on Cut Out + Keep

I had planned on purchasing a fanny pack to use on a trip to an amusement park but my son dug out one he had used when he was younger. When I mentioned it was ugly and would clash my outfit (it was the orange as shown in the second picture) he said "you could always paint it" - so that is what I did.  I painted it with purple acrylic paint, sprayed it with clear acrylic spray paint and also added a flower to make it more girly.


I posted the steps on how I did this over at Cut Out and Keep at the link above

Sunday, August 29, 2010

Hydrangeas Hair Clip


Make a pretty flower hair clip from scraps!

This is based on a tutorial at http://sewingforscarlett.blogspot.com/2010/07/felt-hydrangeas.html where she made Hydrangeas out of felt.  Instead of felt I used scraps of blue cotton and more "petals" on mine.   I used an old hair clip so and a scrap of felt, so the only "new" for this project was the hot glue for the glue gun - other than that, it is an upcycle.

Items used:
  • Fabric Scraps
  • Scrap of felt
  • Scrap of paper
  • Scissors
  • Pen
  • Soda Can
  • Hair clip (or a barrette)
  • Hot glue gun and glue sticks
Place the soda can on a scrap of paper and draw a circle for a template and cut out.  Place the circle on a scrap of felt, draw around it and cut it out.

Cut out little X/petal shapes (like asideways "X") out of the cotton fabric.  I used about 35 little "X"s for this project and found it easier to fold the fabric over several times and cut out the "X"s freehand as opposed to drawing on the fabric and cutting out individually.


Start around the edges and work inward.  I found it easiest to fold up the X so there is a point at the bottom and dab a bit of the hot glue on the point and place it on the felt so you don't burn your fingers with the hot glue - is you want to push it down to secure it, use a pen or pencil.


Once you have glued down all of the pieces and it is fully covered, apply hot glue to the clip then press the flower on top of the clip.


From the  underside, trim around the edges so none of the felt piece is sticking out but without cutting any of the flower pieces off and it is ready to go!