Pages

Sunday, October 31, 2010

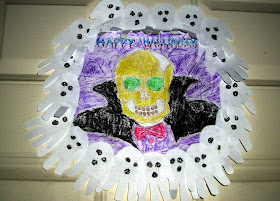
Leaf Skull Rubbing N Ghosts Wreath

Fun decoration for kid's to make for Halloween paper craft using leaves for texturing and handprints for ghost shapes. 

This was inspired by Crafty Lady Abby's Leaf Rubbing Tutorial http://craftyladyabby.blogspot.com/2010/09/skull-day-40-tutorial-18-leaf-rubbing.html.  The ghosts were inspired by Crafts by Amanda http://www.craftsbyamanda.com/2010/09/halloween-hand-print-ghoul-banner.html

Items used:
  • Paper
  • Printer
  • Image to color (I used this one)
  • Crayons
  • Leaves
  • Scissors
  • Cardboard circle from a frozen pizza
  • Glue or Gluestick
  • Tape
  • Pop Tab (optional)
Gather up a few leaves


Print off the image that you want to color. Put the leaves underneath and rub the crayon back and forth horizontally to pick up the veins in the leaves to give it a more spooky effect.


Place the cardboard circle on top of the picture, draw around the edges and cut off the excess.  Use glue of a gluestick to glue the picture to the cardboard.


Next would be to draw the hand print "ghosts" by drawing around the hand on white paper and cutting it out.

The hand print I used for this project was for template of my son's hand when he was a year old.   I used 3 sheets of white paper and got 8 "hand prints" on each page, but how many you need to go around the cardboard circle to make the wreath will vary depending on the size of hand used.


Make faces on the ghosts.  For these just two circles for the eyes and one for the mouth were colored with a black crayon.


Glue on the ghost; I started at the top and overlapped slightly and bent up a bit to give it more dimension. and so you could see the lettering.  On the sides I slid the ghost underneath slightly and and glued down.  On the bottom overlapped the ghosts similar to the top.

If you want to hang up on a nail, glue a pop can tab at the top edge in back so the larger hole peaks over teh top, then tape over the bottom part to secure it.
Saturday, October 23, 2010

Rue La La - $20 Credit For New Members Through 10/25/10

Rue La La is another of the growing number of sites that you join by invitation by another member where designer duds and upscale items are available at a deep discounts for only 2 days.

They are currently offering a $20 credit  if you join by 10/25/10 and is good through 12/31/10.  Here is my invite link if you are interested http://www.ruelala.com/invite/kmom14

The upside is it is possible to get a deal.  I lucked out and found this pair of PUMA Men's "Benny SN" Leather Sneakers that are available in my son's size and will order if he approves that he likes them.  They  were originally $60 on sale for $35.00; shipping on these is $9.95, so with the $20 credit it will cost around $25 before taxes.


However, things like this Michael Kors dress that had been on sale for $39.00 is sold out already.


As was the pink Cuisinart popcorn popper that was on sale for $25 from by Shop For Good to support breast cancer research.


They do have this ring on sale for $25 but shipping on this too the same as the shoes - $9.95 so after the $20 credit would run around $15 and would help a good cause.


There are other brands such Calvin Klein, A.B.S., Aigle, Brics (duffles and luggage) Nourison, Northwest Getaways (vacation packages), LaSirena Winery (wines), to name a few.  Depending on what your interests and budget may be, it is worth a look.

Shabby Chic Circle Flower

Great way to turn scraps into something pretty.

I am working through my scraps stash and going to use this particular "flower" to decorate a tote bag, but it could be used for barrettes, pins or statement necklace.

Items used:
  • Soda Can 
  • Scrap of felt
  • Scrap of burlap or heavy textured fabric
  • Scrap of coordinating solid fabric
  • Scrap of coordinating lace or netting
  • Decorative stone or button
  • Seam gauge or ruler
  • Scissors
  • Pen
  • Nail Polish (optional)
Use the pop can to draw a circle on the felt. Cut out.


Using the seam gauge or ruler, measure out 1/4 inch from the edge on the burlap or textured fabric then cut out. Glue together - the felt circle will be the base.


For the next layer on top of the textured fabric, use the soda can to draw a circle and cut out.  Reduce1/4 inch off the edges after drawing using the seam gauge or ruler.  To make it easier I folded it in half then a quarter, measured then cut.  Glue on top of the textured fabric with a glue gun.


Repeat with the netting or lace, except this time I trimmed off 1/2 inch from the edge(keep - will use around the stone).  Use the hot glue gun to glue it down.


I wanted to soften the look up a bit, so I used nail polish and painted the decorative stone to soften the look up. Glue the stone to the center of the flower.


On the piece of netting/lace trimmed off above fold it in half, glue it around the stone.

Friday, October 22, 2010

Spider Web Nails


See Spider Web Nails and 1000's of others - or share your own on Cut Out + Keep

This look was created using Orange nail polish and a black nail art pen and the how-to is posted over at Cut Out + Keep as I am not HTML savvy and have a terrible time getting the formatting to work on Blogger.

It is is based on the video tutorial by JulieG713 where she used red and gave it a more "Spiderman" look.  Above is my first attempt at trying this and I got a little heavy handed with the black lines and I think the middle finger look more like a wagon wheel) but surprisingly, I received a couple of compliments at the grocery store in spite of that.  It is not difficult and would be easy enough for a grade school girl's Halloween sleepover.

Thursday, October 14, 2010

BOTTLE OF BOOs


This bottle of "BOOs" is a cute Halloween decoration that you can make for free using upcycled materials!  For the how-to visit my other blog Unique Interesting or Unusual.

Monday, October 11, 2010

GARLIC MAYO


DIY you own gourmet condiment!

This is becoming common in upscale deli sandwiches and a major retailer even now makes "Garlic Mayonnaise" but you can DIY your own with version quick and easy at a lower price.

This makes 1/2 cup finished garlic mayo. I like to use it to dip my fries as well as use on a sandwich.  Depending on how "garlicy" you like your mayo determines how much garlic you want to add - for a subtle flavor stick with the 1/2 tsp garlic and 1/4 tsp lemon juice.
  • 1/2 cup mayonnaise (I used commercially prepared from a jar)
  • 1/2 - 1 tsp minced garlic (or 1-2 cloves fresh chopped up, depending on size of clove)
  • 1/4 - 1/2 tsp lemon juice (I used RealLemon from a bottle - use fresh if on hand)


Measure out 1/2 cup mayo.


Add the minced garlic


Add 1/4 to 1/2 tsp of lemon juice on top of the garlic.  Stir together and refrigerate at least two hours before serving to allow the flavor of the garlic to meld with the mayo.  Keep up from 7 to10 days in the fridge.