Pages

Sunday, August 29, 2010

Hydrangeas Hair Clip


Make a pretty flower hair clip from scraps!

This is based on a tutorial at http://sewingforscarlett.blogspot.com/2010/07/felt-hydrangeas.html where she made Hydrangeas out of felt.  Instead of felt I used scraps of blue cotton and more "petals" on mine.   I used an old hair clip so and a scrap of felt, so the only "new" for this project was the hot glue for the glue gun - other than that, it is an upcycle.

Items used:
  • Fabric Scraps
  • Scrap of felt
  • Scrap of paper
  • Scissors
  • Pen
  • Soda Can
  • Hair clip (or a barrette)
  • Hot glue gun and glue sticks
Place the soda can on a scrap of paper and draw a circle for a template and cut out.  Place the circle on a scrap of felt, draw around it and cut it out.

Cut out little X/petal shapes (like asideways "X") out of the cotton fabric.  I used about 35 little "X"s for this project and found it easier to fold the fabric over several times and cut out the "X"s freehand as opposed to drawing on the fabric and cutting out individually.


Start around the edges and work inward.  I found it easiest to fold up the X so there is a point at the bottom and dab a bit of the hot glue on the point and place it on the felt so you don't burn your fingers with the hot glue - is you want to push it down to secure it, use a pen or pencil.


Once you have glued down all of the pieces and it is fully covered, apply hot glue to the clip then press the flower on top of the clip.


From the  underside, trim around the edges so none of the felt piece is sticking out but without cutting any of the flower pieces off and it is ready to go!

Sunday, August 22, 2010

MELDED T-SHIRTS


Meld a too small t-shirt front to a t that fits in 20 minutes!

My son is in to car themed t-shirts and when I found one at the thrift store that was too small I decided to meld it to one that fits.  (It looks a little crooked in the picture, but it is how it is hanging on the hangar).

Items used:
  • T-Shirt front that you want to use
  • T-Shirt that fits
  • Heat N Bond
  • Iron
  • Scissors
  • Pen or Tailor's Chalk
  • Sewing Machine and Thread


To get an even rectangle shape, I used a piece of scrapbook paper and drew with a pen around the edges, then moved the square to the left and did drew around the edged on that side to make a rectangle.  You could use a circle a square or freehand it, depending on the design you want to meld onto the other t-shirt.


Cut out where the lines on the t-shirt have been drawn with a pen or Tailor's Chalk.


This step is the biggest time saver - instead of pinning and re-pinning to get the piece straight on the t-shirt you are melding the piece to, use HeatNBond on the edges.  I cut approximately 1 inch strips of the HeatNBond and then on the wrong side of the t-shirt piece approximately 1/4 inch away for them edges.   I placed it 1/4 inch away from the edges at it will curl up a bit on the edges and look more natural, more like a meld than an applique where you would just stitch or zigzag around the edges.  I do not recommend using HeatNBond on the entire piece as it will make the finished product too stiff, unnatural looking and may even be uncomfortable.  The HeatNBond it more to tack it down in place to it can be sewn without having to use any pins.

Using an iron set on medium to high heat (depending on the fiber content in the t-shirts - if polyester blend, go with medium heat, if both are cotton you could use high heat) and set on the strips for 30 seconds pull up, repeat until all strips have been irorned.  Allow to sit until cool to touch (1-2 minutes) then pull off the paperbacking off of each strip.


Flip the t-shirt piece over to the right side and position it on the t-shirt you are melding it to.  Repeat going around the edges and holding the iron in place for 30 seconds, then lifting and going on to the next edge until you have gone all the way around the t-shirt.


Using a sewing machine, stitch around the edges 1/4 inch from the edge all the way around and then you are ready to wear your creations!

Sunday, August 15, 2010

2 MINUTE UPDO


Quick and easy updo for medium to long hair.

This is based on the video tutorial over at Ebeautyblog.com http://www.ebeautyblog.com/2010/07/2-minute-updo-for-work.html.
It may be easier just to watch her video, but I did a step-by-step just in case someone is using a dial up connection as it takes forever for videos to load.

Items used:
  • Comb
  • Anti-Frizz product or styling gel
  • 2 Ponytail Holders
  • Bobby Pins
  • Hairspray (optional)
Use an anti-frizz product or styling gel to smooth out hair and control flyaways.  I use got2b Smooth Miracle Repair Treatment as my hair is color treated, but use whatever product works best to control your hair.


Brush into a pony tail high on the back of the head and secure with ponytail holder.   I folded my hair up and then secured again with another ponytail holder.


As I couldn't get a decent pic, below is to represent the back the head with the folded pony tail.  Use your fingers where the lines are drawn to create and opening in the hair then tuck the hair inside the opening.


Using the comb smooth over the opening and secure the hair with bobbypins as needed.

Shorts for Boy Rag Doll


See Shorts For Rag Doll and 1000's of others - or share your own on Cut Out + Keep

I made up a pattern for shorts for the boy rag doll as I didn't want him going au natural to his new home. 
I accidentally deleted the step by step photos before going on vacation, but I have created and posted a  "how-to" over at Cut Out and Keep.  The pattern is based on the original pattern for the doll over at Dolly Donations.

Thursday, August 12, 2010

REVERSIBLE VEST FOR RAG DOLL

A reversible vest based on the actual doll pattern - this could be amended to use with any doll pattern.

This one is for Boy Rag Doll I had made previously and based on this patternhttp://dollydonations.blogspot.com/2010/01/dolly-donations-rag-dolly-tutorial-free.html
and it is made out of scraps - I would guess under 1/4 yd of each fabric.

Items used:
  • 2 different fabrics (1 for each side)
  • Scissors
  • Pins
  • Sewing machine or needle
  • Thread
  • Straight pins
  • Iron
All seams are 1/4 inch.


I used the base pattern for the body of the doll.  For the front I added 1/4 of an inch then angled down about 1 1/2 from the edge of the right hand side down to about 2 1/2 inches for the "V" shape for the front of the vest.  Cut two pieces of each fabric.


Fort he back of the vest, add 1/4 inch to the back fold.   I also added a small diagonal to the back of the vest on the fold side for the neck to fit (as represented by the red line in this photo) but you could add a slight curve instead.  Place the back on the fold of each piece for fabric and cut 1 piece for the back of each piece of fabric.

 This is what the vest pieces before they were sewn.


For one side of the vest, right side together, stitch a the sides together and stitch at the shoulders up to 1/4 inch away from the front edge, backstitching to secure.  Do the same with the other side of the vest.   Press seams open with the iron.


What I didn't do, but recommending for a cleaner finish is press under 1/4 of an inch for each armhole before pinning the right sides of each vest together then stitching all the way around the outer edges except for about 2-3 inches at the bottom.


Turn the vest right side out and then stitch along the bottom edge close to the edge.  Do the same with the armholes.  If you did not press under the edges, you could zigzag around them like I ended up doing, but it isn't as pretty as it would be tucked in and stitched.   I didn't add snaps or velcro to close as I do not know the age of the child that will end up with the doll, but you could add those to close the vest if you like.

Sunday, August 1, 2010

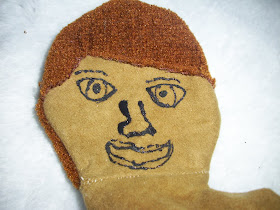
Boy Dolly for Donation For Project Hope In Haiti


This fella is made from scraps and is part of a drive to make for crafters to make 132 dolls to send to Haiti for orphaned children by November1st.

The pattern for this project is by Sarah, who is collecting the dolls for donation:  Here is the link
http://dollydonations.blogspot.com/2010/01/dolly-donations-rag-dolly-tutorial-free.html

Items used:

  • Fabric scraps - Brown  (longest piece is 8 inches long for the legs)
  • Polyester fiberfill or other soft fabric to stuff the doll
  • Sewing Machine
  • Thread
  • Needle
  • Scissors
  • Printer
  • Paper
  • Straight Pins
  • Pen or marker
  • Fabric paints in black, white and red
  • Chalk (optional)
Print off the pattern and cut out then cut pieces - it already has the 1/4 inch seam allowance included in the pattern.  Cut out 4 of the legs and and 4 for the arms, 2 of the body and 1 of the face in the lighter brown fabric.  For the hair and back of the head I used left over darker brown upholstery fabric.   Instead of pinning, it was easier to use a pen and draw the outline on the wrong side of the fabric and then cut it out.
Sew hair to face front all around the edges.  Sew arms and legs right sides together.


Turn arms and legs right side out - use a pen or pencil to assist if necessary. Stuff with fiberfill up to a little under 1/4 inch from the top.


Right sides together, stitch head to body on front and do the same for the back for hair to body.


Draw on face with black fabric paint - allow to dry completely.  This is the first every doll I made and after making it I would suggest working out how you want the face to look on a piece of paper and maybe draw it on with chalk before putting on the doll.


Sew on the arms to the front then pin down.  
Sew on the legs  to the front of the body

Pin the front to the back and stitch around all but the bottom edge.


Turn right side out and stuff with fiberfill.

Turn under 1/4 inch on the back, pin down and hand stitch the edges together.


 Use the white fabric paint at the edge of the eye for the whites.  Use the red fabric paint to fill in the lips and dab a dot on each cheek and smear it with your fingertip. 

Horror Nails - Bloody Hand Prints

 This entry is an entry for your "Horror Nails" Contest at  Lacquer Files "Horror" Nail Art Contest

Items used:

  • Sally Hansen Diamond Shine Base and Topcoat
  • Sinful Colors in Tokyo Pearl (while nail polish)
  • Red Sharpie or red nail polish and very thin brush or toothpick.
Prime nails with Sally Hansen base coat

Use 3 coasts of the Tokyo Pearl or other white nail polish.  Allow to dry completely.


 Use the red Sharpie to draw three vertical dots for each finger and two dots to the side for the thumb. 


Use the red Sharpie to or polish and draw a sort of an upside down half circle from the "thumb" to the "pinkie" then draw a small circle to squarish shape inside that and use short strokes to fill in the area between the outside edge and the small circle.


Seal with the Sally Hansen or other top coat.


Happy Hauntings!

Horror Nails - Stitched Skin


This was an entry into the "Horror Nails" contest and also my first attempt at any sort of nail art. 
It is an entry into Lacquer File "Horror Nails" contest here http://www.thelacquerfiles.com/2010/08/horror-nail-art-contest-let-voting.html

The inspiration for it was it reminds me of how my ankle looked after I was in an auto accident - pretty darn gross and horrifying.   I also wanted to give it a bit o'glam, like the many diagonal designs that are popular and combined the two concepts to make it sort of  "Zombie Couture".

I used the following polishes:

Base Coat:                                      Sally Hansen Diamond Shine Base and Topcoat

Background Color:                          Sally Hansen Hard As Wraps Polish in "Stone Creme"

Black Lines & Stitches:            Nail Star Two Way Nail Art & Pen Brush in "Black"
Purchased on EBay (http://myworld.ebay.com/b2cpowershop/) for $2.59 (free shipping)

Red Color for "Blood":                     Sinful Colors "Under 18"


I first applied a base coat, then one coat of the background color.  Next I drew on the black diagonal lines free hand - as it was to be sort of mimic an injury I didn't want it to be perfectly straight.  Allow to dry completely.

I dabbed the red polish in between the line to represent blood/wound.  Allow to dry completely.

Next draw horizontal lines lines over the top of the "wound", allow to dry and it is done!